background image

8.  Cleaning, maintenance and ordering

of spare parts

Always pull out the mains power plug before starting
any cleaning work.

8.1 Cleaning

Keep all safety devices, air vents and the motor 

housing free of dirt and dust as far as possible. 
Wipe the equipment with a clean cloth or blow it 
with compressed air at low pressure.
We recommend that you clean the device 

immediately each time you have finished using it.
Clean the equipment regularly with a moist cloth 

and some soft soap. Do not use cleaning agents 
or solvents; these could attack the plastic parts
of the equipment. Ensure that no water can seep
into the device.

8.2 Carbon brushes

In case of excessive sparking, have the carbon 
brushes checked only by a qualified electrician.
Important! The carbon brushes should not be rep
laced by anyone but a qualified electrician.

8.3 Maintenance

There are no parts inside the equipment which 
require additional maintenance.

8.4 Ordering replacement parts

Please quote the following data when ordering
replacement parts:

Type of machine
Article number of the machine
Identification number of the machine
Replacement part number of the part required

For our latest prices and information please go to
www

.einhell.com.au

9. Disposal and recycling

The unit is supplied in packaging to prevent its being
damaged in transit. This packaging is raw material
and can therefore be reused or can be returned to
the raw material system.
The unit and its accessories are made of various
types of material, such as metal and plastic.
Defective components must be disposed of as
special waste. Ask your dealer or your local council.


             11

GB

Anleitung_RT_RO_55_SPK1:_  23.04.2009  13:25 Uhr  Seite 18

Summary of Contents for 43.504.92

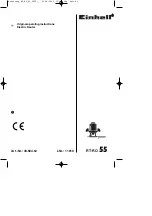
Page 1: ... Art Nr 43 504 92 I Nr 11010 RT RO 55 t Original operating instructions Electric Router Anleitung_RT_RO_55_SPK1 _ 23 04 2009 13 25 Uhr Seite 1 ...

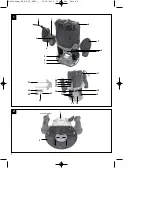
Page 2: ...2 1 5 15 3 16 25 22 21 17 18 19 20 2 1 8 7 9 10 11 12 3 23 6 7 4 13 14 24 2 2 f 1 Anleitung_RT_RO_55_SPK1 _ 23 04 2009 13 25 Uhr Seite 2 ...

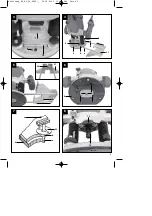
Page 3: ...3 3 4 1 2 b a a 2 5 6 24 25 2 7 8 d c b 25 e 10 13 3 b 3 21 24 f 12 21 Anleitung_RT_RO_55_SPK1 _ 23 04 2009 13 25 Uhr Seite 3 ...

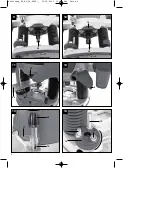
Page 4: ...4 9 23 11 12 22 13 14 9 20 15 14 15 19 10 12 17 15 10 12 Anleitung_RT_RO_55_SPK1 _ 23 04 2009 13 25 Uhr Seite 4 ...

Page 5: ...5 15 16 17 18 5 4 19 20 11 16 19 15 14 17 18 a c c b Anleitung_RT_RO_55_SPK1 _ 23 04 2009 13 25 Uhr Seite 5 ...

Page 6: ... mask Dust which is injurious to health can be generated when working on wood and other materials Never use the device to work on any materials containing asbestos Wear safety goggles Sparks generated during working or splinters chips and dust emitted by the device can cause loss of sight GB 6 Anleitung_RT_RO_55_SPK1 _ 23 04 2009 13 25 Uhr Seite 13 ...

Page 7: ...e The router is ideal for machining wood and plastic and also for cutting out knots cutting grooves removing recesses copying curves and logos etc The router must not be used for machining metal stone etc The machine is to be used only for its prescribed purpose Any other use is deemed to be a case of misuse The user operator and not the manufacturer will be liable for any damage or injuries of an...

Page 8: ...assembly Fig 3 Item 13 Fit the safety guard 13 as shown in Fig 3 5 3 Parallel stop assembly Fig 4 Item 21 Push the guide shafts a of the parallel stop 21 into the holes b on the routing shoe 2 Set the parallel stop 21 to the required dimension and secure it in place with the wing screws 3 5 4 Compass point assembly Fig 5 Item 24 You can cut circular areas using the compass point 24 Secure the comp...

Page 9: ...ntrol Fig 18 Item 11 The best speed depends on the material and the diameter of the cutter Select a speed between 11 000 and 30 000 rpm using the speed control switch 11 You can choose from 6 different switch positions The speeds in the various switch positions are as follows Switch position 1 approx 11 000 rpm minimum speed Switch position 2 approx 16 000 rpm Switch position 3 approx 21 000 rpm S...

Page 10: ...h as described in point 6 3 so that the depth stop 19 is over the highest end stop 15 Now route in this setting After completing the first routing operation adjust the end stop revolver 14 so that the depth stop 19 is above middle end stop 15 Now complete a routing operation in this setting as well Now set the lowest end stop 15 and finish the routing 6 6 Routing circles with the compass point 24 ...

Page 11: ...portant The carbon brushes should not be rep laced by anyone but a qualified electrician 8 3 Maintenance There are no parts inside the equipment which require additional maintenance 8 4 Ordering replacement parts Please quote the following data when ordering replacement parts Type of machine Article number of the machine Identification number of the machine Replacement part number of the part requ...

Page 12: ...d by unprofessional installation failure to comply with the operating instructions e g connection to the wrong mains voltage or current type misuse or inappropriate use such as overloading of the product or use of non approved tools or accessories failure to comply with the maintenance and safety regulations ingress of foreign bodies into the product e g sand stones or dust effects of force or ext...

Reviews: