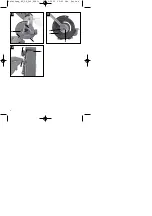
6.3 Adjusting the workpiece supports (Fig. 8-9 /
Item 7)
Adjust the workpiece supports (7) using the
fastening screws (6) so that the distance between
the dry grinding wheel (5) and the workpiece
support (7) is as small as possible and certainly
does not exceed 2 mm.
Adjust the workpiece supports (7) periodically to
compensate for wear on the dry grinding wheel.
6.4 Changing the grinding wheel (Figs. 10-11)
Remove the 3 screws (A) holding the side section of
the safety hood (B) and remove the safety hood.
Undo the nut (D) (
Important: The grinding/sanding
wheel is fastened with a left-handed thread)
, by
holding the nut of the grinding/sanding wheel mount
on the opposite side. Remove the flange (C). and
replace the grinding wheel (5). To assemble,
proceed in reverse order.
6.5. Changing the grinding/sanding belt
(Fig. 1/12)
Undo the three screws (4) and remove the side safety
guard. Undo the clamp screw for the top belt roller
(12) by a few turns.
Push the clamping lever (13) downwards and pull the
grinding/sanding belt off the rollers.
Place the new grinding/sanding belt (11) in the center
of the top and bottom rollers and release the
clamping lever (13). Now tighten the clamp screw
(12) and fit the side safety guard.
7. Operation
7.1 ON/OFF switch (1)
To switch on the equipment set the On/Off switch (1)
to position 1.
Move the ON/OFF switch (1) to position 0 to switch
off the equipment.
After switching on the equipment wait for the
equipment to reach its maximum speed of rotation
before commencing with the sanding/grinding work.
7.2 Grinding
We recommend that you use the fine-grained
grinding wheel for fine sanding/grinding work and
the coarse-grained grinding wheel for coarse
sanding/grinding work.
Place the workpiece onto the workpiece support
(7) and slowly guide the workpiece towards the
grinding wheel (5) at the desired angle to the
point where workpiece and grinding wheel make
contact.
Move the workspiece slightly back and forth to
produce an optimal grinding result. This way the
grinding wheel (5) is evenly worn. Allow the
workpiece cool every now and then.
7.3 Grinding/Sanding
Always hold the workpiece firmly during
grinding/sanding.
Do not exert excessive pressure.
The workpiece should be moved to and fro on the
belt as you grind/sand it to prevent the paper
wearing on one side.
Important!
Pieces of wood should always be
sanded with the grain to prevent them splitting.
8. Cleaning, maintenance and ordering
of spare parts
Always pull out the mains power plug before starting
any cleaning work.
8.1 Cleaning
Keep all safety devices, air vents and the motor
housing free of dirt and dust as far as possible.
Wipe the equipment with a clean cloth or blow it
with compressed air at low pressure.
We recommend that you clean the device
immediately each time you have finished using it.
Clean the equipment regularly with a moist cloth
and some soft soap. Do not use cleaning agents
or solvents; these could attack the plastic parts of
the equipment. Ensure that no water can seep
into the device.
8.2 Maintenance
There are no parts inside the equipment which
require additional maintenance.
8.3 Ordering replacement parts:
Please quote the following data when ordering
replacement parts:
Type of machine
Article number of the machine
Identification number of the machine
Replacement part number of the part required
For our latest prices and information please go to
www.einhell.com.au
8
GB
^åäÉáí ì åÖ| _q| r p| OQM| pmhNW| ==OTKMRKOMNM==NRWOO=r Üê==pÉáí É=NP


