10
GB
5. Before starting the equipment
Before you connect the equipment to the mains
supply make sure that the data on the rating plate
are identical to the mains data.
Always pull the power plug before making
adjustments to the equipment.
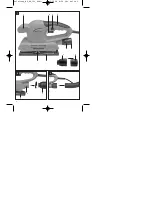
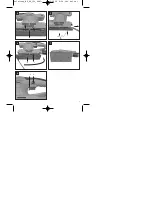
5.1 Installing the dust extractor adapter
(Figure 2-3/Item 5)
Connect the dust extractor adapter (5) to the dust
extractor connector (a) as shown in Fig. 2 and
secure it by turning it. Connect the dust extractor
adapter to a suitable dust extraction system.
Important.
For health safety reasons it is imperative that you use
a dust extraction system.
5.2 Securing sanding/grinding paper using a
clamp (Fig. 4-7)
Only use sanding/grinding paper of the appropriate
size and suitable perforations.
Lift the lever (7) on the front of the orbital sander.
Insert the sanding/grinding paper as far as
possible into the open clamp and close the lever
again.
Place the sanding/grinding paper taut over the
orbital plate (6) and clamp it again using the
second lever (7) on the rear of the orbital sander.
Make sure that the perforations in the
sanding/grinding paper line up with the oscillating
plate.
6. Operation
6.1 Switching the machine on and off
(Fig. 8/Item 2)
To switch on:
Press the control switch (2).
Continuous operation:
Lock the control switch by pressing the locking
switch (3).
To switch off:
Press the control switch briefly and release it.
6.2 Working with the orbital grinder/sander
Place the whole surface area of the sanding disk
on the material.
Switch on the machine and move it with gentle
pressure over the workpiece completely circular
movements or moving it to and fro and up and
down.
Use a coarse paper for
coarse sanding
and a
finer paper for
finish sanding
. You can find the
best paper for the job by means of testing.
Important.
The dust generated when working with the machine
may be harmful.
Always wear goggles and a dust mask when
carrying out sanding/grinding work.
Everybody who uses the machine or enters the
workplace must wear a dust mask.
Do not eat, drink or smoke at the workplace.
Do not use the machine on paints which contain
lead.
7. Replacing the power cable
If the power cable for this equipment is damaged, it
must be replaced by the manufacturer or its after-
sales service or similarly trained personnel to avoid
danger.
8. Cleaning, maintenance and
ordering of spare parts
Always pull out the mains power plug before starting
any cleaning work.
8.1 Cleaning
Keep all safety devices, air vents and the motor
housing free of dirt and dust as far as possible.
Wipe the equipment with a clean cloth or blow it
with compressed air at low pressure.
We recommend that you clean the device
immediately each time you have finished using it.
Clean the equipment regularly with a moist cloth
and some soft soap. Do not use cleaning agents
or solvents; these could attack the plastic parts of
the equipment. Ensure that no water can seep
into the device.
Anleitung_BT_OS_150_SPK1:_ 13.02.2008 8:55 Uhr Seite 10


