GB
- 16 -
6. Operation
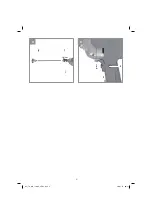
6.1 ON/OFF switch (Fig. 5/Item 3)
•
First fit a suitable mixing tool in the equipment
(see 5.2).
•
Connect the mains plug to a suitable socket.
To switch on:
Press the ON/OFF switch (3)
Continuous operation:
Secure the ON/OFF switch (3) with the locking
button (2).
To switch o
ff
:
Press the ON/OFF switch (3) brie
fl
y.
6.2 Adjusting the speed (Fig. 5/Item 3)
•
You can infinitely vary the speed whilst using
the tool.
•
Select the speed by applying a greater or les-
ser pressure to the ON/OFF switch (3).
6.3 Preselecting the speed (Fig. 5/Item 4)
•
The speed setting ring (4) enables you to
define the maximum speed. The ON/OFF
switch (3) can only be pressed to the defined
maximum speed setting.
•
Set the speed using the setting ring (4) on the
ON/OFF switch (3).
•
Do not attempt to make this setting whilst the
equipment is in use.
6.4 Clockwise/Counter-clockwise switch (Fig.
5/Item 5)
•
Change switch position only when the drill is
at a standstill!
•
Set the running direction of the paint and mor-
tar mixing tool using the clockwise/counter-
clockwise switch (5):
Direction Switch position
Clockwise <--
Counter-clockwise -->
6.5 Working with the paint and mortar mixing
tool
The additional handle must be
fi
tted!
Before changing the mixing tool you must pull the
power plug.
Reduce the working speed when you immerse
the mixing tool into the material you want to mix
and when you take it out again. When the mixing
tool is fully immersed, raise the speed to maxi-
mum in order to ensure adequate cooling of the
motor. Move the mixing tool through the mixing
container during the mixing operation. Continue
mixing until all the material has been thoroughly
processed. When you are
fi
nished with your mi-
xing work, clean the mixing tool.
6.6 Using the equipment as a drill
•
First fit a suitable drill in the tool.
•
Connect the mains plug to a suitable socket.
•
Position the equipment in the position you
wish to drill.
•
Now switch on the machine as described in 6.
Operation.
7. Replacing the power cable
Danger!
If the power cable for this equipment is damaged,
it must be replaced by the manufacturer or its
after-sales service or similarly trained personnel
to avoid danger.
8. Cleaning, maintenance and
ordering of spare parts
Danger!
Always pull out the mains power plug before star-
ting any cleaning work.
8.1 Cleaning
•
Keep all safety devices, air vents and the
motor housing free of dirt and dust as far as
possible. Wipe the equipment with a clean
cloth or blow it with compressed air at low
pressure.
•
We recommend that you clean the device
immediately each time you have finished
using it.
•
Clean the equipment regularly with a moist
cloth and some soft soap. Do not use
cleaning agents or solvents; these could at-
Anl_TC_MX_1100_E_SPK1.indb 16
Anl_TC_MX_1100_E_SPK1.indb 16
20.01.15 08:31
20.01.15 08:31

