EN
- 11 -
Special safety information
Secure the workpiece whenever possible: Use
clamps or a vise to hold the workpiece securely.
This is far safer than holding it in your hand and
also means that you have both hands free to ope-
rate the electric tool.
Safety information for planes
•
Wait for the cutter to stop before setting
the tool down.
An exposed rotating cutter
may engage the surface leading to possible
loss of control and serious injury.
•
Hold the power tool by insulated gripping
surfaces, because the cutter may contact
its own cord.
Cutting a “live” wire may make
exposed metal parts of the power tool “live”
and could give the operator an electric shock.
•
Use clamps or another practical way to
secure and support the workpiece to a
stable platform.
Holding the workpiece by
your hand or against the body leaves it unsta-
ble and may lead to loss of control.
•
To avoid damage to the electric plane, make
sure there are no foreign objects attached to
the workpiece.
•
Hold the tool’s handle in both hands; place
the front base plate of the plane on the work-
piece. The base plates must lie flat on the
workpiece while planing is in progress.
•
Allow the tool to reach its full speed before
you begin planing.
•
Set the chip depth to 0 mm when you have
finished your work.
•
The planing knives should be replaced by a
new pair of planing knives as soon as they
become worn.
•
Some types of planing knife have two blades.
If one of the blades becomes blunt, the pla-
ning knife can be reversed.
•
Blunt planing knives cannot be resharpened.
•
Always replace both knives.
•
Only the original knife shaft from the manu-
facturer is allowed to be used for this electric
plane.
•
To work well and safely you must use only
clean and sharp planing knives.
SAVE THESE INSTRUCTIONS
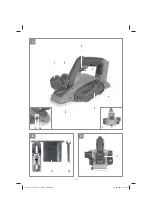
2. Layout and items supplied
2.1 Layout
1. Setting knob for the chip depth
2. Chip
ejector
3. Safety
lock-o
ff
4. On/O
ff
switch
5. Rear base plate
6. Belt
cover
7. Parking
soleplate
8. Front base plate
9. Thumb screw for step depth scale
10. Step depth scale
11. Parallel stop
12. Wrench
13. Mounting
14. Thumb screw
15. Lock bolt
16. Wing nut
17. V-shaped groove
18. Hexagonal screws
19. Screws
20. Belt pulley, large
21. Drive belt
22. Belt pulley, small
23. Battery capacity indicator
24. Battery capacity indicator button
25. Pushlock button
2.2 Items supplied
Please check that the article is complete as
speci
fi
ed in the scope of delivery. If parts are
missing, please contact our service center or the
store where you made your purchase at the latest
within 5 work days after purchasing the article and
upon presentation of a valid bill of purchase.
•
Open the packaging and take out the equip-
ment with care.
•
Remove the packaging material and any
packaging and/or transportation braces (if
present).
•
Check to see if all the items are supplied.
•
Inspect the equipment and accessories for
transport damage.
•
If possible, keep the packaging until the end
of the guarantee period.
Danger!
The equipment and packaging material are
not toys. Do not let children play with plastic
bags, plastic sheets and small parts. There is
a risk of choking and su
ff
ocating!
Anl_TE_PL_18_82_Li_SPK7_USA.indb 11
Anl_TE_PL_18_82_Li_SPK7_USA.indb 11
31.03.2021 13:53:02
31.03.2021 13:53:02

