background image

AFTER SALES SUPPORT


  0151 649 1500      

  1890 94 62 44


  www.einhell.co.uk

22

Safety

75W DETAIL SANDER – WZDS 75 K

g) 

The operator must be at least 18 years of age.

h)  

Children should be supervised to ensure that they do not 

play with the detail sander. Cleaning and user maintenance 

must not be performed by children.

i)  

Do not allow children to play with the packaging wrapper. 

They may get caught in it when playing and suffocate.

j)    Make sure that children do not insert any objects into the detail 

sander.


WARNING!

Additional Safety Warnings
4) Power tool use and care
a)  

   Keep the air vents clear of dirt. Risk of smoke and fire hazards 

if the motor overheats.

b)  

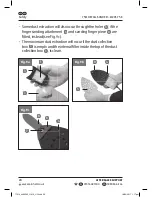
 If the machine is blocked, switch off the motor and pull out 

the mains plug before you start the cleaning procedure. 

Ensure that the motor vents 

V

 and the waste output throat 

T

 to the dust collection box 

3

 are clear of waste and other 

accumulations to protect the motor from suffering damage or 

possibly catching fire. (See Figs. 6a - b).

77014_4460595_11016_UG.indd   24

18/04/2017   1:17 pm

Summary of Contents for WZDS 75 K

Page 1: ...r purchase for many years to come If you require technical support or in the unlikely event that your purchase is faulty please telephone our Helpline for immediate assistance Faulty product claims made within the 3 year warranty period will be repaired or replaced free of charge provided that you have satisfactory proof of purchase keep your till receipt safe This does not affect your statutory r...

Page 2: ...also observe country specific guidelines and laws Store the instruction manual for future use If you pass the detail sander on to third parties please be absolutely sure to include this instruction manual Explanation of symbols The following symbols and signal words are used in this instruction manual on the detail sander or on the packaging DANGER This signal symbol word indicates a hazard with h...

Page 3: ...g with the screw Fitting the peel off finger sanding pieces The intended use and how to use it for grinding sanding polishing of wood iron plastic and similar materials using the appropriate grinding sanding paper rust removing pad and polishing pad How to store it Simple maintenance and fault finding If necessary contacting about repairs spare parts and warranty claims WARNING Read all safety reg...

Page 4: ...erious danger Be sure to observe the restrictions in the safety information Please note that our equipment has not been designed for use in commercial trade or industrial applications Our warranty will be voided if the equipment is used in commercial trade or industrial businesses or for equivalent purposes DANGER When using ensure that any dry dust etc will not become close to any Burning materia...

Page 5: ...der too close to adjacent objects which may then be sucked into the holes in the base of the oscillating plate Damage Injury caused by positioning the detail sander or finger sanding attachment too close to adjacent objects which may then become damaged due to the abrasive action of the grinding sanding sheets or pads fitted on the detail sander Damage Injury caused by not guiding the power cable ...

Page 6: ... CAUTION Wear ear muffs The impact of noise can cause damage to hearing 3 CAUTION Wear a breathing mask Dust which is injurious to health can be generated when working on wood and other materials Never use the device to work on any materials containing asbestos 4 CAUTION Wear safety goggles Sparks generated during working or splinters chips and dust emitted by the device can cause loss of sight Fi...

Page 7: ...ll co uk 11 Safety 75W DETAIL SANDER WZDS 75 K Explanation of the pictograms for handling on the machine See Fig 3 DANGER 1 Warning Read the user manual and follow the warnings and safety instructions Fig 3 1 77014_4460595_11016_UG indd 13 18 04 2017 1 17 pm ...

Page 8: ...body Push the ON button I to start the sander motor The detail sander is ON when the OFF button 0 is above the surface of the sander body and the ON I button is below the surface of the detail sander body Push the OFF button 0 to stop the sander motor To STOP the detail sander when it is working press the OFF 0 button f There is a filter Fig 4b item f fitted underneath the top of the dust collecti...

Page 9: ...nd well lit Clutteredordarkareas inviteaccidents b Do not operate power tools in explosive atmospheres such as in the presence of flammable liquids gases or dust Power toolscreatesparkswhichmayignitethedust orfumes c Keep children and bystanders away while operating a power tool Distractionscancauseyoutolosecontrol d Keep pets and animals away while operating a power tool Distractionscancauseyouto...

Page 10: ...lectric shock d Do not abuse the cord Never use the cord for carrying pulling or unplugging the power tool Keep cord away from heat oil sharp edges or moving parts Damaged or entangled cords increase the risk of electric shock e When operating a power tool outdoors use an extension cord suitable for outdoor use Use of a cord suitable for outdoor use reduces the risk of electric shock f If operatin...

Page 11: ...uce personal injuries c Prevent unintentional starting Ensure the switch is in the off position before connecting to power source and or battery pack picking up or carrying the tool Carrying power tools with your finger on the switch or energising power tools that have the switch on invites accidents d Remove any adjusting key or wrench before turning the power tool on A wrench or a key left attac...

Page 12: ... for your application The correct power tool will do the job better and safer at the rate for which it was designed b Do not use the power tool if the switch does not turn it on and off Any power tool that cannot be controlled with the switch is dangerous and must be repaired c Disconnect the plug from the power source and or the battery pack from the power tool before making any adjustments chang...

Page 13: ...orking conditions and the work to be performed Use of the power tool for operations different from those intended could result in a hazardous situation h Keep handles and grasping surfaces dry clean and free from oil grease Slippery handles and grasping surfaces do not allow safe handling and control of the tool in unexpected situations i Children must not be allowed to operate power tools Power t...

Page 14: ... any repairs or cleaning power tools Such preventive safety measures reduce the risk of starting the power tool accidentally WARNING Safety Warnings 6 Detail Sander Use a Contact or inhalation of dusts generated when working with the detail sander may be harmful or toxic and can endanger the health of the operator and bystanders DANGER b Never use the detail sander on asbestos painted surfaces whi...

Page 15: ...pressed air lines as this will disturb the dust and allow it to become inhaled Always clean up using a vacuum cleaner suitable for fine dust particles A suitable vacuum cleaner will reduce dust related hazards f Never eat drink or smoke at the workplace Risk of dust related hazards g Never use a detail sander whilst barefoot or wearing sandals Risk of injury related hazards WARNING Before using Wh...

Page 16: ...ticularly when working on ladders and platforms Failure to do this may result in causing you to slip or lose control which may cause an accident leading to an injury DANGER Additional Safety Warnings 2 Electrical safety a The electric circuit must be protected at your Distribution Board by at least a 16A fuse WARNING Additional Safety Warnings 3 Personal safety a Use the detail sander only for the...

Page 17: ... to either the oscillating plate 4 or the finger sanding attachment 6 See Fig 5a c d To detect significant damage or defects the equipment must be inspected each time before use and each time after being dropped or suffering other shocks Do not use the detail sander and accessories if any damage has occurred as a result of dropping Riskofinjury death e Avoid an abnormal posture Maintain a safe pos...

Page 18: ...ocate j Makesurethatchildrendonotinsertanyobjectsintothedetail sander WARNING Additional Safety Warnings 4 Power tool use and care a Keep the air vents clear of dirt Risk of smoke and fire hazards if the motor overheats b If the machine is blocked switch off the motor and pull out the mains plug before you start the cleaning procedure Ensure that the motor vents V and the waste output throat T to ...

Page 19: ...ened c Examine the equipment for signs of wear or damage each time before you use it and after any impacts Have essential repairs carried out without delay d Use only original replacement parts for repair and maintenance purposes e Never use replacement parts or accessories which are not approved or recommended by the manufacturer f Allowtheequipmenttocoolbeforecarryingoutanymaintenance work adjus...

Page 20: ...r immediately and allow the motor to come to a standstill Do not use the detail sander again until it has been examined for damage and or any foreign bodies removed and the dust collection box 3 is emptied and the filter F underneath the top of the dust collection box 3 is cleaned See Fig 6a b on page 23 WARNING c Risks associated with using the detail sander If used improperly or in a negligent m...

Page 21: ...ce into the collection box 3 when a correct grinding sanding sheet is fitted with corresponding holes through the sheet The best dust extraction will occur when the holes in the grinding sanding sheet 5 are aligned correctly with the holes in the oscillating plate 4 see Fig 7b Some dust extraction will also occur through the holes h if the finger sanding attachment 6 and sanding finger piece 8 are...

Page 22: ...llection box 3 emptied andthefiltercleaned orreplacedasnecessary Thesafety workingandmaintenancenotesofthemanufacturer aswellastheinformationspecifiedinthetechnicaldatamustbe compliedwith Neverremovedebrisfromthemachine whiletheelectricmotor isrunning Toremoveanydustfromthedustcollectionbox 3 switchOFFthe detailsander andunplugthe13Aplug cable 12 fromthemains supply Thenremovethedustcollectionbox ...

Page 23: ...ly Onlythecorrectdustcollectionbox 3 withtheintegralfilter f fittedontheinsidetopofthedustcollectionboxmustbefittedto thedetailsander SeeFig 7aonpage25 Thefiltermustbeina goodcondition withnoholesinthematerial 10 Safety and protective equipment Thereisaninternalfilter f fittedinsidethetopofthedust collectionbox 3 SeeFig 9aitem f onpage28 toreduce theamountoffinedustgeneratedbythedetailsanderinthe ...

Page 24: ...occurthroughtheholes h ifthe fingersandingattachment 6 andsandingfingerpiece 8 are fitted instead seeFig 9c Themaximumdustextractionwilloccurifthedustcollection box 3 isempty andtheinternalfilterinsidethetopofthedust collectionbox 3 isclean Fig 9b 5 h 4 Fig 9a 3 3 f Fig 9c 7 8 6 4 77014_4460595_11016_UG indd 30 18 04 2017 1 17 pm ...

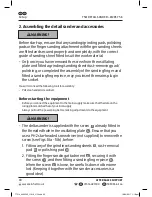
Page 25: ...he threaded hole in the oscillating plate 4 2 Check to make sure that the delivery is complete see Fig 1 on Page 3 3 Check whether the detail sander or any of the parts accessories exhibit any damage 4 In the event of damages or missing parts do not use the detail sander Contact the manufacturer via the service address indicated on the warranty card or by using the After Sales Support contact info...

Page 26: ...ollowing tools for assembly PH2 star headed screwdriver Before starting the equipment Before you connect the equipment to the mains supply make sure that the data on the rating plate matches that of your local supply Always pull out the power plug before making adjustments to the equipment WARNING The delta sander is supplied with the screw 7 already fitted in the threaded hole in the oscillating ...

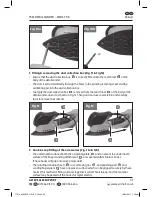
Page 27: ...er open it as shown in Fig 12 Then position it over a waste bin and carefully tap it to remove the contents Fig 11 3 t Fig 12 3 t 2 Hook Loop fitting of the accessories Fig 13a 13b The underneath surface of both the oscillating plate 4 and an area of the underneath surface of the finger sanding attachment 6 are covered with miniature hooks These hooks will grip onto woven materials The grinding sa...

Page 28: ...es and edges of the oscillating plate 4 and fit together with the woven material on the grinding sand sheet 5 in contact with the oscillating plate 4 See Fig 13a 13b CAUTION Ensure that the surface of the grinding sanding sheet is fitted flat Fig 13b Fig 13a 5 4 4 To remove the grinding sanding sheet Fig 14a 14b Starting at one of the rear corners of the grinding sanding sheet 5 carefully peel the...

Page 29: ...upply turn the detail sander upside down and align the edges of the polishing pad 10 or rust removing pad 11 to the edges of the oscillating plate f and fit together with the woven material in contact with the oscillating plate 4 See Fig 13a 13b Remove the pad by starting at one of the rear corners and carefully peel the pad away from the oscillating plate 4 See Fig 14a 14b CAUTION Ensure that the...

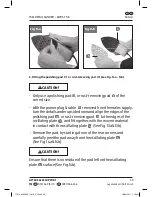
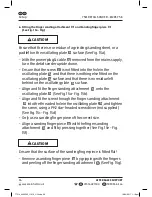
Page 30: ...re is no residue left behind on the oscillating plate 4 surface Align and fit the finger sanding attachment 6 onto the oscillating plate 4 See Fig 15a Fig 15b Align and fit the screw through the finger sanding attachment 6 into the threaded hole in the oscillating plate 4 and tighten the screw using a PH2 star headed screwdriver not supplied See Fig 15c Fig 15d Only use a sanding finger piece of t...

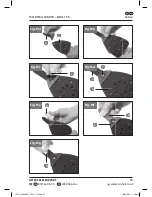
Page 31: ...PPORT 0151 649 1500 1890 94 62 44 www einhell co uk 35 Set up 75W DETAIL SANDER WZDS 75 K Fig 15b Fig 15e 8 Fig 15a 4 6 Fig 15g 8 Fig 15c 7 Fig 15d 7 6 4 Fig 15f 8 6 77014_4460595_11016_UG indd 37 18 04 2017 1 18 pm ...

Page 32: ... statutory regulations governing noise abatement may differ from one location to another Each time before use check the following That the equipment is in perfect condition and that the safety devices are complete That all screws are securely fastened 1 Connecting up the machine and switching it on Fig 1 Connect the 13A plug 12 on the detail sander power cable Fig 1 either to a 13A socket on the m...

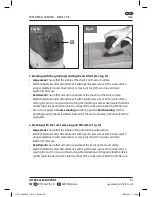
Page 33: ...he shape of the work surface Switch OFF after use Use a coarse paper for coarse sanding and a fine paper for finish sanding Test the grinding sanding sheets to determine which is the most suitable on the material of the work piece 4 Working with the rust removing pad fitted See Fig 17 Large areas Ensure that the whole of the pad is on the work surface Switch the detail sander ON and move it with a...

Page 34: ... surface moving it to and fro or up and down Using the delta shape of the pad rotate the detail sander to get the best position into the shape of the work surface Switch OFF after use Only use a small amount of polish until you can determine how much is required to suit the work surface being polished 6 Working with the finger attachment sanding piece fitted See Fig 18a Fig 18b Detail work ensure ...

Page 35: ...n Grinding sanding performance unsatisfactory The dust collection box 3 may be full or the filter fitted on the inside top of the dust collection box could be blocked Remove the dust collection box 3 and empty it and or clean the filter fitted on the inside top of the dust collection box 3 The grinding sanding sheet 5 rust removing pad 11 polishing pad 10 or the sander finger 8 piece may be worn R...

Page 36: ...ing the motor unit Clean the plastic body and other plastic parts with a mild household cleaning agent and a damp cloth Do not use any aggressive agents or solvents for cleaning purposes as these may be aggressive to the plastic parts of the equipment Never clean the detail sander by spraying it with water 2 Cleaning the oscillating plate 4 The underneath surface of the oscillating plate 4 is cove...

Page 37: ...derside of the top of the dust collection box See Fig 19a Fig 19b Switch OFF the detail sander and unplug the 13A plug cable 12 from the mains supply Then remove the dust collection box 3 from the rear of the detail sander body and remove the dust into a dustbin or waste container See Fig 19 A vacuum cleaner can also be used to extract the dust from the mouth of the dust collection box Open the du...

Page 38: ...ways set the On Off button switch 1 to Stop 0 disconnect the 13A plug from the mains supply before starting any cleaning and maintenance work See Fig 1 Risk of electric shock Maintenance Pull out the mains plug and carry out the following work Check the machine for signs of damage Check that all the parts are secure and tighten them if necessary Have any damaged parts replaced or repaired but use ...

Page 39: ...e the detail sander which require additional maintenance Risk of electric shock Storing the equipment Clean the detail sander accessories before storage in the suppled storage bag 9 See Fig 1 Store the detail sander accessories in a dry room at above freezing temperatures The ideal storage temperature is between 5 C and 30 C Store the detail sander accessories out of reach of children 77014_446059...

Page 40: ...electric shock or fire if the 13A plug is damaged Environmental protection Dispose of soiled maintenance material and operating materials at the appropriate collection point Recycle packaging material metal and plastics Ordering replacement parts Please quote the following data when ordering replacement parts Type of machine WZDS 75 K Article number of the machine 4460595 Identification number of ...

Page 41: ...is damaged it must be replaced by the authorised after sales service personnel such as a qualified electrician or similarly trained person to avoid danger CAUTION Always set the On Off button switch 1 to Stop 0 disconnect the 13A plug from the mains supply before starting any cleaning and maintenance work See Fig 1 Risk of electric shock 77014_4460595_11016_UG indd 47 18 04 2017 1 18 pm ...

Page 42: ...power level 69 dB A uncertainty 3 dB A The declared vibration total value and the declared noise emission value have been measured in accordance with a standard test method and may be used for comparing one tool with another The declared vibration total value and the declared noise emission value may also be used in a preliminary assessment of exposure CAUTION Wear ear defenders The impact of nois...

Page 43: ...ing on ways in which the tool is used especially what kind of workpiece is processed There is a need to identify safety measures to protect the operator that are based on an estimation of exposure in actual conditions of use taking account of all parts of the operating cycle such as the times when the tool is switched off and when it is running idle in addition to the trigger time 77014_4460595_11...

Page 44: ...mables Category Example Wear parts None Consumables Grinding sanding sheets rust removing pads polishing pads sanding finger pieces etc Not necessarily included in the scope of delivery In the event of defects or faults please register the problem on the Internet at www einhell co uk or by telephone to one of the After Sales Support telephone numbers Please ensure that you provide a precise descri...

Page 45: ...AFTER SALES SUPPORT 0151 649 1500 1890 94 62 44 www einhell co uk 49 Technical data 75W DETAIL SANDER WZDS 75 K Declaration of conformity 77014_4460595_11016_UG indd 51 18 04 2017 1 18 pm ...

Page 46: ...PPORT 3 Or contact via the Einhell UK Ltd website How do I obtain spare parts not covered by the warranty Make sure you have the information from the product data label or page 44 of this manual and then 1 Contact Einhell UK Ltd using one of the Telephone numbers for AFTER SALES SUPPORT and choose the option for Spare Parts 2 Or contact via the Einhell UK Ltd website where spares information price...

Page 47: ...ogether with it Einhell UK Ltd Unit 9 Stadium Court Wirral International Business Park Plantation Road Bromborough CH62 3QG AFTER SALES SUPPORT Aftersales support available Monday Thursday 8 45am 5pm Friday 8 45am 3pm Please add the Ser Nr in the box below You will find the 7 character Ser Nr here YEAR WARRANTY www einhell co uk 0151 649 1500 1890 94 62 44 MODEL WZDS 75 K PRODUCT CODE 77014 07 201...

Page 48: ...e safety and maintenance instructions Other improper treatment or modification After the expiry of the warranty period you still have the possibility to have your product repaired at your own expense If the repair or the estimate of costs is not free of charge you will be informed accordingly in advance This warranty does not affect you statutory rights The period of the warranty can only be exten...

Page 49: ...us at www aldi com User Manual Spend a little Live a lot Contents Original instruction manual Spend a little Live a lot 75W DETAIL SANDER Plus 14 piece Accessory Set AFTER SALES SUPPORT 0151 649 1500 1890 94 62 44 www einhell co uk MODEL WZDS 75 K ON SALE DATE 07 2017 YEAR WARRANTY PRODUCT CODE 77014 Pack contents parts 3 4 General information 5 Reading and storing the original instruction manual ...

Page 50: ...st be disposed of as special waste Ask your dealer or your local council Recycling The unit is supplied in packaging to prevent it being damaged in transit This packaging is raw material and can therefore be reused or can be returned to the raw material stream SLEEVE FILM CARD widely recycled recyclenow com PLASTIC not currently recycled For EU countries only Never place any electric tools in your...

Reviews: