background image

5

Mount the eInstruction


TouchBoard


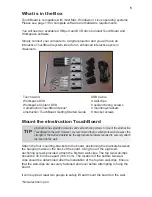
Attach the four mounting-brackets to the board, positioning the brackets between 

the hanging marks on the back of the board. Using four of the eight self-

anchoring screws provided, attach the first two wall-clips. The top two wall-clips 

should be 39.6 inches apart (100.5 cm). The location of the bottom two wall-

clips should be determined after the installation of the top two wall-clips. Ensure 

that the wall-clips are securely fastened and level before attempting to hang the 

board. 

It will require at least two people to safely lift and mount the board on the wall.

*Non-electronic pen

USB Cable

4 wall-clips

8 self-anchoring screws 

4 mounting-brackets

8 bracket screws

Touch wand

Workspace DVD

Workspace Content DVD

4 eInstruction


TouchBoard pens* 

eInstruction


TouchBoard Getting Started Guide

What is in the Box

TouchBoard is compatible with most Mac, Windows or Linux operating systems. 

Please see page 13 for complete software and hardware requirements. 

You will need an available USB port and DVD drive to install TouchBoard and 

Workspace software.

Simply connect your computer to a digital projector and you will have an 

interactive TouchBoard system ideal for an enhanced interactive system 

classroom.

eInstruction has provided wall-clips and self-anchoring screws to mount the eInstruction


TouchBoard to the wall. However, we recommend that a skilled professional assess the 

strength of the wall and determine the appropriate hardware required to securely attach 

the board to the wall.

TIP

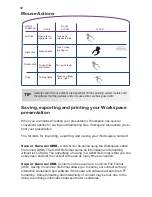
Summary of Contents for TouchBoard EITB2078

Page 1: ...DualBoard GETTING STARTED ...

Page 2: ...GETTING STARTED eInstruction TouchBoard ...

Page 3: ...you to visit our web site at www einstruction com for our latest product information and updates that would be in addition to the Getting Started Guide included in the box Click on any of the eInstruction products to access product information software downloads documentation and training information Please recycle www einstruction com www einstruction eu www einstruction it www einstruction fr ww...

Page 4: ...ost Out of eInstruction TouchBoard 9 TouchBoard Calibration Windows 7 9 Device Manager Calibration 10 Gestures 11 Gestures Table 11 Mouse Actions Table 12 Saving Exporting and Printing a Workspace presentation 12 13 Storing the TouchBoard pen 13 Mobility Solution with eInstruction AdjustIt Pro Stand TM 14 Support and Troubleshooting 14 Hardware and Software Requirements 14 15 Appendixes A Limited ...

Page 5: ...he first mobile interactive whiteboard designed to support student centered collaborative learning and give you the freedom and flexibility to manage your class and deliver engaging lessons from anywhere in the room The eInstruction TouchBoard comes with the award winning WorkspaceTM software Workspace enables you to create and assemble the interactive lesson content and gives you the ability to c...

Page 6: ...ews 4 mounting brackets 8 bracket screws Touch wand Workspace DVD Workspace Content DVD 4 eInstruction TouchBoard pens eInstruction TouchBoard Getting Started Guide What is in the Box TouchBoard is compatible with most Mac Windows or Linux operating systems Please see page 13 for complete software and hardware requirements You will need an available USB port and DVD drive to install TouchBoard and...

Page 7: ...k on the Workspace DVD icon that will now show on the desktop 2 Follow the on screen instructions to proceed through the installation process You will know Workspace has installed successfully by the appearance of the eInstruction icon in the Menu Extras Munulets area 3 Repeat steps 1 and 2 using the Workspace Content DVD to install the Workspace Content Workspace Software and Workspace Content Li...

Page 8: ...TouchBoard connects to your computer via a USB cable A separate power supply is not necessary since the eInstruction TouchBoard is powered through the USB connection 1 Plug the USB cable into the USB port on the back of the board 2 Plug the other end of the USB cable into a USB port on your computer or a USB hub connected to your computer A red light located at the bottom right corner of the board...

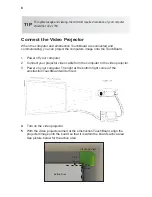
Page 9: ...wer on your computer The light at the bottom right corner of the eInstruction TouchBoard will turn red 4 Turn on the video projector 5 With the video projector aimed at the eInstruction TouchBoard align the projected image onto the board so that it is within the board s active area See picture below for the active area For optimal usage and viewing the minimum required resolution of your computer ...

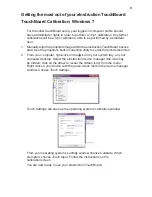
Page 10: ...orrection utility to correct for picture distortion 2 From your computer right click on the icon in your system tray on your computer desktop Select the eInstruction device manager the icon may be hidden click on the arrow to reveal the hidden icon from the menu Right click on your device with the green check mark in the device manager window Choose Touch Settings Touch Settings will open up the o...

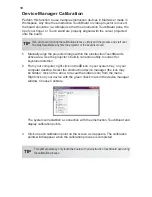
Page 11: ... your system tray on your computer desktop Select the eInstruction device manager the icon may be hidden click on the arrow to reveal the hidden icon from the menu Right click on your device with the green check mark in the device manager window Choose Calibrate The system will establish a connection with the eInstruction TouchBoard and display calibration points 3 Click on each calibration point ...

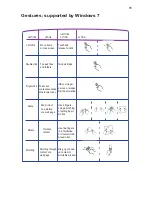
Page 12: ... your finger on screen release after the animation Scale Zoom in out on a picture or a web page Rotate To rotate content Two quick taps Use 2 fingers using a pinching or pulling apart motion Scrolling Drag up or down on content or scrollable window Scrolling through content or a web page Use two fingers in a Clockwise or Counterclock wise motion To access context sensative drop down menu ...

Page 13: ... all information and formatting without loss of data The advantage of saving in a GWB file format is that you can easily open and edit the content with ease as many times as needed Save or Save as IWB Content can be saved as a Common File Format IWB Saving in common file format allows you to share your content with any interactive whiteboard and software if the board and software accepts the CFF f...

Page 14: ... the My Documents or Documents Interwrite Workspace Export folder Export as PDF Export the currently open presentation file to a PDF format By default the PDF file is saved in the My Documents or Documents Interwrite Workspace Export folder E mail as PDF Content can be e mailed as a PDF Content is first saved as a GWB file The GWB file is converted and attached to a new e mail if there is an e mai...

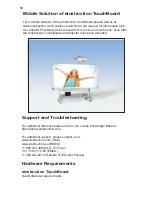
Page 15: ...se even after the eInstruction TouchBoard and projector have been mounted Support and Troubleshooting For additional reference please refer to our on line Knowledge Base at http kbnew einstruction com For additional support please contact us at www einstruction com USA www einstruction eu EMEA 1 888 333 4988 U S Toll Free 33 1 58 31 10 65 EMEA 1 480 443 2214 Outside of USA and Europe Hardware Requ...

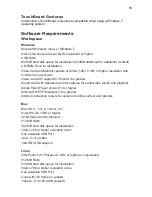
Page 16: ...ter Sound Card with Speakers and microphone for audio video record and playback Adobe Flash Player version 9 0 or higher Microsoft NET Framework 3 0 or greater Internet connection require for access to online content and tutorials Mac Mac OS X 10 5 8 10 6 or 10 7 PowerPC G4 1GHz or higher 32 bit Kernel and Extensions 512 MB RAM 500 MB hard disk space for installation 1024 x 768 or higher resolutio...

Page 17: ...ough the consumer must pay any shipping charges to ship the product to eInstruction for warranty service after 90 days of the invoice date eInstruction will pay the return shipping charges for ground shipment Other shipping options are available at an additional fee 4 Whenever warranty service is required the original dated sales invoice or a copy must be presented as proof of warranty coverage an...

Page 18: ...lowing specifications EMC En 55022 2006 A1 2007 En 61000 3 2 2006 En 61000 3 3 2006 En 55024 1998 A2 2003 RoHS These products are RoHS compliant 2002 95 EC Supplementary Information The product herewith complies with the requirements of the Low Voltage Direc tive 2006 95 EC and the EMC Directive 2004 108 EC and older Directives 92 31 EEC 89 336 EEC Other 90 270 EEC Does not Apply Scottsdale Arizon...

Page 19: ...f natural resources It may contain hazardous substances that could impact health and the environment In order to avoid the dissemination of the hazardous substances into the envi ronment and to diminish the pressure on our natural resources we encourage you to return this product to the appropriate take back system facility These facilities reuse or recycle most of the materials in this equipment ...

Page 20: ...cted by copyright All rights reserved No part of this document can be photocopied or reproduced in any form without the prior written consent of eInstruction 37 01500 01 36 01730 RevA www einstruction com support www einstruction eu support eInstruction Office 14400 N 87th Street 250 Scottsdale Arizona 85260 Tel 480 948 6540 Support 480 443 2214 Fax 480 948 5508 Technical Support eInstruction Tech...

Page 21: ...GETTING STARTED GUIDE www einstruction com ASY 37 01498 01 37 01499 01 Rev A 36 01729 01 ...

Reviews: