background image

30

Chapter 3  Settings and Adjustment

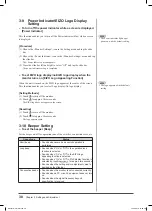
3-9  Power Indicator/EIZO Logo Display 

Setting


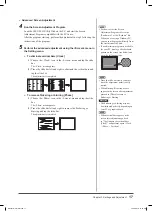
To turn off the power indicator while a screen is displayed 
[Power Indicator]

This function enables you to turn off the Power indicator (blue) while a screen 

is displayed.

[Procedure]

(1)  Choose the <Monitor Settings> icon in the Setting menu and tap the slide 

bar.

(2)  Choose the <Power Indicator> icon in the <Monitor Settings> menu and tap 

the slide bar.

The <Power Indicator> menu appears.

(3)  Trace the slide bar left and right to select “Off” and tap the slide bar.

The power indicator setting is completed.


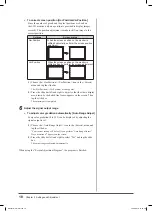
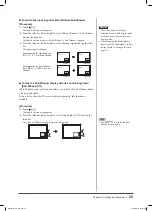
To set EIZO logo display/no EIZO logo display when the 
monitor turns on [EIZO Logo Appearing Function]

When the unit is turned on, the EIZO logo appears at the center of the screen.

This function enables you to select Logo display/No logo display.

[Setting Methods]

(1)  Touch 

 to turn off the monitor.

(2)  Touch 

 for approx. three seconds.

The EIZO logo does not appear on the screen.

[Resetting]

(1)  Touch 

 to turn off the monitor.

(2)  Touch 

 for approx. three seconds.

The logo appears again.

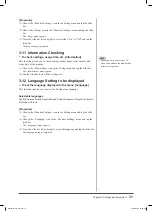
3-10  Beeper Setting


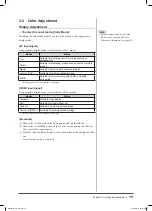
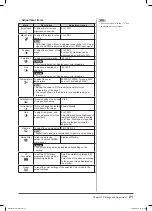
To set the beeper [Beep]

Set the beeper on/off for operation tone of the switches, connection error, etc.

Sound type

Status

Short beep

•  Sounds whenever a basic switch operation is 

performed.

Long beep

•  Sounds when “On” or “Off” in the operation lock 

function is selected.

•  Sounds when “On” or “Off” in the EIZO logo 

appearing function is selected.

•  Sounds when “On” or “Off” in PinP display function is 

selected by touching 

 for approx. two seconds.

•  Sounds when the setting and/or adjustment value is 

decided by the slide bar.

Consecutive beeps

•  Sounds when the monitor is not connected correctly.
•  Sounds when a PC or an AV equipment does not turn 

on.

•  Sounds when the signal frequency beyond 

specifi cation is received.

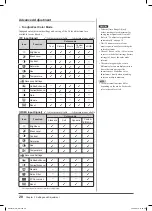
NOTE

•  The Power indicator lights up at 

power on with the default setting.

NOTE

•  The logo appears with the default 

setting.

HD2441W_UM_EN.indd   30

HD2441W_UM_EN.indd   30

4/14/2007   6:22:00 PM

4/14/2007   6:22:00 PM

Summary of Contents for FLEXSCAN HD2441W - SETUP

Page 1: ... 3 7 Off Timer Setting 3 8 Monitor Power saving Mode Setting 3 9 Power Indicator EIZO Logo Display Setting 3 10 Beeper Setting 3 11 Information Checking 3 12 Language Setting to be Displayed Chapter 4 Troubleshooting Chapter 5 Reference 5 1 Attaching an Arm 5 2 Cleaning 5 3 Specifications 5 4 Glossary 5 5 Preset Timing How to Setup Please read the Setup Manual separate volume Important Please read...

Page 2: ...ifications are subject to change without notice ENERGY STAR is a U S registered mark Apple and Macintosh are registered trademarks of Apple Inc VGA is a registered trademark of International Business Machines Corporation DPMS is a trademark and VESA is a registered trademark of Video Electronics Standards Association Windows is a registered trademark of Microsoft Corporation HDMI the HDMI logo and...

Page 3: ...esult in fire electric shock or equipment damage Do not open the cabinet or modify the unit Opening the cabinet or modifying the unit may result in fire electric shock or burn Refer all servicing to qualified service personnel Do not attempt to service this product yourself as opening or removing covers may result in fire electric shock or equipment damage Keep small objects or liquids away from t...

Page 4: ...r a humidifier To avoid danger of suffocation keep the plastic packing bags away from babies and children Use the enclosed power cord and connect to the standard power outlet of your country Be sure to remain within the rated voltage of the power cord Not doing so may result in fire or electric shock To disconnect the power cord grasp the plug firmly and pull Tugging on the cord may damage and res...

Page 5: ...result in injury or equipment damage When the unit is dropped please ask your dealer for advice Do not continue using a damaged unit Using a damaged unit may result in fire or electric shock When reattaching the tilt stand please use the same screws and tighten them securely Do not touch a damaged LCD panel directly with bare hands The liquid crystal that may leak from the panel is poisonous if it...

Page 6: ...result in fire electric shock or equipment damage Do not touch the plug with wet hands Doing so may result in electrical shock Use an easily accessible power outlet This will ensure that you can disconnect the power quickly in case of a problem Do not set the sound volume too high when using a headphone Doing so may damage your hearing ability Periodically clean the area around the plug Dust water...

Page 7: ...edly applied to the screen it may deteriorate or damage your LCD panel Leave the screen white to decrease the prints Do not scratch or press on the panel with any sharp objects such as a pencil or pen as this may result in damage to the panel Do not attempt to brush with tissues as this may scratch the LCD panel When the monitor is cold and brought into a room or the room temperature goes up quick...

Page 8: ...o display the PC input signal screen Main Window and the VIDEO input signal screen Sub Window simultaneously PinP 24 To change the Sub Window position Sub Window Position 26 To set the translucent level for Sub Window Translucent 26 To select the Sub Window display size Sub Window Size 26 3 6 Screen Size Changing 27 To change the screen image projected image size appearing on the screen Screen Siz...

Page 9: ...ctor 1 two input connectors Horizontal scan frequency and Vertical scan frequency are as follows Horizontal scan frequency Digital input signal 31 5 76kHz each preset signal 1kHz Analog input signal 31 5 80kHz each preset signal 1kHz Vertical scan frequency Digital input signal 59 61Hz each preset signal 1Hz VGA TEXT 69 71Hz 49 51Hz is also available 720p 1080p Analog input signal 55 76Hz each pre...

Page 10: ...hone jack USB devices Keyboard Also available to connect a printer or a scanner etc Attention Use a PC OS applicable to USB devices Applicable OS Windows 2000 XP Vista Mac OS 8 5 1 or later Mouse PC Enables you to use as a monitor by connecting to a Windows PC or a Macintosh Attention The USB setting is required to change depending on a PC used page 15 HD2441W AV equipment HDMI connector DVD playe...

Page 11: ...d Orange Power saving Off Power off ScreenManager is an EIZO s nickname of the Setting menu In this manual the setting adjustment item names in the Setting menu are put in angle brackets ex Color NOTE As well as touching if you touch the or slide bar the monitor turns on While the screen is displayed the power indicator that is lighting blue can be turned off see Power Indicator EIZO Logo Display ...

Page 12: ...l from PC PC 2 Input Page 16 Setting Adjusting the Monitor Color Adjustment Simple Adjustment Color menu To select the color mode Color Mode Color Adjustment Advanced Adjustment Brightness Black Lebel Contrast Saturation Hue Temperature OutlineEnhancer ContrastEnhancer Gain Gamma Noise Filter I P Conversion can be set for each mode Settable functions vary with the display mode Resumption of Defaul...

Page 13: ...aspect information of the input signal Auto Screen Size see page 27 Color Space Setting To set when the image color is not displayed correctly Color Space see page 35 Field Rate Setting To select the setting according to the area where the monitor is used Field Rate see page 35 Changing the USB Setting USB menu To change the setting according to the PC used when USB is connected USB Page 15 Screen...

Page 14: ...decrease speed of the adjustment value may change depending on the tracing speed of the slide bar At fine adjustment Tapping once changes the adjustment value to one step up or down Touching the slide bar continuously may change the value serially Fixing an item Deciding the setting and adjusting value Power Off Touch Power On Touch any of the keys to turn on the monitor Touch Touch Tap the slide b...

Page 15: ...g menu Displaying the Setting menu and selecting function 1 Touch on the operation panel The Main menu appears 2 Trace the slide bar left and right to select the function and tap the slide bar The Sub menu appears 3 Trace the slide bar left and right to select the function and tap the slide bar The setting adjustment menu appears 4 Trace the slide bar left and right to set adjust the monitor and t...

Page 16: ...the settings adjustments status except for Field Rate USB and Volume to the default settings factory settings Procedure 1 Choose the Reset icon in the Setting menu and tap the slide bar All settings except for the field rate and USB are reset appears on the screen 2 Trace the slide bar left and right to select Reset and tap the slide bar The reset operation is completed 2 4 Locking Switches To loc...

Page 17: ...e sent from the equipment or tap the slide bar The desired image appears When connecting a PC with USB connection USB Switch the USB setting according to the input signal of the PC used Settings Using status PC 1 Digital signal When using PC 1 PC 2 Analog signal When using PC 2 Procedure 1 Choose the USB icon in the Setting menu and tap the slide bar The USB menu appears 2 Trace the slide bar left...

Page 18: ...when the settings of the PC in use are updated The Auto Screen Adjust function works in the following cases When a signal is input into the monitor for the first time When a signal is input into the monitor for the first time after the resolution or refresh rate of input signals is changed Adjustment Procedures 1 Choose the Screen icon in the Setting menu and tap the slide bar The Screen menu appe...

Page 19: ... left and right to remove the flickering or blurring and tap the slide bar The adjustment is completed NOTE Trace the slide bar slowly to adjust since the adjustment point is easily missed When blurring flickering or bars appear on the screen after adjustment proceed to Phase to remove flickering or blurring Attention The flickering or blurring may not be eliminated perfectly depending on your PC ...

Page 20: ...Position Ver Position menu appears 2 Trace the slide bar left and right to adjust so that the whole display area drawn by the dotted line frame appears on the screen Then tap the slide bar The adjustment is completed 6 Adjust the signal output range To adjust color gradation automatically Auto Range Adjust Every color gradation 0 to 255 can be displayed by adjusting the signal output level 1 Choos...

Page 21: ...ed at that time is displayed VIDEO Input Signal An appropriate display mode is selectable out of four modes Modes Status Standard Standard video display Soft Suitable for cinema effect etc Dynamic Suitable for a clearly outlined image Custom VIDEOx Available for making desired settings The input signal selected at that time is displayed Procedure 1 Choose the Color icon in the Setting menu and tap...

Page 22: ...astEnhancer Gamma Noise Filter I P Conversion Reset The input signal selected at that time is displayed Attention Perform Auto Range Adjust before starting color adjustment for analog input signals sent from a PC Refer to To adjust color gradation automatically on page 18 Wait 30 minutes or more from monitor power on before starting the color adjustment Choose Reset in the Color menu to revert to ...

Page 23: ... only as reference OutlineEnhancer This emphasizes the outline of images by shading 5 to 5 ContrastEnhancer This can change the feeling of contrast in the image Enable Disable Gain To adjust red green and blue to a desired color tone respectively 0 to 100 Adjust the respective brightness of red green blue to make a desired color tone Display an image with white or gray background for adjustment Ga...

Page 24: ...ues and tap the slide bar The adjustment settings are completed To adjust the brightness automatically Auto Brightness The screen brightness is automatically adjusted corresponding to both the brightness of the image and the environmental brightness detected by the sensor at the lower side of the monitor Procedure 1 Choose the Monitor Settings icon in the Setting menu and tap the slide bar 2 Choos...

Page 25: ...o adjust the sound strengths weaknesses in the high sound area 15 to 15 Bass To adjust the sound strengths weaknesses in the low sound area 15 to 15 Balance To adjust the volume balance on left and right sides 32 to 32 Sound Level To adjust the input sound level 3 to 3 Procedure 1 Choose the Sound icon in the Setting menu and tap the slide bar 2 Choose the desired function to adjust in the Sound m...

Page 26: ...se the PinP icon in the PinP Settings menu and tap the slide bar The PinP menu appears 3 Trace the slide bar left and right to select Off and tap the slide bar The PinP display mode is canceled NOTE When the PinP is set to On the monitor displays the images for the PC input signal currently selected and the VIDEO input signal previously selected in dual screen In PinP display mode both sounds for ...

Page 27: ...C 2 PC 1 VIDEO 1 VIDEO 1 VIDEO 1 VIDEO 2 To hide the Sub Window display with its sound being heard Sub Window Off In PinP display mode this function allows you to hide the Sub Window display with its sound heard If you want to show the PC screen display temporarily this function is available Procedure 1 Touch The Input Selection menu appears 2 Trace the slide bar left and right to select Sub Windo...

Page 28: ...slide bar left and right to select either 0 1 2 and 3 and tap the slide bar The translucent setting is completed To select the Sub Window display size Sub Window Size The Sub Window display size is automatically changed according to the aspect information from the input signal of an AV equipment Auto Screen Size However the Sub Window display size may be changed manually in the Sub Window Size men...

Page 29: ...ted VIDEO Input Signal The screen display size is automatically changed according to the aspect information from the input signal of an AV equipment Auto Screen Size However the screen size may be changed manually in the Screen Size menu Settings Status 4 3 Displays the image in 4 3 size The borders are shown on both sides of the screen 16 9 sized images from the input signal are compressed horizo...

Page 30: ...ws a 4 3 screen display keeping the vertical and horizontal ratio of 16 9 Procedure 1 Choose the Screen Size icon in the Setting menu and tap the slide bar The Screen Size menu appears 2 Trace the slide bar left and right to select either 4 3 Letterbox 16 9 or 16 9 Full and tap the slide bar The screen size setting is completed NOTE Select 16 9 when the noise appears around the peripheral portions...

Page 31: ...tected in no signal status the monitor resumes to display the projected image with the current input signal selected Disable After 45 seconds with no input signal status the monitor enters power off status Procedure 1 Choose the Monitor Settings icon in the Setting menu and tap the slide bar 2 Choose the Signal Detection icon in the Monitor Settings menu and tap the slide bar The Signal Detection ...

Page 32: ...approx three seconds The EIZO logo does not appear on the screen Resetting 1 Touch to turn off the monitor 2 Touch for approx three seconds The logo appears again 3 10 Beeper Setting To set the beeper Beep Set the beeper on off for operation tone of the switches connection error etc Sound type Status Short beep Sounds whenever a basic switch operation is performed Long beep Sounds when On or Off i...

Page 33: ...pears 2 Tap the slide bar to check the settings etc 3 12 Language Setting to be displayed To set the language displayed in the menu Language This function enables you to select the Setting menu language Selectable languages English German French Spanish Italian Swedish Japanese Simplified Chinese Traditional Chinese Procedure 1 Choose the Monitor Settings icon in the Setting menu and tap the slide...

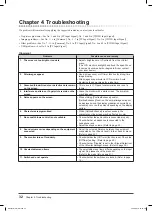
Page 34: ...white screen The symptom may disappear 5 Noise appears on the screen When utilizing ContrastEnhancer and or OutlineEnhancer function the normal images may not be displayed since the display gradation abnormality or noise may occur on the screen depending on the display pattern 6 Characters are pigmentized When OutlineEnhancer is set excessively the characters on the screen may be affected by color...

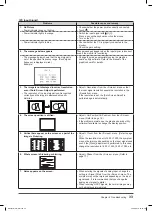
Page 35: ...n menu so that the input signal resolution equals the resolution in the Resolution menu If the resolution is set the Auto Screen Adjust is performed again automatically 4 The screen position is shifted Adjust Hor Position Ver Position from the Screen menu Refer to page 18 If the problem persists use the graphics board s utility software if available to change the display position 5 Vertical bars a...

Page 36: ...eral devices work correctly by changing the USB port contact your local dealer Refer to the manual of the PC for details Please perform the following to check the status Reboot the PC Connect the PC and peripheral devices directly If the PC or peripheral devices work correctly without connecting via the monitor working as a USB hub please contact your local dealer Check whether the PC and OS are U...

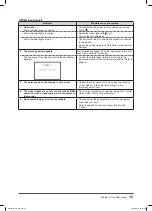
Page 37: ...s outside the specification Example Confirm the digital signal format by referring to the instruction manual of the equipment connected Refer to page 39 3 The color shown on the display is not correct Change the color space of the video input signal using Color Space in the Monitor Settings menu Normally select Auto 4 The video images are out of control by the FF REW operation when a video equipme...

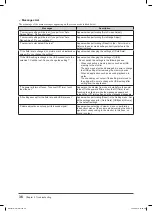
Page 38: ...e such as a USB memory to the monitor The data may be lost and damaged Be sure to change the USB setting after removing the memory device When an application such as a sound playback etc works The sound may not output if the setting is returned to the original Be sure to change the USB setting after exiting from the application The power will turn off soon To cancel Off Timer touch the slide bar A...

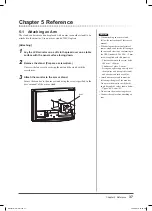
Page 39: ... stand Arm Attention When attaching an arm or stand follow the instructions of their user s manual When using another manufacturer s arm or stand confirm the following in advance and select one conforming to the VESA standard Use M4 12 mm screws supplied with this monitor Clearance between the screw holes 100 mm 100 mm Thickness of plate 2 6 mm Strong enough to support weight of the monitor unit e...

Page 40: ...itor periodically to keep the monitor clean and extend its life Cabinet Clean the cabinet with a soft cloth dampened with a little mild detergent LCD Panel Clean the LCD panel with a soft cloth such as cotton cloth or lens cleaning paper Remove persistent stains gently with a cloth dampened with a little water and then clean the LCD panel again with a dry cloth for better finishing HD2441W_UM_EN i...

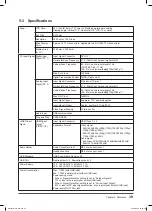
Page 41: ...put Signal Video Analog positive 0 7Vp p 75Ω Video Signal Memory 50 preset 34 Audio Input USB communication Plug and Play VESA DDC2B VIDEO Input Signal HDMI Input Signal 2 VIDEO 1 2 Input Signal Connector HDMI Type A 2 Applicable Format Video signal 525i 480i 525p 480p 1125i 1080i 750p 720p 1125p 1080p 60Hz 625i 576i 625p 576p 1125i 1080i 750p 720p 1125p 1080p 50Hz Audio signal 2ch linear PCM 32kH...

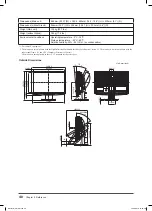
Page 42: ...The monitor is in compliance with the HighDefinition Multimedia Interface Specification Version 1 2 The monitor is not in compliance with the input signal from a PC and CEC Consumer Electronics Control The monitor is not applicable to the xvYCC standard for the color space Outside Dimensions 566 22 3 372 14 6 293 5 11 6 11 1 0 44 363 5 14 3 365 6 14 4 60 60 5 2 38 23 5 0 93 522 20 6 24 0 94 520 4 ...

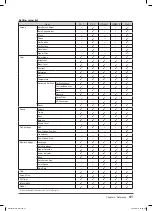
Page 43: ...lineEnhancer ContrastEnhancer Gain Gamma Noise Filter I P Conversion Reset Sound Volume Treble Bass Balance Sound Level PinP Settings PinP Sub Window Position Translucent Sub Window Size Monitor Settings Language Auto Brightness Signal Detection Power Indicator Beep Auto Screen Size Color Space Field Rate USB Screen Size Off Timer Information Reset When the Main Window uses PC 2 at PinP display HD...

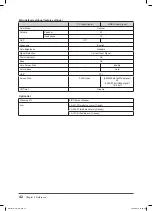
Page 44: ... Input Signal Power Indicator On Beep On Auto Screen Size Enable Color Space Auto USB PC 1 Screen Size Full Screen 480i 480p 576i 576p signal 4 3 1080i 720p 1080p signal 16 9 Full Off Timer Disable Option list Cleaning Kit EIZO ScreenCleaner Arm LA 011 W wall mount arm 1 axis LA 030 W wall mount arm 3 axes LA 131 D flexible arm 3 axes HD2441W_UM_EN indd 42 HD2441W_UM_EN indd 42 4 14 2007 6 22 05 P...

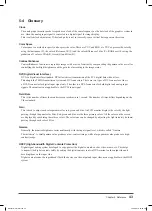
Page 45: ... for both digital and analog input signals The monitor is not applicable to the DVI I input signal Field Rate This is the number of times the monitor screen is redrawn in 1 second The number of times differs depending on the Video standard Gain This is used to adjust each color parameter for red green and blue An LCD monitor displays the color by the light passing through the panel color filter Re...

Page 46: ...ling timing to convert the analog input signal to a digital signal Phase adjustment is made to adjust the timing It is recommended that phase adjustment be made after the clock is adjusted correctly Range Adjustment Range adjustment controls the signal output levels to display every color gradation It is recommended that range adjustment be made before color adjustment Resolution The LCD panel con...

Page 47: ...0 00 Positive VESA 1024 768 60Hz 65 0 MHz Horizontal 48 36 Negative Vertical 60 00 Negative VESA 1024 768 70Hz 75 0 MHz Horizontal 56 48 Negative Vertical 70 07 Negative VESA 1024 768 75Hz 78 8 MHz Horizontal 60 02 Positive Vertical 75 03 Positive VESA 1152 864 75Hz 108 0 MHz Horizontal 67 50 Positive Vertical 75 00 Positive VESA CVT 1280 768 79 5 MHz Horizontal 47 78 Negative Vertical 59 87 Posit...

Page 48: ...t Mode Dot clock Frequency Polarity Horizontal kHz Vertical Hz 720 50Hz 1280 720p 74 3 MHz Horizontal 37 50 Positive Vertical 50 00 Positive 720 60Hz 1280 720p 74 3 MHz Horizontal 45 00 Positive Vertical 59 94 Positive 1080 50Hz 1920 1080p 148 5 MHz Horizontal 56 25 Positive Vertical 50 00 Positive 1080 60Hz 1920 1080p 148 5 MHz Horizontal 67 50 Positive Vertical 59 94 Positive HD2441W_UM_EN indd ...

Page 49: ...r the user and environment Electrical safety Emissions Electromagnetic fields Noise emissions Ecology The products must be prepared for recycling and the manufacturer must have a certified environmental management system such as EMAS or ISO 14000 Restrictions on chlorinated and brominated flame retardants and polymers heavy metals such as cadmium mercury and lead The requirements includes in this ...

Page 50: ...hat interference will not occur in a particular installation If this equipment does cause harmful interference to radio or television reception which can be determined by turning the equipment off and on the user is encouraged to try to correct the interference by one or more of the following measures Reorient or relocate the receiving antenna Increase the separation between the equipment and rece...

Page 51: ...it zur Drehung des Bildschirmgerätes besitzen max 180 Der maximale Kraftaufwand dafür muß weniger als 100 N betragen f Der Standfuß muß in der Stellung verharren in die er manuell bewegt wurde g Der Glanzgrad des Standfusses muß weniger als 20 Glanzeinheiten betragen seidenmatt h Der Standfuß mit Bildschirmgerät muß bei einer Neigung von bis zu 10 aus der normalen aufrechten Position kippsicher se...

Page 52: ...HD2441W_UM_EN indd 50 HD2441W_UM_EN indd 50 4 14 2007 6 22 07 PM 4 14 2007 6 22 07 PM ...

Reviews: