background image

USER GUIDE

EK-Quantum 

Vector Strix RTX 3080/3080Ti/3090 Active Backplate

Summary of Contents for Vector Strix RTX 3080 Backplate

Page 1: ...USER GUIDE EK Quantum Vector Strix RTX 3080 3080Ti 3090 Active Backplate ...

Page 2: ... any possible damage to your GPU or its circuit board PCB EK Fittings require only a small amount of force to screw them firmly in place since the liquid seal is ensured with the rubber O ring gaskets The use of quality market proven corrosion inhibiting coolants is always strongly recommended for any liquid cooling system Do not use pure distilled water as a cooling liquid For best results EK rec...

Page 3: ...S AND MAIN PARTS 6 INSTALLING THE ACTIVE BACKPLATE 7 PREPARING THE GRAPHICS CARD 7 CUTTING AND PLACING THERMAL PADS 9 REMOVING THE TERMINAL METAL PLATE 12 ATTACHING THE ACTIVE BACKPLATE 12 INSTALLING FITTINGS AND TUBING 14 CONNECTING THE D RGB LED STRIP 14 TESTING THE LOOP 15 SUPPORT AND SERVICE 16 SOCIAL MEDIA 16 ...

Page 4: ...m 24 mm BOX CONTENTS Allen Key 2 5 mm 1 pc EK Quantum Vector Strix RTX 3080 3080Ti 3090 Active Backplate Thermal PAD F 1 0 mm 120x16mm 3 pcs ThermalPadG1 5mm 120x24mm 1pc Thermal PAD F 2 0 mm 120x16mm 5 pcs Universal Mounting Mechanism You may not need all the screws mounting mechanism is universal ...

Page 5: ... 5 ACTIVE BACKPLATE DIMENSIONS 281 mm 129 mm 165 mm 194 mm 142 mm 154 mm 6 20 mm 33 30 mm Phillips Head Screwdriver Scissors REQUIRED TOOLS ...

Page 6: ...GB Cable Length 500 mm D RGB LED Count 9 Plexi Version D RGB Connector Standard 3 Pin 5V Data Blocked Ground AB TERMINAL TOP PLATE PLEXI ACETAL ALU BACKPLATE COLDPLATE NICKEL EK BADGE D RGBLEDSTRIP OPTIONAL M2 5x6AX1SCREW TERMINAL METAL PLATE M4x27DIN7984SCREW TERMINALO RING15x1mm M4x8DIN7984SCREW ACETAL STANDOUT MAIN O RING 142 x 2 mm ...

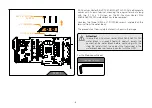
Page 7: ...he installation of your EK Quantum Vector Strix RTX 3080 3080Ti 3090 water block according to its installation manual In case the water block is already installed remove the six 6 AX1 screws and their PVC washers as shown in the image Phillips Head Screwdriver For this Step you will need ...

Page 8: ...and detach the terminal from the water block The procedure of terminal detachment is shown in the image Attention In case the EK Quantum Vector Strix 3080 3080Ti 3090 water block is already filled with coolant empty the content of the water block before continuing with this step Be careful that the coolant that remained in the water block does not come in contact with the GPU M4 x 27 DIN7984 SCREW...

Page 9: ...6996787 Thermal PAD F 2 0 mm 120 x 16 mm EAN 3830046996756 EK only guarantees compatibility with included EK brand thermal pads Installation process cooling performance and block contacts are tested exclusively with EK brand thermal pads Listed thermal pad thicknesses apply only to thermal pads included in the package EK does not guarantee compatibility with aftermarket alternatives for thermal in...

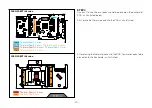
Page 10: ...ion Thermal Pad F 1 mm Thermal Pad F 1 mm Thermal Pad F 2 0 mm Thermal Pad G 1 5 mm Thermal Pad F 1 mm Thermal Pad F 2 0 mm F1 F1 F2 F1 F2 F1 F2 F1 F1 F1 F2 G1 5 F1 G1 5 F1 F2 F2 After placing the thermal pads on to the PCB few more needs to be placed on to the Backplate as illustrated 3080 3080Ti Version STEP 3 Thermal Pad G 1 5 mm Thermal Pad F 2 mm G1 5 G1 5 G 1 5 F2 F2 F2 ...

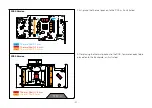
Page 11: ... Thermal Pad G 1 5 mm Thermal Pad F 2 0 mm F1 G1 5 F1 F1 F2 F2 F2 F2 F2 F2 F2 F2 F2 F2 F2 G1 5 G1 5 G1 5 After placing the thermal pads on to the PCB few more needs to be placed on to the Backplate as illustrated 3090 Version STEP 3 Thermal Pad G 1 5 mm Thermal Pad F 2 mm G1 5 G1 5 G 1 5 F2 F2 F2 ...

Page 12: ...metal plate has to be removed Unscrew the three 3 M4 x 27 DIN7984 screws with the provided 2 5 mm Allen Key shown on the picture Keep the screws as they will be needed in the upcoming step unlike the metal plate which will not be needed anymore STEP 4 M4 x 27 7984DIN SCREW TERMINAL METAL PLATE Allen Key 2 5 mm For this Step you will need A STEP 5 ATTACHING THE ACTIVE BACKPLATE First make sure the ...

Page 13: ...hermal pads near the terminal must be compressed This can be achieved by squeezing the block and active backplate together This will not damage the PCB as the mounted standoffs prevent contact at critical locations This is the only way to guarantee the promised performance of the components Then position the three 3 M4 x 27 7984DIN screws that were detached from theGPUwaterblockterminalintoeachoft...

Page 14: ...et outlet EK recommends using EK fittings with all EK water blocks CAUTION When using connectors other than EK fittings pay special attention to the length of the fittings male G1 4 thread 5 mm is the maximum G1 4 thread length allowed CONNECTING THE D RGB LED STRIP STEP 1 Plug the 4 pin D RGB connector from the GPU water block to the D RGB Header on your motherboard or controller The LED strip wi...

Page 15: ... with coolant connect the pump to a PSU outside your system Do not connect power to any of the other components Turn on the PSU and let the pump run continuously Inspect all parts of the loop and in case the coolant leaks fix the issue and repeat the testing process To prevent possible damage please ensure that all hardware is dry before the system is powered on ...

Page 16: ...ed assistance please contact https www ekwb com customer support EKWB d o o Pod lipami 18 1218 Komenda Slovenia EU EKWaterBlocks EKWaterBlocks ekwaterblocks ekwaterblocks EKWBofficial SUPPORT AND SERVICE SOCIAL MEDIA ...

Reviews: