background image

HIGH VOLTAGE POWER SUPPLY HVS-100 

EKSMA OPTICS 

• 

Tel.: +370 5 272 99 00 

• 

Fax: +370 5 272 92 99 

• 

info@eksmaoptics.com 

• 

www.eksmaoptics.com 


   QUICK START GUIDE 


2.1.


INSTALLATION AND CONNECTING 


Ground the HV supply. 


Connect the device to the AC power source. 


Connect the load. 


2.2.


OPERATION 

2.2.1


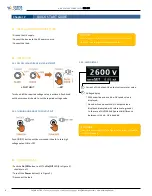
PRECISE HIGH VOLTAGE (HV) ADJUSTMENT


2.2.3. OLED DISPLAY


Turn knob till the required voltage value is achieved. Push knob 

until buzzer sound is heard to set the required voltage value. 


2.2.2. TURNING ON AND OFF OF HV OUTPUT


Push ON/OFF button until buzzer sound is heard to turn high 

voltage output ON or OFF. 

1


Current of HV output: HV output current meter value. 

2


Voltage display: 


With underline and overline: HV tuned value is 

displayed; 


No underline and overline: HV output value is 

displayed (measured with reference to ground). 
In the case of HVS100-2x60 potential difference 
bHV and - HV is doubled. 


2.3.


DISCONNECTING 


Push the 

On/Off 

button to off. The 

On/Off 

LED 

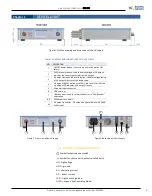
(4 in Figure 2) 

should turn off. 


Turn off the 

Power 

button 

(1 in Figure 2)


Disconnect the load. 

ATTENTION


Take care not to apply HV of a higher value than your load is 
certified to handle. 

ATTENTION 
For safety reasons, do not connect/disconnect the load 
when the supply is powered and switched on. 

ADJUSTMENT 

SET 

  Chapter 2 

Summary of Contents for HVS-100

Page 1: ...HVS 100 HighVoltage Power Supply Technical Description 2022 Lithuania ...

Page 2: ... HV Output 4 2 2 3 OledDisplay 4 2 3 DISCONNECTING 4 Chapter 3 SPECIFICATIONS 5 3 1 GENERAL INFORMATION 5 3 1 1 Model 5 3 1 2 MainComponents 5 3 2 TECHNICAL SPECIFICATIONS 5 Chapter 4 WARRANTY 6 4 1 WARRANTY STATEMENT 6 4 2 SAFETY 6 4 3 SERVICE CONTACT INFORMATION 6 LIST OF FIGURES Figure 1 OUTLINE DRAWING AND DIMENSIONS OF THE HV SUPPLY 3 Figure 2 FRONT VIEW OF THE HV SUPPLY 3 Figure 3 BACK VIEW ...

Page 3: ...oltage tuning of HV output Press to set the tuned value 4 HV output ON OFF button with LED Used to turn ON OFF the HV output LED indicates if HV output is active 5 AC power input connector 6 GND terminal 7 USB connector Used to control the device via CAN Browser application 8 9 24V output connectors 10 HV output connector HV output is only available for HVS100 2x60 model Figure 2 Front view of the...

Page 4: ...zer sound is heard to turn high voltage output ON or OFF 1 Current of HV output HV output current meter value 2 Voltagedisplay With underline and overline HV tuned value is displayed No underline and overline HV output value is displayed measured with reference to ground In the case of HVS100 2x60 potential difference between HV and HV is doubled 2 3 DISCONNECTING Push the On Off button to off The...

Page 5: ...ATIONS MODEL HVS100 2X60 HVS100 120 HVS100 5 HVS100 40 HVS100 80 HVS100 150 Maximal high voltage output options 1 4kV 2 5kV 1 8kV 2 6kV 3 1kV 3 6kV 1 8kV 2 8kV 4 0kV 4 4kV 5 0kV 1 3kV 1 8kV 2 5kV 3 6kV 4 0kV 1 8kV 2 6kV 3 1kV 3 6kV 4 0kV 4 4kV 1 8kV 2 6kV 3 1kV 3 6kV 4 0kV 4 4kV Maximal output power at maximal output voltage 2 60 W 120 W 5 W 40 W 80 W 150 W Voltage control limits 40 Umax to Umax R...

Page 6: ... of its high voltage points Make sure that instruments are properly grounded Before supplying the power to the instrument make sure that the correct voltage of the AC power source is used After the power off please wait few seconds before making any connections in order for capacitors to discharge The units may only be operated in a clean dry environment Please make sure that no objects or liquids...

Reviews: