w w w . e k t
2
. c o m
Electronics
Katrangi
Trading
Car battery charger ULG 3.8 A1
Q
Introduction
Please carefully read these operating
instructions and fold out the page with
the illustrations. Keep these operating
instructions in a safe place and hand them over to
anyone to whom you pass on the appliance.
Q
Proper Use
The UlTIMATE SPEED UlG 3.8 A1 is a battery
charger with a pulse trickle charge mode and is
suitable for charging and maintenance charging of
the following 6 V or 12 V lead rechargeable batter-
ies with wet cell or gel electrolyte:
• 6 V: with a capacity of 1.2 Ah to 14 Ah
• 12 V: with a capacity of 1.2 Ah to 14 Ah
• 12 V: with a capacity of 14 Ah to 120 Ah
You can also used it to regenerate completely dis-
charged batteries. The battery charger has protective
circuits to prevent sparking and overheating. Any in-
correct or improper use leads to loss of the warranty.
The manufacturer takes no responsibility for damage(s)
arising out of usage that is contrary to the instructions
laid down. The appliance is not meant for commer-
cial use.
Q
Delivery Contents
Check the appliance and all accessories for damage
immediately after unpacking. Do not put a defective
appliance or parts into operation.
1 Charger
UlTIMATE SPEED UlG 3.8 A1
2 Quick / contact clamps (1 red, 1 black)
1 Operating manual
Q
Component description
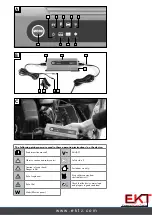
see Fig. A:
1
lED display (standby)
2
„6 V“ lED display „Mode 1“
3
lED display „Mode 2“
4
lED display „Mode 3“
5
lED display „Mode 4“
6
lED display „incorrect polarity / fault“
7
lED display „fully charged“
8
lED display „Charging process active“
9
Q
Selection button „MODE“
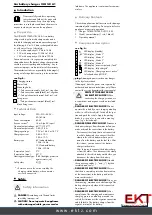
see Fig. B:
10
Charging station
11
Mains lead
12
Mounting holes
13
„+“-Pole connection cable (red), incl. ring shoe
14
„–“-Pole connection cable (black), incl. ring shoe
15
„+“-Pole quick-contact terminal (red), incl. red
fixing screw
16
„–“-Pole quick-contact terminal (black), incl.
black fixing screw
Q
Technical Data
Input voltage:
220–230–240 V ~
50 / 60 Hz
Power consumption:
60 W
Reverse current*:
< 5 mA (no AC input)
Nominal output voltage: 6 V
/ 12 V
Nominal output current: 0.8 A / 3.8 A
Charging voltage:
7.3 V or 14.4 V or 14.7 V
Charging current:
0.8 A ± 10 %
3.8 A ± 10 %
Battery type:
6 V lead-acid battery
1.2 Ah–14 Ah
12 V lead-acid battery
1.2 Ah–120 Ah
Temperature (min.):
0°C
Temperature (max.):
40°C
Housing protection type: IP 65 (dust-tight, protected
against water jets)
Safety class:
II /
* = Return current is the current used by the
charging station battery, when no mains
current is connected.
Q
Safety
Safety information
DAnGer!
Avoid danger to life and limbs
caused by improper use!
CAUTIOn! Do not operate the appliance
with a damaged cable, power cord or
plug.
A damaged power cord causes danger
to life by electric shock.
If damaged, have the power cord repaired by
authorised and trained technicians only! Please
contact the service department for your country!
PrOTeCT yOUrSeLF FrOM
An eLeCTrIC ShOCk!
When
connecting the charging station, use
a screwdriver and a spanner with an insulated
handle!
DAnGer OF eLeCTrIC ShOCk!
Do not
operate the vehicle if you are charging a battery
while it is still in the vehicle! Switch off the igni-
tion and park the vehicle. Apply the parking
brake (e.g. in cars) or secure with a mooring
rope (e.g. electric boat)!
DAnGer OF eLeCTrIC ShOCk!
Disconnect
the battery charger from the mains before you
make or break the connections to the battery.
- First connect the clamp that is not connected
to vehicle bodywork, then connect the other
clamp to the vehicle bodywork at a point
away from the battery and the fuel line. After
this is done, you can connect the battery
charger to the mains.
- After charging, disconnect the battery charg-
er from the mains. Then disconnect the clamp
attached to the vehicle bodywork before you
disconnect the clamp from the battery.
DAnGer OF eLeCTrIC ShOCk!
Handle
the connecting cables („–“ and „+“) by their
insulated areas only!
DAnGer OF eLeCTrIC ShOCk!
Ensure
that there is complete protection from moisture
at the connections to the battery and at the
mains outlet socket!
DAnGer OF eLeCTrIC ShOCk!
Carry out
the mounting, maintenance and cleaning of the
battery charger only when it is disconnected
from mains!
DAnGer OF eLeCTrIC ShOCk!
After
completion of the charging and maintenance
charging process on a battery mounted in a
vehicle, first disconnect the negative connection
cable (black) of the battery charger from the
negative terminal of the battery.


