background image

- 4 -

EK-PLUG G1/4 (2x) 

3830046999153

Allen Key 2.5mm (1x) 8902

Allen Key 2mm (1x) 8901

120 mm

24

 mm

BOX CONTENTS

Nut M2.5 (6x) 8506

Screw M2.5x4 ax1 (16x) 

9047

EK-Loop Multi Allen Key (1x) 

3830046996213

Screw M2.5x8 ax1 (10x) 8104A

Screw M3x6 DIN 7991 (2x) 9029

Thermal PAD F 1.0mm - (120x16mm) 

(3x) 3830046996732

Screw M3x4 DIN7985 (2x) 

8123

EK-TIM Ectotherm (1g) (1x) 

3830046998446

Screw M2.5x10 ax1 

(13x) 104344

Screw UNC 6/32x5 (1x) 8483

EK-Pro GPU WB RTX A6000 Ni +Inox

3831109847930

Washer POLYAMID M2.5 0.7mm 

with self-adhesive tape (2x) 8627

Thermal PAD G 1.0mm - (120x24mm) 

(3x) 3830046996770

120 mm

16 mm

Washer POLYAMID M2.5 0.5mm 

(16x) 8623

Screw M2.5x6 ax1 (13x) 

9058

Summary of Contents for EK-PRO GPU RTX A6000

Page 1: ...USER GUIDE GPU WATER BLOCK EK PRO GPU WB RTX A6000...

Page 2: ...B EK Fittings require only a small amount of force to screw them firmly in place since the liquid seal is ensured with the rubber O ring gaskets The use of quality market proven corrosion inhibiting c...

Page 3: ...STOCK COOLER 7 CLEANING THE PCB 7 CUTTING AND PLACING THERMAL PADS 8 APPLYING THERMAL COMPOUND 8 INSTALLING THE WATER BLOCK 9 PLACING THE BLOCK ON THE GRAPHICS CARD 9 ATTACHING THE BACKPLATE 12 CHECKI...

Page 4: ...crew M3x6 DIN 7991 2x 9029 Thermal PAD F 1 0mm 120x16mm 3x 3830046996732 Screw M3x4 DIN7985 2x 8123 EK TIM Ectotherm 1g 1x 3830046998446 Screw M2 5x10 ax1 13x 104344 Screw UNC 6 32x5 1x 8483 EK Pro GP...

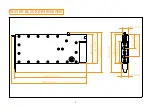
Page 5: ...5 WATER BLOCK DIMENSIONS 96 9 mm 104 2 mm 134 2 mm 241 4 mm 252 8 mm 23 6 mm 134 2 mm 96 9 mm 70 mm 46 4 mm 75 4 mm 19 3 mm...

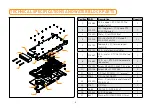
Page 6: ...terminal direct 2x G1 4 1 6 103713 054 metal power adapter 1 7 103687 054 metal RTX A6000 Pro top inox 1 8 103689 054 alu RTX A6000 backplate black elox 1 9 103090 Screw M3x6 ISO 14581 TX inox 21 10...

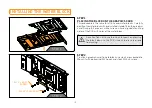
Page 7: ...ng steps in order to install the EK Pro GPU RTX A6000 water block onto the graphics card STEP 2 CLEANING THE PCB Wipe off the remains of the original thermal compound using a nonabrasive cloth or Q ti...

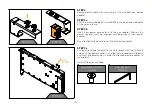
Page 8: ...of thermal pads to complete this Step You must remove the protective foil from both sides of the thermal pad before installation Thermal Pad F 1 0 mm Thermal Grease Apply the enclosed EK TIM Ectotherm...

Page 9: ...hics card During this process make sure you have aligned mounting holes of the PCB with holes of the water block Pay attention not to use too much force when pressing the block down to the PCB since c...

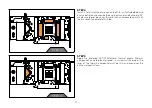
Page 10: ...Pads on the power adapter must be alligned with openings in inox power adapter Pay attention to the orietation of the latch on connector For this Step you will need M3x6 SCREW Screw M3x6 DIN 7991 2x...

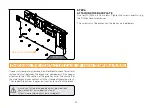
Page 11: ...ic card and backplate EK made sure to provide you with more than an adequate quantity of thermal pads to complete this Step STEP 5 Apply the enclosed EK TIM Ectotherm thermal grease thermal compound o...

Page 12: ...block makes contact with the intended integrated circuit Then repeat Steps from the previous section to re attach the block In case you fail to obtain good contact please check again or contact our s...

Page 13: ...he water block assembly that might damage your card or water block To ensure the installation of EK components was successful we recommend you perform a 24 hour leak test When your loop is complete an...

Page 14: ...e with TECHNICAL SPECIFICATIONS AND WATER BLOCK PARTS where you can find the EAN number of each part you might need Include the EAN number with quantity in your request Mounting Mechanism EAN can be f...

Reviews:

Related manuals for EK-PRO GPU RTX A6000