www.Deuba24online.de
www.Deuba24online.de
Cautious with gas
• Procedure for smell of gas:
If you smell gas, immediately close the gas sup-
ply, extinguish all flames and open the lid of the
appliance. If the smell lasts, call your gas supplier.
• Never smoke near a gas appliance in use or
near a gas cylinder.
• Do not store or use gas or other inflammable
vapors or liquids in the vicinity of the gas grill or
similar source of heat or source of ignition.
• A gas cylinder not connected for use must not
be stored near the gas grill or similar source of
heat or source of ignition.
• Always turn off the gas supply at the gas cylin
-
der after use.
• Never store your spare gas cylinder near a gas
appliance in use.
• Never store your gas cylinder or spare cylinder
in the cabinet of your appliance.
• Always store gas cylinders outdoors, in a
well-ventilated area. Make sure they are not ex
-
posed to excessive heat or direct sunlight.
Gas and Regulator
Make sure that the gas grill, the gas hose and the
pressure regulator are permitted in your country.
Propane or butane can be used as LP-Gas for
this gas grill. Propane cylinders will supply gas
all around the year, even on cold winter days.
Depending on the type of pressure regulator you
use, you need a cross-slotted screwdriver and/
or an adjustable spanner. You must use a proper
regulator and a matching gas cylinder so that the
gas grill can be used and will void the warranty.
Please contact your local gas dealer for the right
gas cylinder.
• Never connect the cylinder directly to the ap-
pliance. Always mount a pressure regulator on
the cylinder first.
• Never modify pre-assembled or sealed parts of
the cylinder, the hose or the pressure regulator.
• Keep the hose as short as possible (1,5 m max-
imum) to prevent it from dragging on the ground.
• Never distort or twist the hose. Do not pull or
pierce the hose. Keep the hose away from any
parts of the barbecue that get hot. Check that
the flexible hose stretches out normally, without
twisting or pulling.
• Do not bend the hose.
Installation
SELECTING A LOCATION
This gas grill is suitable for outdoor use only and
should be placed in a well-ventilated area. Die
Using it indoors, even in a garage or shed, can
cause carbon monoxide poisoning.
Note further:
- Place the appliance at least three meters away
from any building, in an open and well-ventilated
area.
- Make sure there is a free air flow to the burners
and the vent holes in the cabinet at all times.
WARNING!
Do not obstruct any of the ventilation openings
of the gas grill.
- Make sure the appliance is not under over
-
hanging structure (a porch, a shelter…) o runder
foliage.
- Put the appliance on a firm and stable sur-
face. Never put it on a moving vehicle (a boat, a
trailer…).
Attach the pressure regulator to
the gas cylinder
Make sure that all the control knobs of the gas
grill are at «off» position. Connect the pressure
regulator to the gas cylinder according to the
instructions of the pressure regulator and gas
cylinder.
Leak test
Warning! The leak test must be performed in a
well-ventilated area.
Warning! Never use an open flame to check for
leaks.
1. Make sure that all control knobs are at «off»
position.
2. Open the gas control valve on the cylinder or
the regulator.
3. Check for leaks by brushing a solution of 1/2
water and 1/2 soap over all joints of the gas
system, including all valve connections, hose con
-
nections and regulator connections.
4. If bubbles form over any of the joints, there
is a leak.Turn off the gas supply and retighten all
joints. Repeat the process. If bubbles form again,
do not use the gas grill. Contact a qualified spe
-
cialist.
5. The leak test should be performed regularly,
especially when the gas cylinder is removed or
replaced.
OPERATION
• Make sure that all control knobs are at «off»
position. Turn on the gas valve on the gas cylin
-
der or regulator.
• Press the ignition / control knob with the sign
«
» and turn it counterclockwise until it reaches
the position of the ignition mark «Max» and a
click is heard. Now the burner is ignited.
• If more burners to use, press the left knob or
right knob counterclockwise until the burner is
lit.
• Before you ignite the next burner, left or right,
the burner with «
» should always be ignited.
• If the burner fails to light, turn all control knobs
at the «Off» position. Please try again after 5
minutes.
• After ignition, preheat the grill with the control
knobs of the bumer set at high-flame position for
3-5minutes. This process should be carried out
before each cooking process. The cover should
be open during preheating.
• After completion of preheating, the burner
should normally be tumed down to a lower-flame
position for best cooking results.
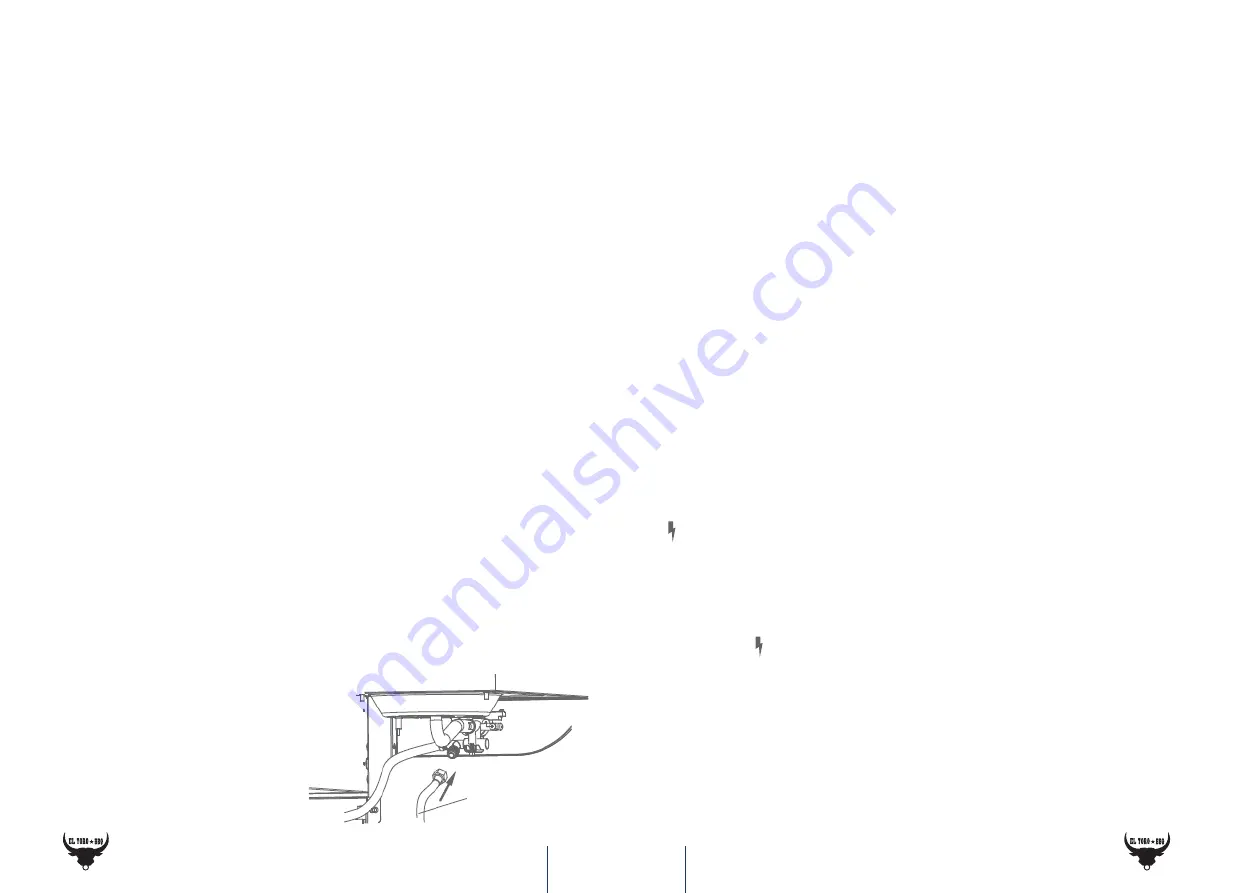
F3-1. Fixing the hose to the grill.
Gas Hose
12
13
1. Instructions for manual ignition
• Strike a match and insert it through the hole for
a match on the bottom of the grill.
• Push in and turn the rightmost control knob
counter-clockwise to the «MAX» position. The
burner should light within 5 seconds
• If the rightmost burner is lit, you light the re-
maining burners one after other from right to
left.
• If the burner does not ignite, you should con-
tact the customer service.
• After ignition, preheat the grill with the control
knobs of the burner set at high-flame position for
3-5minutes. This process should be carried out
before each cooking process. The cover should
be open during preheating.
• After completion of preheating, the burner
should normally be turned down to a lower-
flame position for best cooking results.
2. Grilling with the cover closed
A grill that is equipped with a cover allows to grill
with the cover closed and can be used as a kind
of oven for roasting food. If the cover is closed,
a high temperature can be formed in the grill.
Therefore, it is important to turn off the burner
-
,which is activiated directly under the food, and
adjust other burners to a lower-flame position, to
avoid burning the food. Avoid opening the cover
when roasting, since the heat in the grill will be
lost.
After grilling
Before switching off the grill
Whenever the grilling is complete, turn the con-
trol konbs to «Max» position and let the burner
burn for 5 minutes to burn off residue on the
grill, which can facilitate subsequent cleaning.
Note: The cover must be open during the process.
Turning off the gas drill
After finishing grilling, turn off the gas valve on
the gas cylinder.Then turn all control knobs to
«off» position.Let the gas grill cool completely
before closing the cover.
Summary of Contents for 4250525355727
Page 16: ...www Deuba24online de www Deuba24online de 30 31 4 3 2 2 6 5 A A A A...
Page 17: ...www Deuba24online de www Deuba24online de 32 33 6 8 B A A A A A A A A B 5 4 13 13 5 6 3 7 8...
Page 18: ...www Deuba24online de www Deuba24online de 34 35 14 3 4 6 5 9 4 3 14 A A A A...
Page 19: ...www Deuba24online de www Deuba24online de 36 37 5 6 9 1 11 11 A A A A...
Page 20: ...www Deuba24online de www Deuba24online de 38 39 A A 1 A A A A 1 12 11 12 10 10 9...
Page 21: ...www Deuba24online de www Deuba24online de 40 41 11 15 12...
Page 22: ...www Deuba24online de www Deuba24online de 42 43 13 19 18 17 14 20 5 3...


