6
The device operates as a transparent bridging firewall with Deep Packet Inspection
enabled on the SIP traffic. By default, the appliance has been configured with static IP of
10.0.0.1 (Net mask 255.255.255.0).
The device has been made to be fully functional with the default configuration. However
if the user needs to tune the device settings & the DPI policies, they can tune the
configuration via the Device WebUI.
The device also provides the command line interface accessible via SSH, which will
allow configuring the basic settings and viewing device status.
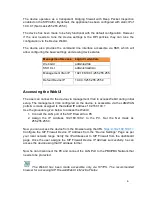
Management Access Login Credentials
Web GUI
admin/admin
SSH CLI
admin/stmadmin
Management Vlan IP
192.168.100.1/255.255.255.0
Default Device IP
10.0.0.1/255.255.255.0
Accessing the WebUI
The user can connect to the device via management Vlan to access WebUI during initial
setup. The management Vlan configured on the device, is accessible via the LAN/WAN
ports & is made assigned to the default IP address ‘192.168.100.1’
Use the procedure given below to access the WebUI,
1. Connect the LAN port of the SIP Firewall to a PC.
2. Assign the IP Address 192.168.100.2 to the PC. Set the Net mask as
255.255.255.0.
Now you can access the device from the browser using the URL
https://<192.168.100.1>
Configure the SIP Firewall Device IP Address from the “Device Settings” Page as per
your local network range. Verify the IP address set to SIP Firewall from the dashboard
page. Once the user assigns the SIP Firewall Device IP Address successfully, he can
access the device using that IP address further.
Now he can disconnect the PC and connect the LAN Port to the PBX/PBX Network that
needs to be protected.
The WebUI has been made accessible only via HTTPS. The recommended
browser for accessing SIP Firewall WebUI is Mozilla Firefox.
Summary of Contents for SIP Firewall
Page 1: ......
Page 2: ...Elastix SIP Firewall Quick Installation Guide ...


