background image


6

CLEANING   


Before cleaning the iron in any way, make sure that the appliance plug is not connected 
to the wall outlet. 


Any deposits, starch residue or size left on the plate can be removed using a damp cloth 
or an unabrasive liquid detergent. 


Avoid scratching the plate with steel wool or metallic objects. 
The plastic parts can be cleaned with a damp cloth then wiped over with a dry cloth. 
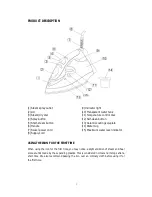
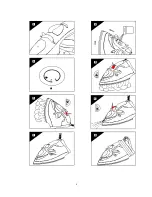
 

SELF-CLEAN FUNCTION     


The  self-clean  feature  helps  to  cleans  inside  the  plate,  removing  impurities.  We 
recommend using it every 10-15 days.   


Directions: 


Fill the water tank (10) according to the maximum water level indicator. 


Plug the product into a standard 220-240V AC electrical outlet near a sink, turn 
the temperature control dial (11)  to the MAX position. Rest the iron in vertical 
position and stable surface and allow it to heat until the indicator light (9) goes 
off.   


Hold  the  iron  horizontally  over  the  sink  and  press  the  self-clean  button  (12). 
Boiling  water  and  steam  will  be  released  from  the  soleplate  (13),  taking 
impurities with them. Move the iron forward and backward until the water tank 
is  empty.  Then,  turn  the  steam  dial  (3)  to  “0”  position  and  the  temperature 
control dial to MIN. Unplug the product, let the appliance to cool down. 


If it appears that more self-clean is necessary (e.g., if impurities can still be seen), 
repeat above steps until the soleplate and water tank are clean. Dry thoroughly 
until impurities are totally cleaned. [Fig. 7]. 


When the soleplate has cooled down, you can clean it with a damp cloth. 


STORING THE IRON 


Disconnect the plug of the iron from the socket. 


Empty the water tank by turning the iron upside down and gently shaking it. 


Leave the iron to cool down completely. 


Roll up the power cord [Fig. 8]. 


Always put the iron away in a vertical position. 


Summary of Contents for ESI-A2030C(PP)

Page 1: ...ly before operating your set Retain it for future reference Record model number and serial number of the set See the label attached on the set and quote this information to your dealer when you require service For The Warranty Terms Conditions Please Refer To Warranty Certificate ...

Page 2: ...down completely before putting away Loop cord loosely around iron when storing 7 Warning The soleplate of the iron can become extremely hot right after use and may cause burns if touched 8 Do not add chemical additive scented substances or decalcifies into the water tank 9 Always disconnect iron from electrical outlet when filling with water or emptying and when not in use 10 This appliance is not...

Page 3: ...soleplate 6 Handle 14 Water cup 7 Swivel power cord 15 Maximum water level indicator 8 Supply cord USING THE IRON FOR THE FIRST TIME When using the iron for the first time you may notice a slight emission of steam and hear some sounds made by the expanding plastics This is considered normal and it stops after a short time We also recommend passing the iron over an ordinary cloth before using it fo...

Page 4: ...1 please refer to page 8 Open the lid 2 Raise the tip of the iron to help the water enter the opening without overflowing Slowly pour the water into the water tank 10 using the water cup 14 and never overfill the maximum level indicated by MAX on the reservoir Fig 2 Close the lid 2 SELECT THE TEMPERATURE Put the iron in a vertical position Put the plug in the socket Adjust the temperature control ...

Page 5: ...eam that can penetrate the fabrics and smooth the most difficult and tough creases Wait for a few seconds before pressing again Fig 4 By pressing the shot steam button at intervals you can also iron vertically curtains hung garments etc Fig 5 Warning the shot steam function can only be used at high temperatures Stop the emission when the indicator light has 9 light up then start ironing again only...

Page 6: ...and stable surface and allow it to heat until the indicator light 9 goes off Hold the iron horizontally over the sink and press the self clean button 12 Boiling water and steam will be released from the soleplate 13 taking impurities with them Move the iron forward and backward until the water tank is empty Then turn the steam dial 3 to 0 position and the temperature control dial to MIN Unplug the...

Page 7: ...aking them irremovable The size is more effective if you use a dry iron at a moderate temperature excess heat scorches it with the risk of forming a yellow mark To avoid marking silk woolen or synthetic garments shiny iron them inside out To avoid marking velvet garments shiny iron in one direction following the fibre and do not press down on the iron The heavier the washing machine is loaded the ...

Page 8: ...8 ...

Page 9: ...9 ...

Reviews: