background image

4

IMPORTANT INSTRUCTIONS AND ADVICE FOR THE USE OF ELECTRICAL

APPLIANCES

The  use  of  any  electrical  appliance  requires  the  compliance  with  some  basic  rules, 

namely:
• 

do not touch the appliance with wet or damp hands (or feet);

• 

do not use the appliance whilst in bare feet;

• 

do not allow the appliance to be operated by children or unqualified persons without 

supervision.

The manufacturer cannot be deemed responsible for damages caused by wrong or

incorrect use.

FIRST USE OF THE OVEN

It is advised to follow these instructions:
• 

Furnish the interior of the oven as described at chapter “Cleaning and maintenan-

ce”.

• 

Switch on the empty oven on max to eliminate grease from the heating elements.

• 

Let the oven cool down and clean the interior of the oven with a cloth soaked in 

water and neutral detergent, then dry carefully.

Important:

This appliance is designed and manufactured solely for the cooking of domestic (house

-

hold) food and is not suitable for any non domestic application and therefore should not 

be used in a commercial environment.

This appliance guarantee will be void if the appliance is used within a non domestic 

environment i.e. a semi commercial, commercial or communal environment.

Summary of Contents for N58740 Series

Page 1: ... CUISINIERES A GAZ ELECTRIQUES MODELS MODELES N58 740 N58 742 Instructions for the use Installation advices Mode d emploi Conseils pour l installation Made in Italy H O M E A P P L I A N C E S 100 ELBAQUALITY MADE IN ITALY ...

Page 2: ...nces Le fabricant n est pas responsable des erreurs éventuelles dues à des fautes de frappe ou d impression suscepti bles de se trouver dans cette notice Il se réserve le droit sans porter préjudice aux caractéristiques essentielles du point de vue fonctionnel et du point de vue sécurité d apporter à ses produits à tout moment et sans préavis toutes les modifications éventuellement nécessaires pou...

Page 3: ... the event that doubts should arise relating to its operation This appliance must be used only for the task it has explicit ly been designed for that is for cooking foodstuffs Any other form of usage is to be considered as inappropriate and there fore dangerous The manufacturer declines all responsibility in the event of damage caused by improper incorrect or illogical use of the appliance Read th...

Page 4: ...to follow these instructions Furnish the interior of the oven as described at chapter Cleaning and maintenan ce Switch on the empty oven on max to eliminate grease from the heating elements Let the oven cool down and clean the interior of the oven with a cloth soaked in water and neutral detergent then dry carefully Important This appliance is designed and manufactured solely for the cooking of do...

Page 5: ... using the appliance WARNING When correctly installed your product meets all safety requirements laid down for this type of product catego ry However special care should be taken around the rear or the underneath of the appliance as these areas are not designed or intended to be touched and may con tain sharp or rough edges that may cause injury Fire risk Do not store flammable mate rial in the ov...

Page 6: ...S AND ELECTRIC HOTPLATES 1 Auxiliary burner A 1 00 kW 2 Rapid burner R 3 00 kW 3 Semi rapid burner SR 1 75 kW 4 Electrical plate Ø 145 mm 1000 W 5 Electrical plate Ø 180 mm 1500 W COOKING HOB 1 Fig 1 1 2 3 1 3 4 5 ...

Page 7: ...ate control knob 5 Front left burner control knob 6 Rear left burner control knob 7 Oven light rotisserie control button 8 Electric oven grill control knob 9 Gas burners electronic igniter control button 10 60 minutes alarm control knob only for model N58 740 11 Electrical plates indicator lights 12 Electric oven grill indicator light 4 3 2 1 10 9 5 6 7 8 11 12 Only for model N58 740 ...

Page 8: ...ing conditions of liquids To reduce the gas flow to minimum rotate the knob further anti clockwise to point the indicator towards the small flame symbol Other intermediate operating adjustments can be achieved by posi tioning the indicator between the maxi mum and minimum aperture positions and never between the maximum aperture and closed positions Caution The cooking hob becomes very hot during ...

Page 9: ...a boiling point in a shorten amount of time since the capacity of heat absorption of a liquid mass depends on the volume and the surface of the pot Fig 3 3 LIGHTING THE BURNERS To ignite the burner the following instruc tions are to be followed 1 Press in the corresponding knob and turn counter clockwise fig 3 2 to the full flame position marked by the symbol fig 3 1 and hold the knob in until the...

Page 10: ... comes to the boil turn the heat down to the level desired Remember that the hotplate will continue to produce heat for about five minutes af ter it has been turned off While using the electric hotplate you must avoid keeping it on without something on it avoid pouring liquids on it while it is hot use flat bottomed electric hotplate type pots and pans only use cooking receptacles which cover as m...

Page 11: ... boiling i e boiled meats spaghetti soups continuations of steam cooking of roasts stews potatoes For every kind of frying cutlets uncovered cooking i e risotto Browning of meats roasted potatoes fried fish omelet tes and for boiling large quantities of water Fast frying grilled steaks etc 0 Position of switch 1 2 3 2 3 4 4 4 5 6 ELECTRIC HOTPLATE USAGE TABLE After a short period of use experience...

Page 12: ...cally depending on the tem perature required commanded by the thermostat Position grill element in opera tion without temperature control see specific paragraph The automatic turning on and off of the elements is signalled by a light above the knob GENERAL FEATURES The oven is furnished completely clean it is advisable however upon first use to turn the oven on to the maximum tempe rature for abou...

Page 13: ...away A WARNING Hot part allow to cool before removing OVEN COOKING To cook before introducing the food pre heat the oven to the desired temperature When the oven has reached the desired temperature introduce the food control the cooking time and tum off the oven 5 minutes before the theoretical time to re cuperate the stored heat For orientative purposes only some oven cooking indications are show...

Page 14: ...central rack holders of the oven The rotisserie motor is operated by the switch indicated by the symbol on the control panel fig 4 5 USE OF THE ROTISSERIE Very important the rotisserie must al ways be used with the oven door slight ly open and with shield A mounted Fig 4 3 Insert the dripping pan into the lowest rack holders of the oven and insert the rod support into the intermediate rack holders...

Page 15: ...5 60 ALARM Fig 5 1 The minute counter is a timed acoustic warning device which can be set for a ma ximum of 60 minutes The knob must be rotated clockwise as far as the 60 minute position and then set to the required time by rotating it anticlockwi se Fig 5 1 ...

Page 16: ...around the cooking areas It is very important that children are not left alone in the kitchen when you are cooking Do not use a steam cleaner because the moisture can get into the appliance thus make it unsafe Do not use harsh abrasive cleaners or sharp metal scrapers to clean the oven door glass or the glass lid models with glass lid only since they can scratch the surfa ce which may result in sh...

Page 17: ...sk Do not store flammable material in the oven Let the oven cool down and pay special attention no to touch the hot heating elements inside the oven cavity S F C BURNERS These parts can be removed and cleaned with appropriate products After cleaning the burners and their flame spreaders must be well dried and correctly replaced Check that the electrode S fig 6 1 is always clean to ensure trouble f...

Page 18: ...nts to cool down Switch off the electrical supply Remove the protective cover Unscrew and replace the bulb with a new one suitable for high temperatu res 300 C having the following speci fications 230V E14 and same power check watt power as stamped in the bulb itself of the replaced bulb Refit the protective cover Note Oven bulb replacement is not cove red by your guarantee OVEN DOOR only for mode...

Page 19: ...t be installed in compliance with regulations in force in your country and in observation of the manufacturer s instructions Always disconnect the appliance from the electrical supply before carrying out any maintenance operations or repairs Some appliances are supplied with a protective film on steel and aluminium parts This film must be removed before using the cooker ...

Page 20: ...furniture which is higher than the gas hob cooktop a gap of at least 30 cm must be left between the side of the cooker and the furniture If the cooker is located on a pedestal provide safety measures to prevent it falling out The walls of the units must not be higher than work top and must be capable of resi sting temperatures of 75 C above room temperature Do not instal the appliance near inflamm...

Page 21: ...of at least 650 mm between the hob of the cooker and any wall cupboard or extractor hood positioned immediately above see fig 7 3 DISCHARGING PRODUCTS OF COMBUSTION Extractor hoods connected directly to the outside must be provided to allow the pro ducts of combustion of the gas appliance to be discharged fig 7 3 If this is not possible an electric fan may be used attached to the external wall or ...

Page 22: ...he specifications plate Ensure that the room in which the cooker is to be installed is adequately ventila ted in compliance with applicable regu lations Connection to the gas supply pipe or gas cylinder must be made in accordance with the requirements of the applicable regulations Connect the cooker to the gas mains utilizing rigid or flexible pipes The connection must be executed to the rear of a...

Page 23: ...as short as possible without contractions or kinks must be easy to inspect along its enti re length to check its wear must never be at any point in its leng th in contact with the hot parts of the cooker from time to time check to make sure that the rubber tube is in perfect con dition and substitute it at printed due date or if it shows signs of wearing or damage the gasket D Fig 8 3 guarantees t...

Page 24: ...d over the hose connectors to the full depth IMPORTANT Only 13 kg maximum cylinders may be used in the cylinder compartment and they must be positioned in such a way that the regulator and shut off cock are easily accessible When changing the gas cylinder do not withdraw the hose from the support Installation and replacement of gas cylinders must only be carried out by qualified persons Gas cylind...

Page 25: ...gas for which it is to be used The burners are conceived in such a way so as not to require the regulation of the primary air J Fig 8 5 ADJUSTING OF THE MINIMUM OF THE TOP BURNERS In the minimum position the flame must have a length of about 4 mm and must re main lit even with a quick turn from the ma ximum position to that of minimum The flame adjustment is done in the fol lowing way Turn on the ...

Page 26: ...ARY FOR GAS COMBUSTION 2 m3 h x kW BURNERS Air necessary for combustion m3 h Auxiliary A 2 00 Semi rapid SR 3 50 Rapid R 6 00 LUBRICATION OF THE GAS TAPS In case of difficulty in the gas taps operation call Service IMPORTANT All intervention regarding installation maintenance of the appliance must be fulfilled with original factory parts The manufacturer declines any liability resulting from the n...

Page 27: ... an omnipolar switch with minimum opening between the contacts of 3 mm between the ap pliance and the mains The power supply cable must not touch the hot parts and must be positioned so that it does not exceed 75 C at any point Once the appliance has been installed the switch must always be accessible N B For connection to the mains do not use adapters reducers or bran ching devices as they can ca...

Page 28: ...g 9 1 Feed the supply cable through the cable clamp C fig 9 1 The supply cable must be of a suitable size for the current requirements of the appliance see the section Feeder cable specifications Connect the wires to the terminal block B as shown in the diagram in figure 9 2 Take up any slack in the cable and secure with the cable clamp C Replace the cover A Note The earth conductor must be left a...

Page 29: ...efficacement à découvrir toutes les qualités de votre nouvel appareil Cette cuisinière devra être destinée seulement à l uti lisation pour laquelle elle a été conçue c est à dire la cuisson des aliments Toute autre utilisation doit être retenue incorrecte et dangereuse Nous déclinons toute responsabilité en cas de dom mages occasionnés par l utilisation incorrecte erronée ou irrationnelle de l app...

Page 30: ...TION DU FOUR Il est conseillé de suivre ces instructions Equiper l intérieur du four comme décrit dans le chapitre NETTOYAGE ET EN TRETIEN Allumer le four vide à la puissance maximale pour éliminer les traces de graisse des éléments chauffants Nettoyer l intérieur du four avec un chiffon imprégné d eau et de détergent neutre Puis essuyer parfaitement Important Cet appareil a été conçu et fabriqué ...

Page 31: ...orsqu il est correcte ment installé votre appareil répond à to utes les exigences de sécurité prescrites pour ce type de produit Toutefois vous devez porter une attention particulière à l arrière et au dessous de l appareil car ces endroits ne sont pas conçus pour être touchés et certaines parties peuvent s avé rer tranchantes ou rugueuses et peuvent causer des blessures Ne placer aucun matériau i...

Page 32: ...Z ET PLAQUES ELECTRIQUES 1 Brûleur auxiliaire A 1 00 kW 2 Brûleur rapide R 3 00 kW 3 Brûleur semirapide SR 1 75 kW 4 Foyer normale Ø 145 mm 1000 W 5 Foyer normale Ø 180 mm 1500 W TABLE DE TRAVAIL 1 Fig 1 1 2 3 1 3 4 5 ...

Page 33: ...rûleur avant gauche 6 Manette commande brûleur arrière gauche 7 Bouton commande éclairage du four tournebroche 8 Manette commande four grilloir électrique 9 Bouton allumage électrique des brûleurs de la table 10 Manette commande minuteur sonore 60 minutes Seulement pour le modèle N58 740 11 Lampes de fonctionnement plaques électriques 12 Lampe de fonctionnement four électrique 4 3 2 1 10 9 5 6 7 8...

Page 34: ...n faisant coïncider les symboles de la ma nette fig 3 1 avec le repère marqué sur le tableau de bord nous aurons repère robinet fermé brûleur éteint repère plein débit brûleur au maximum repère ralenti brûleur au mi nimum Le débit maximum sert à faire bouillir des liquides rapidement tandis que le débit réduit permet de faire réchauffer quelque chose lentement ou bien de maintenir la température d...

Page 35: ...r pour avoir une ébullition plus rapide ne sert à rien car la capacité d absorption de chaleur de la masse liquide reste tou jours la même en rapport avec son volume et la surface de la casserole ALLUMAGE DES BRULEURS 1 Pour allumer le brûleur vous devez placer la manette Fig 3 2 corre spondant au brûleur en question sur la position symbole grande flamme Fig 3 1 et appuyer sur le bou ton d allumag...

Page 36: ...AQUES ELECTRIQUES fig 3 5 Lorsqu on utilise la plaque électrique il faut éviter à tout prix de la faire fonctionner à vide sans récipients chercher au maximum à ne pas ver ser de liquides sur les plaques quand elles sont chaudes ne se servir que de casseroles à fond plat type électrique toujours utiliser des récipients qui re couvrent entièrement la surface de la plaque cuire si possible avec un c...

Page 37: ...auffer des liquides en quantités plus importantes réduction de sauces ou crè mes 3 4 Ebullition des aliments Pot au feu soupes cuisson la vapeur 4 Pâtes riz en récipient ouvert Escalopes 4 5 Ebullition de grands volumes Grillades express 6 Fritures frites steaks beignets Après une brève période d utilisation l ex périence vous indiquera quel est le régla ge qui répond le mieux à vos besoins Fig 3 ...

Page 38: ...ntes Les ré sistances s allumeront ou s éteindront au tomatiquement suivant le bésoin d énergie déterminé par le thermostat Position fonctionnement du grill voir paragraphe spécifique La mise en service du four est signalée par un voyant lumineux situé près de la manette du four sur le tableau de bord CARACTERISTIQUES GENERALES Le four est livré parfaitement propre Toutefois il est préférable avan...

Page 39: ... de l enlever Fig 4 2 CUISSON AU FOUR Pour la cuisson avant utilisation préchauf fer le four à la température désirée Quand le four est à température introdui re les mets et vérifier le temps de cuisson en ayant soin d interrompre le chauffage 5 minutes avant la fin du temps de cuisson de manière à récupérer la chaleur emma gasinée dans le four A titre indicatif nous vous indiquons ci après les po...

Page 40: ...bles un support de tige à placer sur le gra din central du four Le moteur se met en fonctionnement grâce à l interrupteur marqué du symbole sur le tableau de bord fig 4 4 UTILISATION DU TOURNEBROCHE Trés important à effectuer toujours à porte entr ouverte et avec le déflecteur A montée Fig 4 2 Placer la lèchefrite sur le gradin le plus bas du four et mettre en place le sup port de la tige Embroche...

Page 41: ...e réglé pour une pério de maximum de 60 minutes La manette de réglage fig 5 1 doit être tournée dans le sens des aiguilles d un montre jusqu à la position de 60 minutes et ensuite positionnée en tournant dans le sens contraire en faisant coïncider le repè re avec le temps désiré Après le temps établi un signal acoustique se démarre et cesse automatiquement Fig 5 1 ...

Page 42: ...appareil il est préférable de fermer le robinet d arrivée du gaz Vérifier de temps en temps le bon état du tuyau de raccordement à la bouteil le ou à la conduite de distribution de gaz il doit être en parfait état et il faut le remplacer dans le cas ou il présente des anomalies Les opérations de graissage des ro binets doivent être effectués par un technicien qualifié Si un robinet grippe ne pas f...

Page 43: ...auffants à l intérieur du four Ne placer aucun matériau inflammable dans le four il pourrait prendre feu pen dant le fonctionnement S F C BULEURS ET GRILLES Ces pièces peuvent être enlevées et la vées avec des produits appropriés Après le nettoyage les brûleurs et leurs répartiteurs de flamme doivent être bien sé chés et remis parfaitement à leur place Vérifier que l électrode S Fig 6 1 soit toujo...

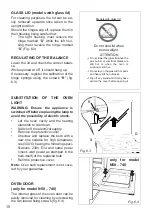
Page 44: ...EN VERRE Fermer le couvercle et vérifier son correct balancement Il doit rester suspendu si ouvert à 45 Eventuellement régler le calibrage des ressorts des charnières à l aide des vis R fig 6 3 REMPLACEMENT DE LA LAMPE DU FOUR IMPORTANT Avant d effectuer toute intervention sur la partie électrique de l appareil il faut absolument débran cher l alimentation électrique Laissez la cavité du four et l...

Page 45: ... être exclusivement effectuées conformément aux prescriptions locales en vigueur et aux instructions du fabricant Toutes les interventions doivent être effectuées lorsque l appareil est débranché Certains appareils sont livrés avec un film de protection recouvrant l acier et les pièces en aluminium Ce film doit être retiré avant l utilisation de la cuisinière ...

Page 46: ...sser la hauteur de la table de cuisson fig 7 1 Si la cuisinière est installée près d un meuble qui est plus haut que le dessus de la table de travail de la cuisinière un espace d au moins 30 cm doit être aménagé entre le côté de la cuisinière et le meuble Si la cuisinière est placée sur un socle il faut prendre des mesures pour éviter que l appa reil ne glisse du socle Les parois des meubles doive...

Page 47: ... pièce adjacente avec ventilation ap propriée à condition qu il ne s agisse pas d une chambre à coucher ou d une pièce dangereuse Dans ce cas la porte de la cuisine doit permettre le passage de l air S il se trouve au dessus de la table de cu isson un meuble suspendu ou une hotte maintenir entre la table et le meuble ou la hotte une distance minimale de 650 mm fig 7 3 EVACUATION DES PRODUITS DE LA...

Page 48: ... suivant le gaz indiqué sur la plaque si gnalétique Assurer une ventilation adaptée au mi lieu d installation de la cuisinière con formément aux normes en vigueur afin de garantir un fonctionnement correct de l appareil raccorder la cuisinière à la bonbonne ou à la conduite de gaz en re spectant les normes en vigueur Le raccordement est exécuté à l arrière de la cuisinière fig 8 1 le tuyau ne doit...

Page 49: ... pos sible sans boucles ou plis Puisse être examiné facilement tout le long de percours pour contrôler la date limite d utilisation marqué sur le tuyau et l état de conservation Ne soit pas en aucun moment en con tact avec des partie chaudes Vérifier de temps en temps le bon état du tuyau en caoutchouc il doit être en parfait état et il faut le remplacer dans le cas ou il présente des anomalies ou...

Page 50: ...serre tête correspondants Ce tube doit être inséré dans le crochet prévu à cet effet fig 8 4 et engager à fond dans les supports de tube correspondants IMPORTANT Dans le compartiment ne peuvent être nsérées que des bouteilles de 13 kg maximum et elles doivent être placées de manière à faciliter la manipulation du robinet et du réducteur de pression Lorsque l on remplace la bouteille ne pas retirer...

Page 51: ...ceux qui conviennent au gaz que l on va utiliser voir Tableau des injecteurs Les brûleurs sont conçus de manière à ne pas nécessiter le réglage de l air pri maire Fig 8 6 REGLAGE DU DEBIT REDUIT DES BRULEURS DE LA TABLE Une flamme correcte au débit réduit doit être d environ 4 mm le passage brusque du maximum au ralenti ne doit jamais cau ser I extinction de la flamme Le réglage de la flamme s eff...

Page 52: ... Ø injecteur 1 100 mm Auxiliaire A 1 00 0 30 50 Semi rapide SR 1 75 0 45 66 Rapide R 3 00 0 75 87 APPORT D AIR NÉCESSAIRE À LA COMBUSTION DU GAZ 2 m3 h x kW BURNERS Apport d air nécessaire m3 h Auxiliaire A 2 00 Semi rapide SR 3 50 Rapide R 6 00 TABLEAU DES INJECTEURS Cat I 3 ...

Page 53: ...e réseau électrique et l appareil un inter rupteur omnipolaire ayant une ouver ture minimale entre les contacts de 3 mm Le câble d alimentation ne doit pas être en contact avec des parties chaudes et doit être mis de façon à ne dépasser en aucun point la température de 75 degrés C L interrupteur doit être accessible quand la cuisinière est installée N B Ne pas utiliser d adaptateurs de réducteurs ...

Page 54: ...ez le câble d alimentation à travers du collier de serrage C Le câble d alimenta tion doit présenter une dimension adaptée aux caractéristiques électriques de l appa reil Consultez la section Section du câble d alimentation Reliez les fils à la borne serre fils B comme illustré dans le schéma de la figure 9 2 Tendre le câble d alimentation et le fixer avec le serre fil C Remonter la protection A R...

Page 55: ...55 ...

Page 56: ... for manufacture or commercial reasons at any moment and without prior notice without jeopardising the essential functional and safety characteristics of the appliances Les descriptions et les informations indiquées sont fournies à simple titre indicatif Le constructeur se réserve le droit d apporter des modifications à son produit à n importe quel moment et sans préavis H O M E A P P L I A N C E ...

Reviews: