background image

INSTALLATION 
 

WARNING FOR THE USER 

Read carefully the instructions/indications contained in this manual before installing and using the instrument. 
The instrument described in this manual is intended for use by properly trained staff only. 

SAFETY 

This instrument has been manufactured and tested in compliance with EN 61010-1standards. In order to maintain these conditions 
and to ensure safe operation, the person must comply with the indications and markings contained in the manual. When the 
instrument is received, before beginning installation, check that it's O.K. And it has not suffered any damage during transport. When 
starting installation make sure that the operating voltage and mains voltage are compatible with the device instructions. The 
instrument power supply must not be earthed. Maintenance and/or repair must be carried out only by qualified and authorized 
personnel. If there is ever the suspicious that, that there is a lack of safety ,during operation, the instrument must be disconnected 
and cautions taken against accidental use. 

Operation is no longer safe when: - The instrument  doesn't work. / - The measured value are obviously wrong or 
unreasonable / - There is clearly visible damage. / - After serious damage incurred during transport. / - After a storage 
under unfavourable conditions 


CONNECTIONS 


ELM-96BP-LON


instruction manual 

IM447-U v0.67 

pag. 2  

Summary of Contents for ELM-96BP-LON

Page 1: ...65 options insulated current inputs neutral current input or residual current input MEASURED PARAMETERS parameters unit of measurement initial identification phase and three phase voltages V kV V L1 N V L2 N V L3 N Σ V L N phase to phase and three phase system voltages V kV V L1 L2 V L2 L3 V L3 L1 Σ V L L phase and three phase currents A kA A L1 A L2 A L3 Σ A neutral current A kA An phase and thre...

Page 2: ...s not suffered any damage during transport When starting installation make sure that the operating voltage and mains voltage are compatible with the device instructions The instrument power supply must not be earthed Maintenance and or repair must be carried out only by qualified and authorized personnel If there is ever the suspicious that that there is a lack of safety during operation the instr...

Page 3: ...rmers with secondary 5A it s possible to use 2 TA on lines with 3 wires insertion three phase Aron The utilization of external TA is obligatory With the neutral current input option installed the multimeter allows the measure of the neutral current using a current transformer 5A the secondary must be connected to the In S1 and S2 terminals available on the rear of the instrument see the wiring dia...

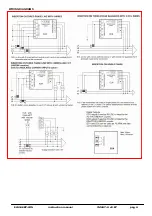
Page 4: ...WIRING DIAGRAMS ELM 96BP LON instruction manual IM447 U v0 67 pag 4 ELM 96BP LON instruction manual IM447 U v0 67 pag 4 ...

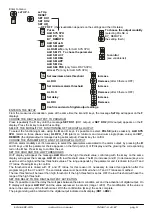
Page 5: ...ree phase system value of the electrical measure selected LED k and M show the eventual multiplying factor k kilo x 1 000 M Mega x 1 000 000 Using the C key the display indicates also the values of the active and reactive energy counters Using the A and B keys the display indicates the maximum and average values G display for the visualization of the electrical measure indicated in LED E energy co...

Page 6: ...T Increase Set CT ratio from 1 to 2000 Decrease SET VT Increase Set VT ratio from 0 1 to 400 0 Decrease version with An input SET CTN Increase Set CT ratio of the neutral input from 1 a 2000 Decrease seT AV9 T Increase Set average time from 1 to 30 minutes Decrease seT EN TOT PAR Set Energy visualization type NORMAL seT 3pH BALANC Set connection UN_BAL type 1PH L1 seT MDE 3 Set wiring connection t...

Page 7: ...ssage CTN Current transformer neutral ratio and the set value on the F display In the same way at the programming of the CT rate will be possible to set this value example with CT 1000 5the value will be 200 Pressing the A key confirm and go away with the next setting Programming of the average time seT AVG T After the programming phase previously described pressing another time the A key on the F...

Page 8: ...s and the I O status RESET PEA NO YES Confirm Reset Deleting maximum values max RESET AVG NO YES Confirm Reset Deleting average values avg and maximum demand maxD RESET EN NO YES Confirm Reset Deleting energy counters RESET ALL NO YES Confirm Reset Deleting maximum and average values and energy counters To enable the chosen type press the B key to change the indication on display G from NO to yes ...

Page 9: ...serial output Press A key to confirm CHOOSE THE PARAMETER TO LINK TO THE DIGITAL OUTPUT With an alarm modality set it s necessary to select the parameters associated to the alarm output by pressing the B and C keys until the parameter choice appears on the third part L3 of F display and the glowing the corresponding led on the D bar Press A key to confirm the set SET THE HIGH AND THE LOW THRESHOLD...

Page 10: ...ime the B key to select the parameter and the A key to confirm it SET THE THRESHOLD Subsequently it s necessary to set the threshold using the B to increase and C to decrease keys Confirm with A key I O INFO PAGE After the hour counter set the I O info page appears in F displays on the first part L1 the status of digital input on the second part L2 the status of the first digital output DO1 on the...

Page 11: ...l the measures appear on the L1 display Visualization section 2 At the same way of the section 1 press the C button to select the parameter that can be displayed and indicated from E LED The voltage values are of the three phase system the frequency is of the L1 channel Visualization energy and hours counters With the C key it s possible to visualize on F display the active reactive and apparent e...

Page 12: ...imum three phase powers Σ max maxD avg I L1 max avg I L2 max avg I L3 max avg I N max avg phase and neutral currents maximum of average phase and neutral currents max demand max maxD avg Σ W max avg Σ VAr max avg Σ VA max avg three phase power maximum of average three phase powers maximum demand max maxD avg I L1 avg I L2 avg I L3 avg I N avg phase and neutral currents average phase and neutral cu...

Page 13: ...20 60Vac 24 72Vdc Version Vac dc 80 230Vac 90 250Vdc consumption max 4VA voltage inputs from 20 to 500V phase phase permanent overload 20 input impedance 1 MΩ insertion on three phase line with 3 wires 4 wires and single phase insertion in MT with external TV and transforming rate programmable from 1 to 400 current inputs from 0 02 to 5A permanent overload 30 from external TA with secondary 5A pri...

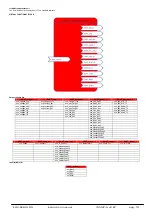
Page 14: ...12 nvo_3ph_cos nvo_3ph_pwr nvo_3ph_AVAh_T1 nvo_voltage_l23 nvo_cos_ph1 nvo_pwr_ph1 nvo_3ph_AVAh_T2 nvo_voltage_l31 nvo_cos_ph2 nvo_pwr_ph2 nvo_cos_ph3 nvo_pwr_ph3 nvo_3ph_Rpwr nvo_Rpwr_ph1 nvo_Rpwr_ph2 nvo_Rpwr_ph3 nvo_MaxAvg3PhAP nvo_MaxAvg3PhRP nvo_MaxAvg3PhApP nvo_LastAv3PhAcP nvo_LastAv3PhRP nvo_LastAv3PhApP SNVT_switch SNVT_freq_hz SNVT_amp_mil SNVT_temp SNVT_count SNVT_state nvo_Debug nvo_Fr...

Page 15: ...mp_mil nvo_MaxAvgCurrL3 MAX AVG CURRENT L3 A SNVT_power_f nvo_MaxAvg3PhAP MAX AVG 3 PH ACTIVE POWER kW SNVT_power_f nvo_MaxAvg3PhRP MAX AVG 3 PH REACTIVE POWER kVAr SNVT_power_f nvo_MaxAvg3PhApP MAX AVG 3 PH APPARENT POWER kVA SNVT_power_f nvo_LastAv3PhAcP LAST AVERAGE 3 PHASE ACTIVE POWER kW SNVT_power_f nvo_LastAv3PhRP LAST AVERAGE 3 PHASE REACTIVE POWER kVAr SNVT_power_f nvo_LastAv3PhApP LAST A...

Page 16: ...Via Lago di Molveno 20 36015 Schio VI Tel 39 0445 661722 Fax 39 0445 661792 http www elco italy com E mail info elco italy com support elco italy com ELM 96BP LON instruction manual IM447 U v0 67 pag 16 ...

Reviews: