11
R
Dual Angle Glossmeter
Note:
If changing more than one lamp, mark the inline connectors to
ensure correct connection.
Remove the gauge case by unscrewing the four fixing screws found
at the back of the gauge. Withdraw the gauge from the case. Unscrew
the two lamp clamping ring screws holding the faulty lamp.
Disconnect the inline connector and remove the old lamp.
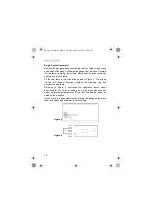
Fit the new lamp in the orientation shown in Figure 5. The arrows
indicate the filament direction. Replace the clamping ring and
connect the new lamp.
Referring to Figure 6, centralise the calibration thumb wheel
potentiometer (A). Take a reading on a high gloss standard using the
appropriate angle selection and adjust the appropriate calibration
potentiometer (C for 20°, D for 60°) until the correct value of the
standard is displayed.
Check the zero gloss adjustment by placing the gauge on the black
foam and adjust potentiometer (B) accordingly.
Figure 5
Figure 6
Op_401_English.fm Page 11 Tuesday, August 30, 2005 8:54 AM

