background image


15 

CAUTION – 
 

1. When scanning for under-cover, the display 

does not measure

 cover. 

 
2. The unit may signal a bar of adequate cover but larger size. 
 
3. The unit 

may not

 signal an under-covered bar of smaller diameter. 

 
4. The unit 

will not

 signal a bar which is completely missing! 


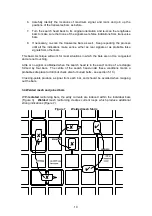
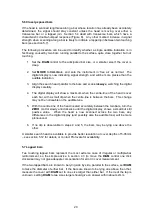
5.4  More about transverse bars 

 
Reinforcing bars lying transverse to the bar being measured will produce some additional 
signal, and hence will cause the depth of cover to be underestimated. 
 
When the search head is moved along the longitudinal bar and towards a transverse bar, 
the signal strength will increase to a maximum followed by a small minimum when the 
center of the head is located over the transverse bar.  As the head is moved away, the 
signal strength will reach another maximum and then fall back to its previous value which 
is related only to the longitudinal bar.  The cover depth indication will show the reverse 
behaviour –  a minimum, a small peak and then a second minimum. 


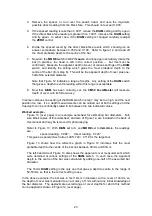
Figure 8      Response to a transverse bar 


Figure 8 shows these characteristic double-humped responses, which should be 

entirely predictable since the locations of all transverse bars should already have 
been identified using the 

LOCate

 mode.  Three simple rules show how to obtain 

the most accurate cover measurements in these circumstances. 

Summary of Contents for Protovale CoverMaster CM52

Page 1: ...Elcometer P350 Protovale CM52 Covermeter Operating Instructions...

Page 2: ...ncy electromagnetic field strength greater than 3V m and are registered trademarks of Elcometer Instruments Ltd Elcometer Instruments Ltd England 1996 2005 All rights reserved No part of this document...

Page 3: ...3 5 ADVANCED TECHNIQUES 14 29 5 1 Search methods for congested situations 14 5 2 Locating deep bars 14 5 3 Scanning for under cover 14 5 4 More about transverse bars 15 5 5 Depth measurements in conge...

Page 4: ......

Page 5: ...ing bars which have been located using the techniques in Section 3 Section5 ADVANCED TECHNIQUES Using the CM52 CoverMaster to make accurate cover measurements in complex or difficult situations Sectio...

Page 6: ...into the socket Screw the knurled sleeve clockwise until it is finger tight Gently pull on the body of the plug it should not come out To unplug either connector turn the locking ring anticlockwise t...

Page 7: ...y may be affected by high battery voltages and or imprecise zero setting during approximately the first hour after switch on Measurements at shallower depths and the metal location function are not af...

Page 8: ...f explosive materials 1 6 Connecting headphones A socket for optional headphones is fitted as standard The 3 5mm stereo jack socket is mounted on the left hand side of the case of the two sockets it i...

Page 9: ...measure the strength of the induced field as it dies away and this signal is processed to give depth measurements plus an optional audible indication Note that the search head is half black and half...

Page 10: ...depth of cover One exception is if the cover material itself is magnetic For example the CM52 cannot detect bars which are covered by steel sheet and depth measurements may become distorted in areas w...

Page 11: ...op left corner of the LCD if it is recharge the batteries 4 Advance the ZERO control clockwise until you hear a ticking sound or low pitched growl from the loudspeaker The CM52 CoverMaster provides th...

Page 12: ...bars slowly scan the head sideways to locate those lengthwise bars figure 6 1 The audible indicator will sound each time it passes over a bar 3 Find the position of exact maximum signal by listening f...

Page 13: ...ue will work for most situations in which the bars are not too congested and are not touching Little or no signal is obtained when the search head is in the exact centre of a rectangle formed by four...

Page 14: ...More complex situations such as congested reinforcing partially connected mesh and reinforced pipes are dealt with in section 5 ADVANCED TECHNIQUES In any situation where signals are very strong the...

Page 15: ...from any metallic object including wristwatch rings metal belt buckle the main CM52 unit or the metal fittings on the neck strap Advance the ZERO control clockwise until the analogue meter needle is e...

Page 16: ...ace of the concrete the minimum depth of cover will be underestimated by 25 of the effective diameter which was set using the DIAM control Where the bar is lying flat beneath the surface of the concre...

Page 17: ...002 or 003 is a clear indication of the presence of metal Scan in the usual way keeping a close watch on the display CAUTION the instrument will also react slightly to shallower bars to the sides of...

Page 18: ...the signal strength will increase to a maximum followed by a small minimum when the center of the head is located over the transverse bar As the head is moved away the signal strength will reach anot...

Page 19: ...surements for single bars and merely warn of potential inaccuracies when other bars are present To cope with real life situations where reinforcing may be very congested the performance of the CM52 Co...

Page 20: ...over in congested situations it is better to use thinner spacers 10 or 20mm under the black face of the search head Figure 10 shows the relationship between the performance of the CM52 CoverMaster and...

Page 21: ...y otherwise be underestimated If the objective is simply to verify adequate cover underestimation is only a problem if the cover appears to be inadequate more accurate measurements are then required T...

Page 22: ...uation Effect upon cover readings Unconnected bars Welded mesh fabric A Correct correct correct B Not over bar very high high C Not parallel to bar very high low D Over transverse bar slightly low ver...

Page 23: ...over each bar with a small dip when the centre line is between the bars This change may not be noticeable on the audible tone 5 With the centre line of the head located accurately between the two bar...

Page 24: ...ntrol to give the correct relationship between depth measurements made from the normal black face of the search head and measurements made using a 30mm spacer for example using the white face Cover me...

Page 25: ...22 Figure 12 Reference graph for recommended method of estimating bar size...

Page 26: ...instances one setting of the DIAM switch in step 7 may be too high and the next position too low If so depth measurements can be carried out at both settings and the true depth can be confidently sta...

Page 27: ...24 Figure 13 Example worksheet...

Page 28: ...arginally in error The table below shows the results of attempting to measure the diameter and cover of the central one of three parallel bars at various values of pitch between centres The true value...

Page 29: ...es 8 Make all depth measurements using that setting and the black face of the search head If no setting gives exactly 30mm difference it may be necessary to make all depth measurements twice using the...

Page 30: ...spacer of known thickness 10 12mm and take another reading If the difference between the two readings exceeds the spacer thickness by more than 2 3mm readings are being affected by a magnetic aggregat...

Page 31: ...able with the standard head It may also be used with covers up to about 50mm but in the 31 to 50mm range the error may increase to 2 or even 3mm For covers greater than about 35mm the standard head sh...

Page 32: ...ogger including those used for half cell potential surveys The CM52 output is continuously present this means that either continuous traverses or discrete readings can be logged If continuous scans ar...

Page 33: ...d including T16 Bars used for calibration must be of high tensile steel if the calibration is to be valid for practical reinforced concrete Each bar must be at least 500mm long and measurements must b...

Page 34: ...lso be carried out by the user The procedure is similar to the full check described above except that the test bar must be mild steel rather than high tensile and the spacer is a concrete prism cast a...

Page 35: ...lable and for details about the other products available from Protovale for the Construction Industry call the Customer Hot line For free advice on tackling problem areas send us a sketch of the struc...

Page 36: ...com SINGAPORE Elcometer Asia Pte Ltd 896 Dunearn Rd Sime Darby Centre 03 09 Singapore 589472 Republic of Singapore Tel 65 6462 2822 Fax 65 6462 2860 e mail asia elcometer com www elcometer com BELGIQ...

Reviews: