5
en
3 GETTING STARTED
3.1 FITTING BATTERIES
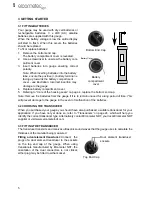
Your gauge may be used with dry cell batteries or
rechargeable batteries. 3 x LR6 (AA) alkaline
batteries are supplied with this gauge.
When the battery voltage is low the entire display
will start to flash. When this occurs the batteries
should be replaced.
To fit or replace batteries:
1.
Remove the bottom end cap.
The battery compartment cover is revealed.
2.
Use a screwdriver to unscrew the battery com-
partment cover.
3.
Insert batteries into gauge ensuring correct
polarity.
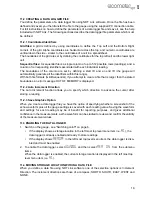
Note: When inserting batteries into the battery
tube, ensure the positive (+) battery terminal is
facing up towards the battery compartment
cover - see illustration. Incorrect insertion may
damage to the gauge.
4.
Replace battery compartment cover.
5.
Refering to “Care of the housing seals” on page 4, replace the bottom end cap.
Note: Remove the batteries from the gauge if it is to remain unused for a long period of time. This
will prevent damage to the gauge in the event of malfunction of the batteries.
3.2 CHOOSING THE TRANSDUCER
When you purchased your gauge you should have also purchased a suitable transducer for your
application. If you have not yet done so, refer to “Transducers” on page 24, which will help you
identify the correct transducer type. Alternatively contact Elcometer NDT, your local Elcometer NDT
supplier or visit www.elcometerndt.com
3.3 FITTING THE TRANSDUCER
The transducer transmits and receives ultrasonic sound waves that the gauge uses to calculate the
thickness of the material being measured.
Fitting a dual element transducer:
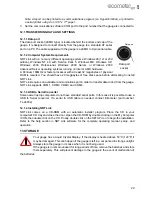
Connect the
plugs of a dual element transducer to the sockets
on the top end cap of the gauge. When using
transducers manufactured by Elcometer NDT, the
orientation of the dual connectors is not critical;
either plug may be fitted to either socket.
Bottom End Cap
Battery
compartment
cover
Battery Cover
Top End Cap
Dual element transducer
sockets


