background image

Italiano - English

Manuale d’uso e manutenzione, parti di ricambio  

User and Maintenance Manual, Spare parts

21

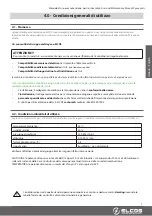
10.0 - TRASPORT AND STORAGE

10.1 - Trasport

It is a good rule during transportation, to firmly fix the generator so that it cannot turn over. Remove the fuel and verify that acid 

or fumes do not leak from the battery. The generator must not be used inside a motor vehicle.

10.2 - Storage

If the generator is not used for periods longer than 30 days, it is recommended to completely empty the fuel tank and the 

carburetor bowl. Change the engine oil if it is exhausted. Clean the generator, disconnect the battery cables, protect it from 

dust and humidity.

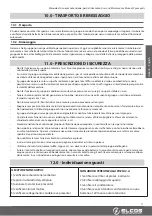
11.0 - SAFETY REGULATIONS

• 

Do not operate the generator in an enclosed space. The engine produces carbon monoxide and other harmful gases , 

which are harmful to the health of persons exposed

• 

Ensure adequate ventilation to the generator, bring the exhaust outside the local where it is installed or to a safe distance 

from the place where the staff work through conduits or other modes of expulsion

• 

The generator must operate only on horizontal surfaces to ensure optimum flow of oil and fuel. If you can not work 

on horizontal surfaces is necessary to ensure adequate means for securing and leveling to ensure the stability of the 

generator.

• 

Do not operate the generator in adverse weather conditions, but assure a stable and secure shelter .

• 

Keep children away from the generator in operation, remember that once the generator shutdown the temperature 

remains high for about 1 hour .

• 

Do not touch mufflers, hoses and engine exhaust, they can cause severe burns

• 

Shutdown the engine during the ordinary and straordinary maintenance

• 

Do not allow the use of the generator who does not know the functions and commands

• 

The generator is used to produce electricity, do not use the generator for improper uses

• 

When the generator is not in use, it is very important to lock it (remove the ignition key, close the cover with the appro-

priate locks, etc.).

• 

Provide in the area of the generator, appropriate lighting in accordance with current standards.

• 

Do not remove the protective devices and do not start-up the generator without them (the sides and cover ). This can 

cause risks for the user. If you remove the protections, the operation must be done with the engine off and by specialized 

personnel

• 

Do not use the generator in environments with explosive atmospheres

• 

In case of emergency, do not use water to extinguish the fire but use fire extinguisher powder

• 

Use tools anti-noise (headphones , earplugs , etc. . ) if you have to stand near the generator set

• 

Avoid direct contact on the body of fuel , engine oil and battery acid. In case of contact with the skin, wash with 

water and soap and rinse thoroughly. In case of contact with the eyes, rinse with water and rinse thoroughly.                                   

In cases of inhalation and ingestion, consult a doctor.

12.0 - TROUBLESHOOTING

THE ENGINE DOES NOT START:
1) Check the fuel in the tank
2) Open the tap of the tank
3) Pull the stater (if present)
4) Check the oil in the engine
5) Check plug connection (if present)

DO NOT GET THE VOLTAGE IN THE AC SOCKET
1) Check if the protection circuit breaker is activated
2) Check panel wiring
3) Check the capacitor
4) Check if exciting the capacitor with a 12V battery, 

the voltage is still missing

Summary of Contents for 24082

Page 1: ...di RICAMBIO USER and MAINTENANCE MANUAL SPARE PARTS ECHO 1 13 KVA 3000rpm RAFFREDDATI AD ARIA AIR COOLED Gruppi elettrogeni portatili diesel e benzina Portable Generating sets diesel and gasoline All...

Page 2: ...enza preavviso Garanzia e Limitazione di Responsabilit Utilizzare solo le parti autorizzate Eventuali danni o malfunzionamenti causati dall uso di ricambi non originali non sono coperti dalla garanzia...

Page 3: ...iminari Pag 8 5 1 Olio motore Pag 8 5 2 Carburante Pag 8 6 0 Avviamento generatore Pag 8 7 0 Uso del generatore Pag 9 7 1 Separazione elettrica Pag 9 7 2 Interruttore differenziale Pag 9 7 3 Ripristin...

Page 4: ...ligo di notifica in linea con i nostri obiettivi di continuo sviluppo e miglioramento dei prodotti Alcune raffigurazioni in esso contenute hanno solo lo scopo di individuare le parti descritte e perta...

Page 5: ...ichiarazione di Conformit La dichiarazione di Conformit viene consegnata con il Gruppo Elettrogeno ELCOS conformemente alla direttiva macchine 2006 42 CE parte integrante del GE stesso Fac simile ATTE...

Page 6: ...ative di riferimento per tutti i gruppi elettrogeni ELCOS 2006 42 CE direttiva macchine 2006 95 CE direttiva bassa tensione 2004 108 CE compatibilit elettromagnetica 2000 14 CE emissioni acustiche amb...

Page 7: ...ollegamento elettrico e la manutenzione siano in conformit alle norme L installazione il collegamento elettrico e la manutenzione vengano eseguite e sorvegliate esclusivamente da personale specializza...

Page 8: ...icurarsi che il tappo sia serrato correttamente dopo il riempimento Evitare il contatto diretto del carburante sul corpo e non respirarne i vapori I vapori della benzina possono facilmente incendiarsi...

Page 9: ...assolutamente collegato a terra con il morsetto PE n con altre parti del generatore Gruppo con quadro elettrico oppure con dispositivi installati dall utente protetto mediante interruzione automatica...

Page 10: ...tore anche dopo spento continua ad emanare calore mantenere quindi un adeguata ventilazione anche dopo averlo fermato Non scaricare olio e residui di carburante in terra o nelle fogne 9 0 MANUTENZIONE...

Page 11: ...are marmitte flessibili di scarico e motore possono provocare ustioni gravi Spegnere sempre il motore durante tutte le operazioni di manutenzione riempimento carburante rifornimento olio ecc Non perme...

Page 12: ...parties without express authority is strictly forbidden The data presented herein could undergo modifications for technical improvements without any notice Warranty and Limitation of LiabilityUse onl...

Page 13: ...checks Pag 18 5 1 Engine oil Pag 18 5 2 Fuel Pag 18 6 0 Generator start up Pag 18 7 0 Generator use Pag 19 7 1 Electrical separation Pag 19 7 2 Differential circuit breaker Pag 19 7 3 Restoring the G...

Page 14: ...continuous development and improvement of products Some pictures contained in it want only to identify the described parts and therefore may not reflect exactly the unit in your posses sion This manua...

Page 15: ...Conformity The declaration of conformity is supplied with the ELcOS generating set in accordance with the Machinery Directive 2006 42 EC and it is an integral part of the G S itself Fac simile ATTENTI...

Page 16: ...ications and standards All ELCOS gensets are compliant with EC Standards 2006 42 CE machine directive 2006 95 CE low voltage directive 2004 108 CE electromagnetic compatibility 2000 14 CE noise direct...

Page 17: ...installation electrical connection and maintenance must be in accordance with regulations The installation electrical connection and maintenance are carried out and supervised by qualified and traine...

Page 18: ...p is properly tightened after refilling Prevent direct contact of the fuel on the body and do not breathe vapors Fuel vapors can easily ignite Check the air filter make sure that it is in good condito...

Page 19: ...ed to the ground at terminal PE and with other parts of the generator The generator with the control panel or with devices installed by the user is protected by automatic disconnection of sup ply It h...

Page 20: ...tart turn the key to OFF position WARNING Even after the engine shutdown it continues to radiate heat maintain adequate ventilation even after stopping it 9 0 MAINTENANCE Read carefully the user and m...

Page 21: ...touch mufflers hoses and engine exhaust they can cause severe burns Shutdown the engine during the ordinary and straordinary maintenance Do not allow the use of the generator who does not know the fun...

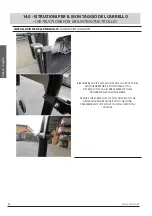
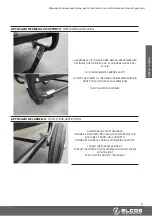
Page 22: ...E DELLE MANIGLIE HANDLES INSTALLATION RIMUOVERE LA VITE CHE VA A FISSARE LA CAPOTTA DEL MOTOGENERATORE E SOSTITUIRLA CON IL SISTEMA DI FISSAGGIO PREASSEMBLATO CHE TROVERETE NELLA CONFEZIONE REMOVE THE...

Page 23: ...SSIVAMENTE SERRARE LE VITI LOOSEN THE SCREWS OF THE OMEGA PREASSEMBLED BAR IN ORDER TO ACCOMODATE THE FRAME BASE THEN TIGHTEN THE SCREWS APPLICAZIONE CARRELLO TROLLEY BAR APPLICATION ALLENTARE LA VITE...

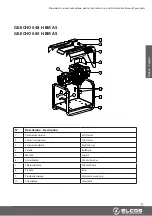
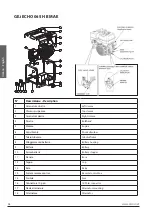
Page 24: ...S 9 8 7 7 6 5 4 3 2 1 N Descrizione Description 1 Carenatura sinistra Left closure 2 Chiusura superiore Top closure 3 Carenatura destra Right closure 4 Paratia Bulkhead 5 Motore Engine 6 Telaio tubola...

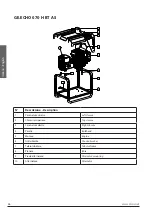
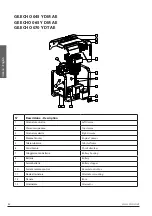
Page 25: ...H BM AS 6 10 9 8 7 6 5 4 3 2 1 N Descrizione Description 1 Carenatura sinistra Left closure 2 Chiusura superiore Top closure 3 Carenatura destra Right closure 4 Paratia Bulkhead 5 Motore Engine 6 Ant...

Page 26: ...Description 1 Carenatura sinistra Left closure 2 Chiusura superiore Top closure 3 Carenatura destra Right closure 4 Paratia Bulkhead 5 Motore Engine 6 Antivibrante Shock absorber 7 Telaio tubolare Tub...

Page 27: ...iore Top closure 3 Carenatura destra Right closure 4 Paratia Bulkhead 5 Motore Engine 6 Antivibrante Shock absorber 7 Telaio tubolare Tubolar frame 8 Alloggiamento batteria Battery housing 9 Batteria...

Page 28: ...Right closure 4 Paratia Bulkhead 5 Motore Engine 6 Antivibrante Shock absorber 7 Telaio tubolare Tubolar frame 8 Alloggiamento batteria Battery housing 9 Batteria Battery 10 Fermabatteria Battery stop...

Page 29: ...iore Top closure 3 Carenatura destra Right closure 4 Paratia Bulkhead 5 Motore Engine 6 Antivibrante Shock absorber 7 Piede alternatore Alternator mounting 8 Telaio tubolare Tubolar frame 9 Alloggiame...

Page 30: ...bolare Tubolar frame 6 Antivibrante Shock absorber 7 Pianale Base 8 Tappo serbatoio carburante Fuel tank cap 9 Tappo scarico serbatoio Fuel tank draining cap 10 Serbatoio carburante Fuel tank 11 Allog...

Page 31: ...aio tubolare Tubolar frame 6 Antivibrante Shock absorber 7 Pianale Base 8 Tappo serbatoio carburante Fuel tank cap 9 Tappo scarico serbatoio Fuel tank draining cap 10 Serbatoio carburante Fuel tank 11...

Page 32: ...ure 2 Chiusura superiore Top closure 3 Carenatura destra Right closure 4 Motore Yanmar Engine Yanmar 5 Telaio tubolare Tubolar frame 6 Antivibrante Shock absorber 7 Alloggiamento batteria Battery hous...

Page 33: ...e 3 Carenatura sinistra Left closure 4 Motore Lombardini Engine Lombardini 5 Telaio tubolare Tubolar frame 6 Antivibrante Shock absorber 7 Pianale Base 8 Tappo serbatoio carburante Fuel tank cap 9 Ser...

Page 34: ...rdini Engine Lombardini 5 Telaio tubolare Tubolar frame 6 Antivibrante Shock absorber 7 Pianale Base 8 Tappo serbatoio carburante Fuel tank cap 9 Serbatoio carburante Fuel tank 10 Tappo scarico serbat...

Page 35: ...ECHO 065 Y DM AE GE ECHO 070 Y DT AE GE ECHO 110 L DM AE GE ECHO 110 L DT AE GE ECHO 150 L DT AE 1 2 3 5 6 7 4 N Descrizione Description 1 Connettore 10 poli 10 Poles connector 2 Fusibile Fuse 3 Scat...

Page 36: ...w elcos net www elcos net Elcos s r l S S 234 Km 58 250 26023 Grumello Cremonese CR Italy tel 39 0372 72330 fax 39 0372 7233220 www elcos net info elcos net elcos pec elcos net PI 01084730199 www elco...

Reviews: