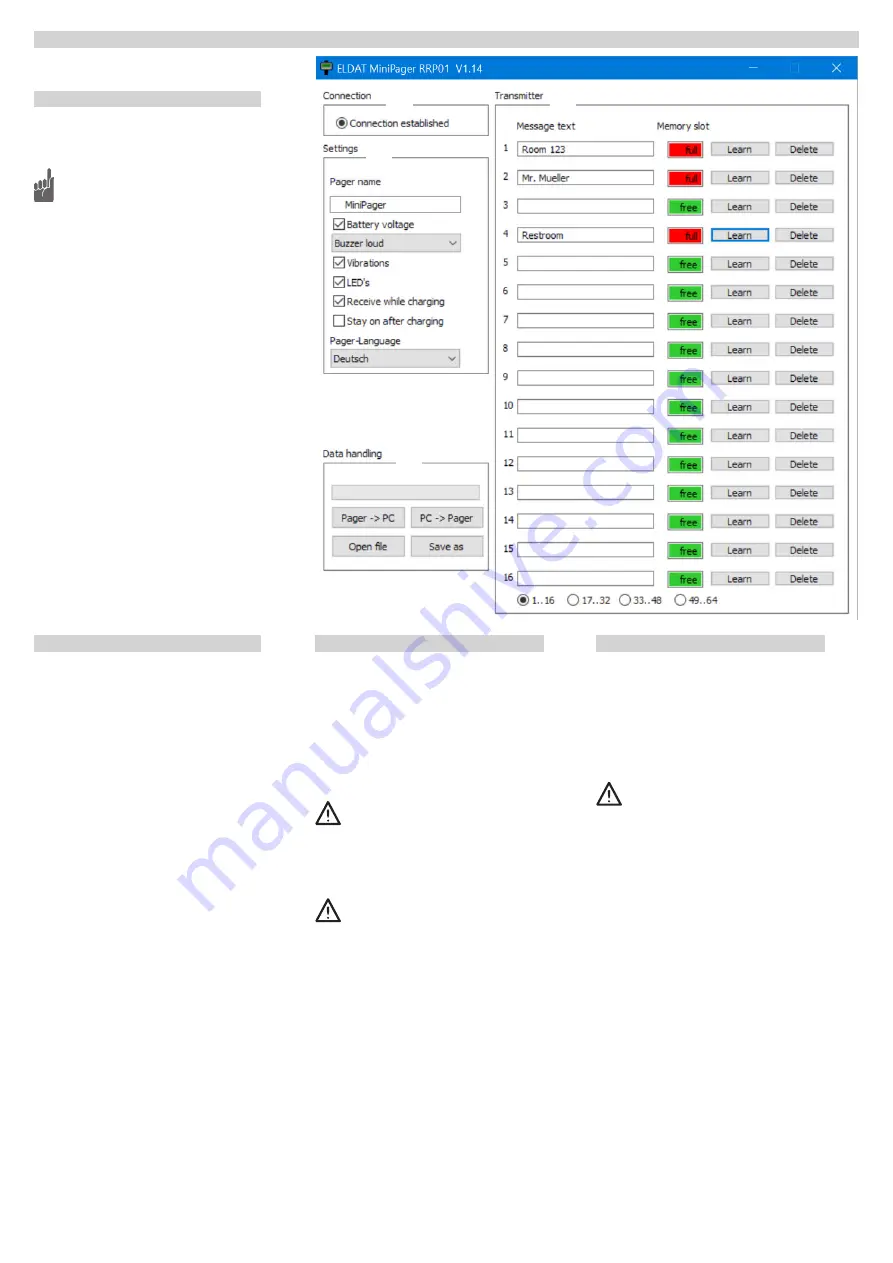
Transmitter
Transmitters can be programmed, deleted, and
the associated message texts configured here. 64
memory locations are available for this.
Each line represents a memory location.
Only 16 memory locations are initially shown
when the MiniPager is connected. Click [17...32],
[33...48] or [49...64] in the lower area to select the
remaining memory locations.
All changes made here only take effect if
the data has been transferred to the con-
nected MiniPager via the “PC -> Pager”
button!
Memory location
Indicates the memory location (1-64) status:
Free/green: No transmitter programmed yet.
Assigned/red: Transmitter programmed.
Program
Click this button to program the button of an
Easywave transmitter.
After pressing the button, you must press the
transmitter button within 10 seconds.
The timer ends and the display switches to
“assigned” if programming is successful.
An error message appears if the maximum pro-
gramming time of 10 seconds is exceeded.
If the memory location is already assigned to ano-
ther transmitter button, it will be overwritten.
A transmitter button can only be programmed to
one memory location. If you try to program a but-
ton at more than one memory location, an error
message will be displayed.
Delete
Press this button to delete the transmitter button
programmed at this memory location. There will
not be a check to confirm you want to do this!
Data handling
This section deals with data transfer between a
PC and MiniPager.
The MiniPager has a separate memory which can
be read or written to via these buttons.
Pager -> PC
Reads the message texts and all programmed
Easywave transmitters of the connected MiniPa-
ger. The data can then be adjusted/updated, or
transferred to another MiniPager.
All settings in the software are overwritten
by the data loaded from the MiniPager!
PC -> Pager
Transfers the message texts currently loaded in
the software and programmed Easywave trans-
mitters to the connected pager.
All changes made only take effect if they
have been transferred to the MiniPager via
this button!
Open file
Data/configurations already stored on a PC can
be re-uploaded here.
All settings in the software are overwritten by the
uploaded data file!
Save as
This button allows you to save the currently loa-
ded message texts and programmed Easywave
transmitters into a file on the PC. This file can
be used to transfer the configuration to other
MiniPagers.
Direct settings
All settings adjusted here are transferred to the
connected MiniPager immediately when changed.
The current settings of a newly connected
MiniPager are automatically read out.
Pager name
The name entered here appears on the pager’s
display in order to assign it, for example to the
correct person or department. “MiniPager” is the
default name.
Battery voltage
If the box is checked, the current battery voltage is
shown on the display.
Buzzer
Activates or disables the acoustic alert when a call
is received. Several volume settings are available.
Vibration
Switches the vibration alert ON or OFF.
LEDs
Determines whether the MiniPager LEDs should
or should not flash in the event of an alert.
Reception during charging
If this checkbox is activated, the MiniPager also
reacts to incoming calls during charging.
Stay on after charging
Determines whether the MiniPager is automa-
tically switched off after the power supply (USB
cable, adapter, charging cradle) is removed.
Pager language
Determines the pager display language.
The pager must be restarted for this setting to be-
come active!
Connection
The current connection status is shown here.
If the MiniPager is correctly connected to the PC,
the display skips to “Connection made”.
If the message “Not connected” appears
even though the MiniPager is connected,
check the USB cable connection. Only use
the supplied USB cable!
Disconnect and restore the connection
again after a short time. Check that the
USB port on the PC/laptop works correctly.
PROGRAMMING


