3-4
PREPARING FOR THE ROAD
(ii)
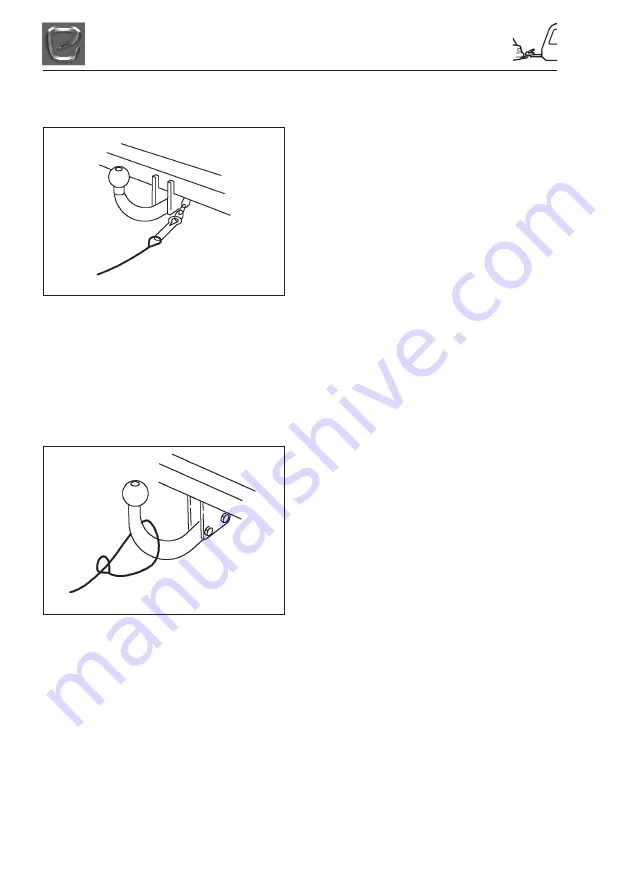
Attach the clip directly to the attachment
point (Fig 3-5, Step 2).
Note:
this must be specifically permitted by the
caravan manufacturer’s guidance, as the clip may
not be sufficiently strong.
Where No Designated Attachment Point Is
Provided On The Tow Bar
(i)
Fixed Ball
- Loop the cable around the
neck of the tow ball. If you fit the cable like
this use a single loop only (Fig 3-6, Step 3).
(ii)
Detachable Ball
- You must contact the
tow bar supplier for advice.
Other Means of Attachment
Alternatively, it may be possible to attach the
cable assembly to a permanent part of the tow
bar structure with the approval of the tow bar
supplier, or to an accessory sold for the purposes
of breakaway cable attachment.
When The Breakaway Cable Is Attached
Check To Ensure
(i)
That the cable cannot snag in use on the
caravan hitch, jockey wheel or any
accessories e.g. a stabiliser, bumper shield,
cycle carrier etc.
(ii)
That there must be sufficient slack in the
cable to allow the towing vehicle and
caravan to fully articulate without the cable
ever becoming taut and applying the brakes.
(iii) That it is not so slack that it can drag on the
ground. Leave it too loose, and the cable
may scrape along the ground, and be
weakened so that it fails before doing its
job!
BEFORE SETTING OFF
(i)
Connect the 13 pin plug on the caravan A-
frame to the towing vehicle.
(ii)
Check that all tail-lights, brake lights, road
lights and indicators work correctly.
(iii) Ensure that the correct vehicle license /
registration plate is attached to the rear of
the touring caravan.
(iv) Using the jockey wheel lift the tow ball
slightly to check hitch is locked onto the ball
(v)
Wind up the jockey wheel until the wheel
supports locate into the cut out sections at
the base of the winding section.
(vi) Raise and secure the jockey wheel using the
clamp. The jockey wheel should be parallel
to the direction of travel at all times.
(vii) Check condition of and secure the
breakaway cable to the tow vehicle.
Fig 3-5
STEP 2
STEP 3
Fig 3-6
Summary of Contents for Crusader
Page 5: ...CONTENTS 4 CONTENTS ...
Page 7: ...1 2 INTRODUCTION ...
Page 11: ...2 4 GENERAL SAFETY ...
Page 17: ...3 6 PREPARING FOR THE ROAD ...
Page 19: ...4 2 TOWING AND DRIVING ...
Page 27: ...6 6 GETTING STARTED ...
Page 29: ...7 2 GAS SAFETY ADVICE ...
Page 32: ...8 3 ELECTRICAL SYSTEM 12V FUSES SINGLE AXLE TWIN AXLE MODELS ...
Page 33: ...8 4 ELECTRICAL SYSTEM MAINS UNIT ...
Page 77: ...10 4 SECURITY ...
Page 85: ...12 2 STORAGE ...
Page 89: ...13 4 WARRANTY ...
Page 91: ...14 2 CODE OF PRACTICE ...
Page 93: ...15 2 CARAVAN CONSTRUCTION ...
Page 95: ...16 2 EQUIPMENT LIST ...
Page 96: ...17 1 ELECTRICAL DRAWINGS ELECTRICAL DRAWINGS 13 PIN PLUG WIRING DIAGRAM ...
Page 97: ...17 2 ELECTRICAL DRAWINGS WIRING DIAGRAM CRUSADER ...
Page 98: ...17 3 ELECTRICAL DRAWINGS ROAD LIGHTS CRUSADER ...
Page 99: ...17 4 ELECTRICAL DRAWINGS ...
Page 109: ...20 6 GLOSSARY ...
Page 115: ...22 2 CHANGE OF OWNERSHIP ...
Page 117: ...23 2 CHANGE OF ADDRESS ...
Page 121: ...24 4 INDEX Designed and Printed by Preset Graphics Tel 01332 549278 MY2012 Ref 21209 ...


