6-4
GETTING STARTED
WATER SYSTEM
Your new Elddis Caravan can be fitted with an on
board water pump as an option.
When the system is first used or if air is sucked
into the system when emptying your water
container:
•
Insert plug into wall socket and close lid to
lock plug in place.
•
Place carbon filter which is fitted to the hose
into the water container.
•
Insert plug into wall socket and close lid to
Switch on the 12V supply to pump.
•
Open the farthest away hot water tap from
the pump.
•
When the water is flowing smoothly close
hot tap and open the cold tap to expel the
remaining air.
•
Repeat points 4 and 5 for the second farthest
away tap from the pump, until the closest tap
is finally purged of air.
Note:
Following these instructions will maximise
the performance of your pump.
Without an on board water tank fitted.
Ensure all your taps are in the off position and
the pump is turned off, and then connect your
external water container to the water inlet using
the connection hose supplied. Switch the pump
switch on the control panel to on and the red
light should illuminate. The pump will run until the
correct pressure has built up in the system. Once
the pump switches off your water system is ready
to use. Please note, it will take at least 30 minutes
for your water heater to heat the water in its
holding tank to the expected temperature. When
you open a tap the pump light should illuminate
and the pump run while the tap is open, the
pump may run for a short time after the tap is
closed in order to build up the correct working
pressure again.
With an on board water tank fitted
(option only).
Filling your water tank:
Ensure all the taps are in the closed position and
the pump switch is in the centre position, and
then connect your external water container to
the water inlet using the connection hose
supplied.
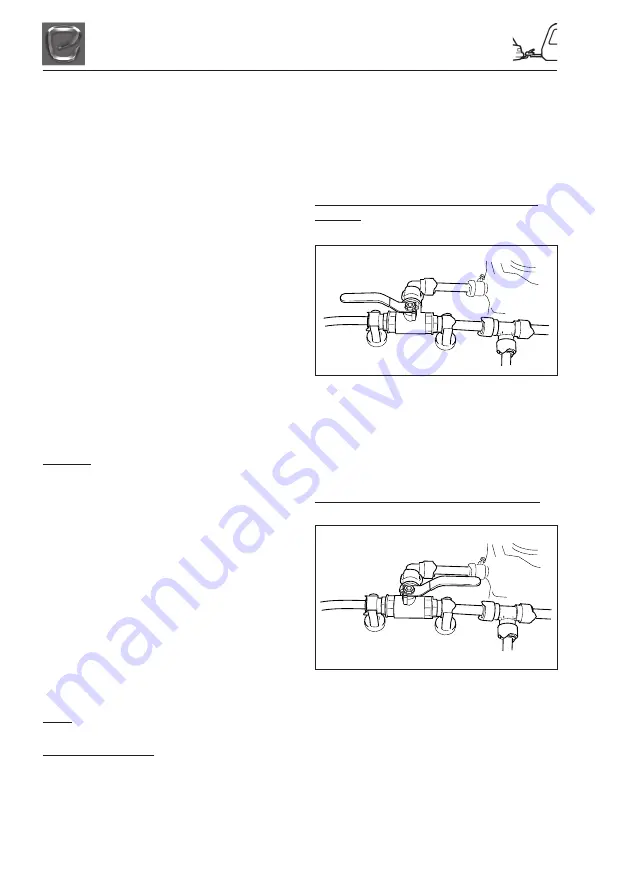
Ensure the manual valve next to the water pump
is in the left position. (i.e. pointing away from the
pump, see Fig 1). Then put the pump switch to the
fill position and the pump should run and start to
fill the water tank from the external water
container. When the tank is full the float switch
fitted in the tank will switch off the pump.
Using your taps direct from an external water
container
Ensure the manual valve next to the water pump
is in the left position. (i.e. pointing away from the
pump, see Fig 1). Then put the pump switch to the
taps position and open a tap. The pump should
run and water exits the tap. Once the tap is
closed the pump may run for a short time after
the tap is closed in order to build up the correct
working pressure again.
Using your taps from the on board water tank
Ensure the manual valve next to the water pump
is in the right position. (i.e. pointing towards the
pump, see Fig 2). Then put the pump switch to the
taps position and open a tap. The pump should
run and water exits the tap. Once the tap is
closed the pump may run for a short time after
the tap is closed in order to build up the correct
working pressure again.
PLEASE NOTE: The valve should not be placed in
the centre position (i.e. pointing towards the side
of the caravan)
Fig 1
Fig 2
Summary of Contents for Crusader
Page 5: ...CONTENTS 4 CONTENTS ...
Page 7: ...1 2 INTRODUCTION ...
Page 11: ...2 4 GENERAL SAFETY ...
Page 17: ...3 6 PREPARING FOR THE ROAD ...
Page 19: ...4 2 TOWING AND DRIVING ...
Page 27: ...6 6 GETTING STARTED ...
Page 29: ...7 2 GAS SAFETY ADVICE ...
Page 32: ...8 3 ELECTRICAL SYSTEM 12V FUSES SINGLE AXLE TWIN AXLE MODELS ...
Page 33: ...8 4 ELECTRICAL SYSTEM MAINS UNIT ...
Page 77: ...10 4 SECURITY ...
Page 85: ...12 2 STORAGE ...
Page 89: ...13 4 WARRANTY ...
Page 91: ...14 2 CODE OF PRACTICE ...
Page 93: ...15 2 CARAVAN CONSTRUCTION ...
Page 95: ...16 2 EQUIPMENT LIST ...
Page 96: ...17 1 ELECTRICAL DRAWINGS ELECTRICAL DRAWINGS 13 PIN PLUG WIRING DIAGRAM ...
Page 97: ...17 2 ELECTRICAL DRAWINGS WIRING DIAGRAM CRUSADER ...
Page 98: ...17 3 ELECTRICAL DRAWINGS ROAD LIGHTS CRUSADER ...
Page 99: ...17 4 ELECTRICAL DRAWINGS ...
Page 109: ...20 6 GLOSSARY ...
Page 115: ...22 2 CHANGE OF OWNERSHIP ...
Page 117: ...23 2 CHANGE OF ADDRESS ...
Page 121: ...24 4 INDEX Designed and Printed by Preset Graphics Tel 01332 549278 MY2012 Ref 21209 ...


