background image

Manual  ElDES EWK1                              

3

Fig. No. 2

Fig. No. 3

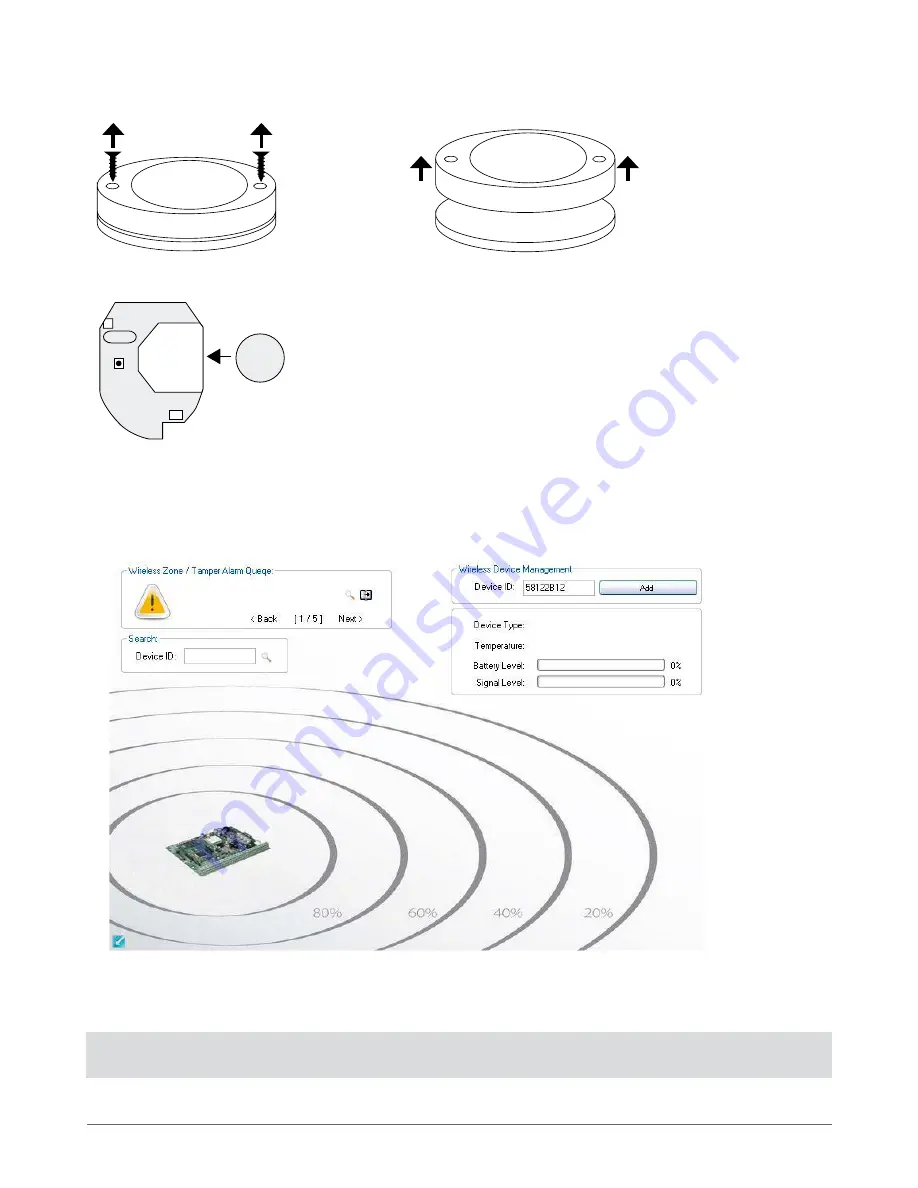
2. Open EWK1 key-fob housing. 

3. Installation

1.   Unscrew the EWK1 key-fob housing.

3.   Insert CR2032 battery provided in the EWK1 package. 

      Before inserting the battery, make sure that the battery’s “+” sign is facing the outer side. 

4.   Close and screw up the key-fob housing. 
5.   Bind the device to the alarm system using ELDES Configuration Tool software. Open 

Wireless Device Management

 section and 

enter a 8-digit wireless device ID located on the EWK1 enclosure and press 

Add

 button (see Fig. No. 5). The device can also be bind 

by sending a corresponding command via SMS message. For more details, please, refer to the software‘s HELP section and ELDES 

alarm system installation manual.

6.   Press any EWK1 button several times until the device is successfully bound. Upon the successful binding process EWK1 icon, 

Battery Level

 and 

Signal Level

 becomes visible in 

ELDES Configuration Tool

 software’s 

Wireless Device Management

 section.

7.   EWK1 is ready to use. 

NOTE: 

If you are unable to bind the wireless device, please, restore the parameters of the wireless device to default and try again.

See chapter 

6. Restoring Default Parameters 

for more details.

3V

CR2032

+

+

Fig. No. 4

Summary of Contents for EWK1

Page 1: ...WIRELESS KEY FOB EWK1 BELAIDIS PULTELIS ...

Page 2: ...feedback signal failure By default one pair of buttons is already configured to arm and disarm the alarm system NOTE Fig No 1 reflects the default EWK1 button configuration All key fob buttons are configurable according to individual needs 1 Package Content 1 EWK1 qty 1 2 CR2032 3V Lithium Battery qty 1 3 User Manual qty 1 2 Technical Specifications 2 1 Electrical Mechanical Characteristics Batter...

Page 3: ...d press Add button see Fig No 5 The device can also be bind by sending a corresponding command via SMS message For more details please refer to the software s HELP section and ELDES alarm system installation manual 6 Press any EWK1 button several times until the device is successfully bound Upon the successful binding process EWK1 icon Battery Level and Signal Level becomes visible in ELDES Config...

Page 4: ... status can be monitored in real time using ELDES Configuration Tool software 6 Restoring Default Parameters 1 Remove the battery from EWK1 key fob 2 Press and hold button 3 Insert the battery back to EWK1 4 Hold the button pressed until LED indicator provides several short flashes 5 Release button 6 Parameters restored to default 7 Additional Information Limited Liability The buyer must agree tha...

Page 5: ... by ELDES UAB ELSDES UAB reserves the right to update or modify this document and or related products without a warning Hereby ELDES UAB declares that this EWK1 wireless key fob is in compliance with the essential requirements and other relevant provisions of Directive 1999 5 EC The declaration of conformity may be consulted at www eldes lt The WEEE Waste Electrical and Electronic Equipment markin...

Page 6: ...eįvykdytą komandą ir negautą grįžtamąjį ryšį Pagal gamyklinę konfigūraciją viena mygtukų pora jau yra sukonfigūruota įjungti ir išjungti apsaugą PASTABA 1 pav pavaizduota EWK1 mygtukų gamyklinė konfigūracija Visų pultelio mygtukų funkcijos gali būti keičiamos pagal poreikius 1 Pakuotės sudėtis 1 EWK1 1 vnt 2 CR2032 3V Lithium baterija 1 vnt 3 Vartotojo vadovas 1 vnt 2 Techninė specifikacija 2 1 El...

Page 7: ... 5 pav Belaidis ryšys taip pat gali būti aktyvuotas nusiuntus atitinkamą SMS žinutę Plačiau apie tai skaitykite programinės įrangos HELP skyriuje ir ELDES apsaugos sistemos instaliavimo vadove 6 Aktyvuodami belaidį ryšį keletą kartų spustelkite bet kurį EWK1 mygtuką Sėkmingai aktyvavus belaidį ryšį tarp EWK1 įren ginio ir apsaugos sistemos ELDES Configuration Tool programinės įrangos Wireless Devi...

Page 8: ...šimkite bateriją iš EWK1 2 Paspauskite ir laikykite mygtuką 3 Įstatykite atgal bateriją į EWK1 4 Laikykite mygtuką kol LED indikatorius keletą kartų trumpai sumirksės 5 Paleiskite mygtuką 6 Gamykliniai parametrai atstatyti 7 Papildoma informacija Atsakomybės ribojimas Pirkėjas sutinka kad sistema sumažina gaisro plėšimo vagystės ar kitą riziką tačiau tai nėra draudimas ar garantija kad paminėti ve...

Page 9: ...umento dali be išankstinio raštiško UAB ELDES sutikimo UAB ELDES pasilieka teise be išankstinio ispejimo tobulinti ar keisti bet kuriuos dokumente paminetus gaminius taip pat pati dokumenta UAB ELDES deklaruoja kad belaidis pultelis EWK1 atitinka esminius reikalavimus ir kitas 1999 5 EC direktyvos nuostatas Jos atitikties deklaracija galima rasti šiame tinklalapyje www eldes lt Pagal WEEE direktyv...

Page 10: ...ducts Inc iButton is a registered trademark of Maxim Integrated Products Inc Dallas is a registered trademark of Maxim Integrated Products Inc Ademco Contact ID is a registered trademark of Pittway Corporation Microsoft Windows and Vista are registered trademarks of Microsoft Corporation ...

Reviews: