1. The occupancy sensor wall switch turns lighting or fan loads on
and off based on occupancy and ambient light level. They are
designed to replace a standard light switch. The switch operates
with 120 to 277V AC line voltage.
2. The sensor uses passive infrared technology to sense human
motion, and defines it as occupancy. A red LED in the sensor
blinks upon occupancy and then resets. It will blink again when
it detects motion after the 2-second reset.
3. In Automatic ON & Automatic OFF mode, the sensor turns on
the load automatically when it detects occupancy. Once the
space is vacant and the time delay elapses, it turns off the load
automatically.
4. With different settings, occupancy sensors (model# SP17OS)
can be converted to vacancy sensors (model# SP17VS), while
vacancy sensors cannot be converted to occupancy sensors.
5. If adequate ambient light is already present in the area, the
sensor will hold off the load it controls. When the light drops
below a field selectable level and the sensor detects occupancy,
the sensor turns on the load.
MOUNTING LOCATION
The device responds to temperature changes and care should be
taken when mounting the device. Do not mount directly above a
heat source, in a location where hot or cold drafts will blow
directly on the sensor, or where unintended motion (e.g., hallway
traffic) will be within sensor’s field-of-view.
4A - INSTALLATION FOR SINGLE POLE
Slotted / Phillips Screwdriver
Pencil
PREPARATION BEFORE INSTALLATION
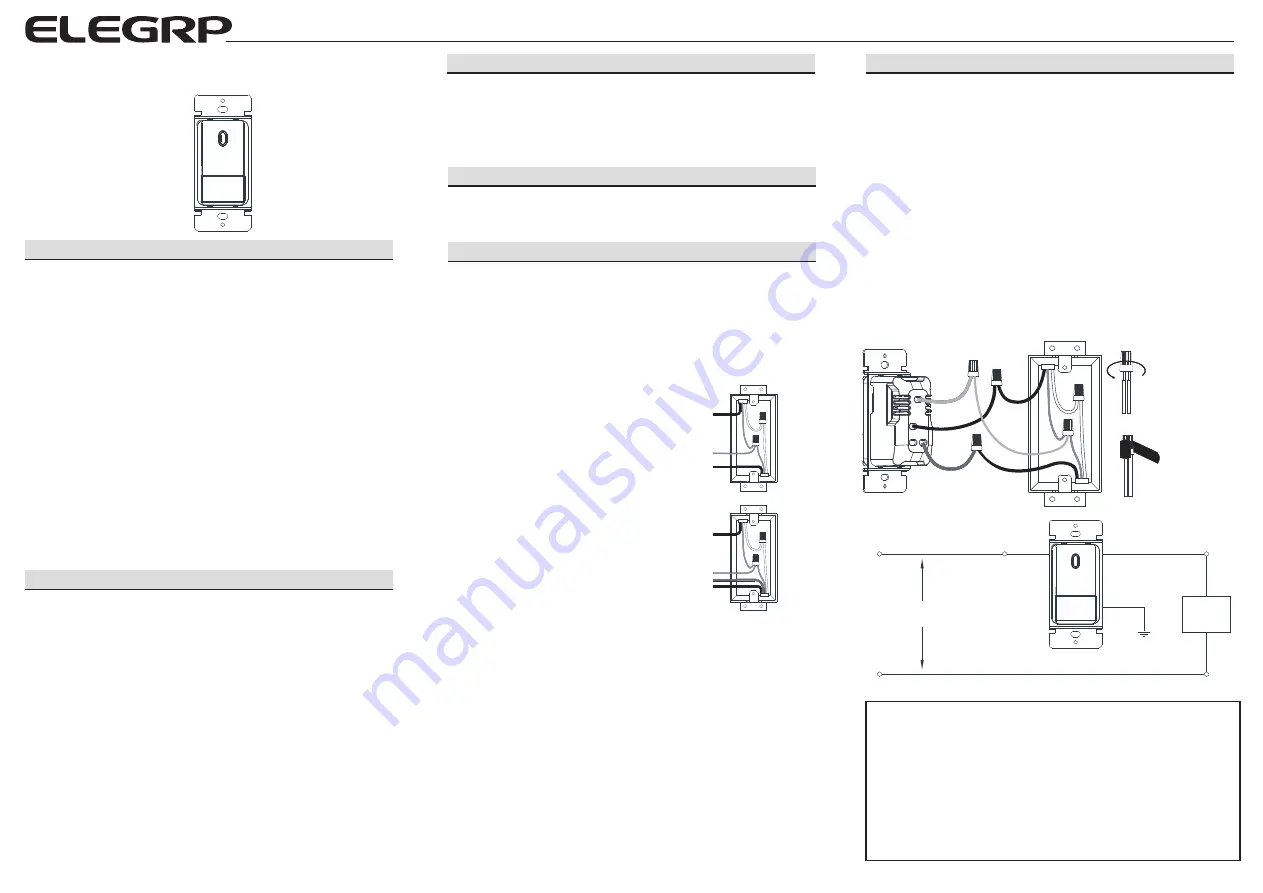
Single-Pole
1. Line (Hot)
2. Neutral
3. Ground
4. Load
Two Location Control
1. Line (Hot)
2. Neutral
3. Ground
4. Traveler (note color)
5. Load
1
2
3
4
1
3
4
5
2
If the wiring in the wall box does not resemble any of these
configurations, consult an electrician.
4. Before Wiring the Device:
1. Make sure that the ends of wires from the wall box are straight
(cut if necessary).
2. Remove 5/8" (1.6 cm) of insulation from each wire in the wall box.
3. Use wire connectors to join one 12 AWG supply wire with one or
two 16 AWG or 18 AWG, or to join one 14 AWG supply wire with
one to three 16 AWG or 18 AWG.
NOTE: Three wire connectors provided in the product
package are suitable for copper or copper clad wire only.
For single-pole applications, go to Step 4A.
For two location control applications, go to Step 4B.
Electrical Tape
Pliers
Cutters
Ruler
1. Turn OFF Power:
Turn power OFF at circuit breaker (or remove fuse).
2. Remove Wallplate and Switch:
Remove wallplate and switch mouting screws. Carefully
remove switch from wall (do not remove wires).
3. Identify the Type of Circuit:
TOOLS NEEDED FOR INSTALLATION
UNIT FEATURES AND DESCRIPTION
WARNINGS AND CAUTIONS
1.
CAUTION:
To avoid overheating and possible damage to this
device and other equipment,
DO NOT
install to control a
receptacle.
2. To be installed and/or used in accordance with appropriate
electrical codes and regulations.
3. If you are unsure about any part of these instructions, consult an
electrician.
4. Use this device with copper or copper clad wire only.
5. Do not use this product to control loads in excess of specified
ratings, or it may cause death, injury or property damage.
6. The sensing switch requires an unobstructed view of room
occupants to detect motion.
7. Hot objects or moving air currents can affect the performance of
the sensing switch.
8. For indoor use only. Operate between 32 to 104
o
F (0 to 40 °C).
9. Clean sensor with a piece of soft damp cloth only. Do not use
any chemical cleaners.
Hot (Black)
Black
Black
White
Line 120VAC, 60HZ
Green Ground
Neutral (White)
Load
Connect wires per wiring diagram as follows:
1. Connect green ground or bare copper wire in wall box to the
Green wire of the device.
2. Connect the Hot wire in wall box wire to the Black wire of the
device.
3. Connect the Load wire(s) in wall box wire to the Red wire of the
device.
4. Screw wire connectors on clockwise making sure no bare
conductors show below the wire connectors. Secure each
connector with electrical tape.
5. Mount device in wall box with screws provided and mount wall plate.
6. Restore power at circuit breaker or fuse. Installation is complete.
7. Turn on the power, manually press the switch button to check
whether the product is installed correctly, and at the same time
ensure that the LED light in the fresnel lens flashes. Wait about
40s for product booting, the product will work properly.
Green
Black
Red
Ground
Neutral
Hot
Load
Insert wires into
wire connectors
then twist
clockwise
Use electrical
tape to secure
wire connectors
and wires
Red
NOTE:
1. A ground connection is required to operate. Use the ground
wire in the wall box for ground connection. If no ground is
available, consult an electrician. Device will not function if it is
not grounded.
2. The hot (black wire) and load (red wire) must be correctly
connected as stated above, otherwise the device will not
function. If the light never turns on, then try to reverse the hot
and load wiring of the sensor.
Passive Infrared Occupancy Sensor Wall Switch
LED/CFL 300W, Incandescent 600W, 1/2 HP, 120~277VAC, 60Hz
INSTALLATION INSTRUCTIONS
Model No.:
SP17OS (Occupancy Sensor)
SP17VS (Vacancy Sensor)


