background image

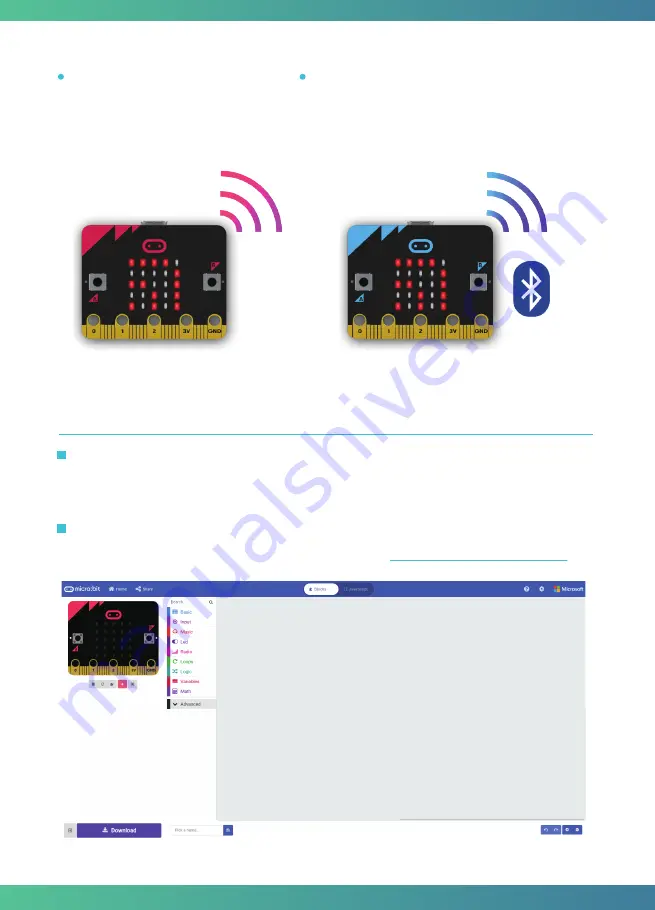
Bluetooth:

 The Bluetooth Low Energy antenna 

allows the micro:bit to 

send and receive Bluetooth 

signals, you can wirelessly communicate between 
micro:bit and phones, PCs, or tablets.

 You need to 

pair your micro:bit with another device before using 
the Bluetooth antenna.

Radio:

 The radio feature allows you 

to 

communicate wirelessly 

between two or more micro:bits

.

Quick start

Step 1. Connect it

Connect the micro:bit with your computer via a USB cable, then your micro:bit will show up on 

your computer as a drive called “MICROBIT”.

Write your micro:bit code by using the official online editor 

https://makecode.microbit.org/

Step 2. Program it

4

Summary of Contents for Crowtail Starter Kit

Page 1: ...User Guide V2 0 2020 02 www elecrow com 2020 ELECROW All Rights Reserved C Crowtail Starter Kit for Micro bit...

Page 2: ......

Page 3: ...Experiment 10 Automatic control Experiment 11 Automatic door Experiment 12 Weather station Experiment 13 Ultrasonic ranging smart door Experiment 14 Make an accurate clock Experiment 15 Distance displ...

Page 4: ...xperiments so you can learn how the electric modules work and use it to build innovative works and plan out unique projects In addition the kit also focuses on stimulating children s creativity so tha...

Page 5: ...as Blocks JavaScript Python Scratch and etc This guide will focus on Makecode a block or JavaScript based environment developed by Microsoft LED Array The micro bit has 25 individually programmable L...

Page 6: ...Temperature Sensor The Microcontroller doubles as a temperature sensor The temperature sensor transforms the temperature in the ambient environment into digital signals that can be read by the micro...

Page 7: ...nother device before using the Bluetooth antenna Radio The radio feature allows you to communicate wirelessly between two or more micro bits Quick start Step 1 Connect it Connect the micro bit with yo...

Page 8: ...ons into this area to form your program Drag and drop some blocks and try your program out in the Simulator in the Makecode Editor the example below shows you how to program a smiley face Step 2 1 Sel...

Page 9: ...to make sure your micro bit is powered up and within easy reach of the phone or tablet while running the App There are two types of APPs available for micro bit which are based on Microsoft Makecode l...

Page 10: ...The Crowtail Base shield for Micro bit is the core part of this kit it acts as a bridge between Micro bit board and Crowtail modules You can plug and then play with Crowtail modules and micro bit thro...

Page 11: ...ight Here we will learn how to use the LED and control it s on and off Learn how the LED work and use it to make a blinking light Learn how to run the code forever Learn how to output logic high and l...

Page 12: ...also use Boolean states of true and false but we will use 0 and 1 as our standard throughout this guide Pause If you were to just turn pins on and off with the digital write block without a pause the...

Page 13: ...ts of Crowtail Base shield for Micro bit The hardware connections are as follows Congratulations you have mastered the method of controlling the LED on and off But just like the lights at home can we...

Page 14: ...if the statement is true the value is digital read from P0 port equal to 1 then turn on the LED on pin 1 else turn off the LED on P1 Download the program to micro bit to see what happens Do you like m...

Page 15: ...ctions are as follows Programming and note Learn how the buzzer work and use it to play songs Learn how to run the code once at the beginning of the program Micro bit x1 Crowtail Base shield for Micro...

Page 16: ...nt to keep the buttons secret There are so many dangerous areas that we can t touch with our hands directly otherwise we may be in danger For example we can t touch the power socket with our hands bec...

Page 17: ...bee noise to prevent touching The buzzer will stop sounding until you stop touching Download the program to micro bit to see what happens If you put your hand on the touch sensor the buzzer will make...

Page 18: ...ction via 4 pin sensor cable and Micro bit sensor expansion board connector Hardware learning and connection Learn how the collision sensor work and use it to make a collision detector with buzzer Mic...

Page 19: ...r on P0 and P2 else turn off the LED and buzzer on P0 and P2 Digital Write There are two modules we need to use the digital write block to set they output 1 logic HIGH signal or 0 logic LOW signal Her...

Page 20: ...bit x1 Crowtail Light Sensor x1 Crowtail LED Green x1 Crowtail Cable x2 USB cable x1 Target Required Parts The Light sensor module uses the GL5516 photoresistor to detect the light intensity of the e...

Page 21: ...larger than this value when it is less than this value it indicates that the brightness is dark and we need to turn on the LED Download the program to micro bit to see what happens The LED will not l...

Page 22: ...1 Crowtail LED Yellow x1 Crowtail Buzzer x1 Crowtail Cable x3 USB cable x1 Target Required Parts This Moisture sensor can be used to detect the moisture of soil and thus to monitor if the plants in yo...

Page 23: ...else if analog read from P0 is more than 500 is true then it will execute the code blocks inside of the else if Else analog read from P0 is larger than 50 and less than 500 it will execute the else bl...

Page 24: ...Required Parts Crowtail PIR Motion Sensor Passive Infrared Sensor can detect infrared signals caused by motion If the PIR sensor notices the infrared energy the motion detector will be triggered and t...

Page 25: ...o bit s matrix LEDs when it runs Here we clear matrix LEDs when PIR motion sensor does not detect the movement of Infrared energy Download the program to micro bit to see what happens Wave your hand i...

Page 26: ...e brightness of the LED Learn how to create variables to store value Learn how to remap numbers from one range to another Micro bit x1 Crowtail Base shield for Micro bit x1 Crowtail Linear Potentiomet...

Page 27: ...a certain propor tion Here we need to map the potentiometerValue value between 0 and 1023 to value between 0 and 255 and write it to P1 port For example if the value of potentiometerVal ue is 240 the...

Page 28: ...ule in some actual applications such as home automation and sometimes you need to control large current such as the air conditioning water heater That is what this Large Current Relay Module can help...

Page 29: ...hen the switch is detected to open we use the digital write module to turn on the relay 1 and then the battery box power can flow through the DC motor so that the battery box and the DC motor could fo...

Page 30: ...cost servo for all your mechatronic needs It comes with a 4 pin power and control cable mounting hardware Servo is used in many intelligent situations such as automatic doors robots aerial models etc...

Page 31: ...ft to 180 degrees and 0 degrees these two specified angles Pause After we moved the servo s shaft to 180 degrees opening the door we used a pause block to pause the code so that the door would not clo...

Page 32: ...Crowtail Base shield for Micro bit x1 Crowtail Temperature Humidity Sensor x1 Crowtail Cable x1 USB cable x1 Target Required Parts This module can help you detect the temperature and humidity of the e...

Page 33: ...pin Use this block in the extension package we added to set the pin of Crowtail Temperature Humidity Sensor and get data from it Available data includes Fahrenheit Celsius and Humidity In here we get...

Page 34: ...quired Parts This HC SR04 has stable performance and high ranging accuracy The process of ultrasonic ranging Ultrasonic pulses travel outward until they encounter an object The object causes the wave...

Page 35: ...r Micro bit The hardware connections are as follows Programming and note Just as Crowtail Temperature Humidity Sensor we need to add the extension package for Crowtail Ultrasonic Ranging Sensor before...

Page 36: ...se you forgot to set the alarm clock This is really embarrassing Let s make an alarm clock with a RTC module together today and say goodbye to being late Experiment 14 Make an accurate clock Instructi...

Page 37: ...days including corrections for leap year Besides this module is really low power consumption it can serve you more than a month with a CR1220 battery Connect Crowtail RTC and Crowtail Buzzer to I2C an...

Page 38: ...e if statement will not run Download the program to micro bit to see what happens It takes too much time to scroll the messages on the micro bit s matrix LEDs which makes viewing very inconvenient But...

Page 39: ...ce that detected by the ultrasonic ranging sensor Learn how to show number and string on OLED Micro bit x1 Crowtail Base shield for Micro bit x1 Crowtail Ultrasonic Ranging Sensor x1 Crowtail OLED x1...

Page 40: ...s block is used to clears the OLED display In this case every time we cycle we will display on a clear OLED screen Show without newline number Displays a number on the OLED module without a newline No...

Page 41: ...icro bit which allows you to communicate between two or more micro bits Experiment 16 Wireless communication Instruction Learn how radio work on micro bit and use it to communicate between 2 micro bit...

Page 42: ...nother micro bit into Crowtail Base shield for Micro bit named bit2 if you don t have two Crowtail Base shield for Micro bit you don t have to plug this micro bit into Crowtail Base shield for Micro b...

Page 43: ...s packet did not contain a number If the number received by bit1 receiv er_code is 3 the code inside the if statement of bit1 will be run If the number received by bit2 send_code is 4 the code inside...

Page 44: ...w to detect the keys pressed by the infrared remote control Target Micro bit x1 Crowtail Base shield for Micro bit x1 Crowtail IR Receiver x1 Crowtail LED Green x1 Crowtail 9G Servo x1 Crowtail Cable...

Page 45: ...to micro bit to see what happens Step2 Add the package to your Makecode and you can see it When you press the 1 key on the controller the LED will turn on when you press the 2 key the LED will turn o...

Page 46: ...es That is a very interesting thing so let s do a similar project in this lesson put it in a box and make a fun and smart music box Experiment 18 Smart music box Instruction Connect Crowtail Ultrasoni...

Page 47: ...ield and the other end of the jumper to the COM port of the Relay Connect the two wires of the motor to the NO port of the relay and the GND port of the Base Shield Note that the power consumed by the...

Page 48: ...ck detects and runs the code we want to run when the button is pressed When the key is pressed turn the relay on when the key is pressed turn the relay off Download the program to micro bit and see wh...

Page 49: ...aking tilting and free fall Micro bit x2 Crowtail Base shield for Micro bit x2 Crowtail Touch Sensor x1 Crowtail Switch x1 Crowtail LED Yellow x1 Crowtail Buzzer x1 Crowtail 9G Servo x1 Crowtail Cable...

Page 50: ...or example shaking the micro bit In send_code when bit1 logo down we send 1 when bit1 tilts to the left we send 2 when bit1 tilts to the right we send 3 Show leds This block is to shows a picture on t...

Page 51: ...shaft rotates to 180 degrees and a right picture is displayed on the micro bit matrix LEDs 5 If the number received is 4 play a melody in background 6 If the number received is 5 turn LED on 7 If the...

Page 52: ...s The game we are going to make is one of the most popular games pick up beans Experiment 21 Pick up beans Target Connect Crowtail Buzzer and Crowtail LED to P0 and P1 ports of Crowtail Base shield fo...

Page 53: ...the score Download the program to micro bit to see what happens 1 Set the position of the player sprite and bean sprite and turn LED off 2 Change the y axis position of the bean sprite 3 If player spr...

Page 54: ...t up to indicate a score a new bean will spawn on top of the matrix LED and start falling otherwise the game ends and the score is displayed Result 51 You have just finished your invention journey wit...

Page 55: ......

Page 56: ......

Reviews: