background image

88

Screw Set Volume Controls

Your hearing care provider will adjust screw set 
volume controls.  There is no on/off switch built 
into the screw set volume control.  To turn off 
your instruments, you must leave the battery 
door open or remove the battery.  An optional 
on/off toggle switch may be used if space is 
available.

Directional Microphone System

Your hearing instrument may be equipped 
with a Directional Microphone System.  For 
listening in noisy situations (directional mode), 
simply move the microphone switch forward.  
For listening in a quiet environment (omni-
directional mode), move the switch backward 
(see figure 7).

Figure 7

Summary of Contents for 06E123456L

Page 1: ...Operating Instructions for Hearing Instruments...

Page 2: ...g instrument as well as operating instructions for other hearing instrument models Refer to the Table of Contents for instructions on using your particular instrument Electone hearing instruments are...

Page 3: ...earning to use your hearing instruments requires a period of adjustment and patience The adjustment period varies for each individual depending on your dedication and motivation Remember that just as...

Page 4: ...truments 5 Inserting and Removing the CIC Hearing Instrument 5 Volume Controls 6 Manual Volume Controls 7 Screw Set Volume Controls 8 Directional Microphone System 8 Using the Telephone 9 Telecoil Swi...

Page 5: ...19 Reset Function 21 General Use 21 Digital Hearing Instruments 22 General Use 22 Maintenance Daily Care 23 Health Considerations 27 Important Notice to Hearing Instrument Users 27 Hearing Instrument...

Page 6: ...ow are suggested guidelines for adjusting to your new hearing instruments Your hearing care professional may provide additional or modified guidelines to meet your individual needs For the first few d...

Page 7: ...scouraged It may simply be a matter of finding the proper spot in order to hear more clearly Binaural Amplification Nature gives us two ears for a reason Binaural amplification the wearing of two hear...

Page 8: ...ls denote the manufacturer size year of manufacture and the serial number Red numbers indicate the instrument is for the right ear blue is for the left In the Ear In the Canal Electone FS 06E123456 L...

Page 9: ...y must match the sign stamped on the battery door Gently close the battery door Avoid forcing the battery door shut If the door doesn t close check to see the correct size battery was inserted and tha...

Page 10: ...proper position by slightly twisting until it is firmly seated in your ear Lightly press inward for a secure and comfortable fit see figure 4 When removing the instrument reverse the insertion process...

Page 11: ...E Your hearing instrument may include a feature which delays power on of the instrument for a few seconds to allow insertion without feedback Your hearing instrument provider will inform you if this f...

Page 12: ...acing instruments in your ears To turn the instrument on and increase volume place the forefinger gently against the wheel and turn rotating the wheel in a forward direction towards your nose When the...

Page 13: ...ttery door open or remove the battery An optional on off toggle switch may be used if space is available Directional Microphone System Your hearing instrument may be equipped with a Directional Microp...

Page 14: ...models may be equipped with a toggle telephone switch that changes your hearing instruments from microphone position to telecoil position In the telecoil position your hearing instruments are compatib...

Page 15: ...iliar With Your Behind the Ear Instruments Your behind the ear instrument is designed for comfort performance and durability The instrument fits comfortably behind your ear and is attached to a custom...

Page 16: ...ery must match the sign stamped on the battery door see figure 8 Gently close the battery door Avoid forcing the battery door shut If the door doesn t close check to see the correct size battery was i...

Page 17: ...ear canal Gently work the earmold into its proper position by slightly twisting until it is firmly seated in your ear Lightly press inward for a secure and comfortable fit see figure 10 Slip the hear...

Page 18: ...control incrementally adjusts the volume To decrease volume press the bottom wide portion of the control To increase volume press the top narrow portion of the control see figure 11A Some instruments...

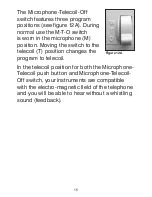
Page 19: ...for you Microphone Telecoil Controls Your behind the ear instruments may be equipped with either a Microphone Telecoil push button or a Microphone Telecoil Off switch The Microphone Telephone push but...

Page 20: ...M position Moving the switch to the telecoil T position changes the program to telecoil In the telecoil position for both the Microphone Telecoil push button and Microphone Telecoil Off switch your i...

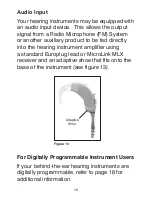
Page 21: ...ct to be fed directly into the hearing instrument amplifier using a standard Europlug lead or MicroLink MLX receiver and an adaptive shoe that fits onto the base of the instrument see figure 13 For Di...

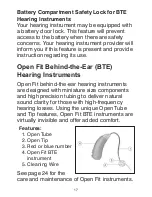
Page 22: ...s use Open Fit Behind the Ear BTE Hearing Instruments Open Fit behind the ear hearing instruments are designed with miniature size components and high precision tubing to deliver natural sound clarity...

Page 23: ...give you distinct high quality amplification They can be adjusted or reprogrammed by your hearing care provider if needed Only your hearing care provider can reprogram your hearing instruments There...

Page 24: ...r listening requirements A push button on the faceplate of the instrument controls this multi memory feature see page 20 At each press of the switch the next memory is selected so you can easily cycle...

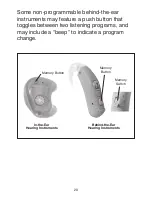
Page 25: ...instruments may feature a push button that toggles between two listening programs and may include a beep to indicate a program change In the Ear Hearing Instruments Memory Button Behind the Ear Heari...

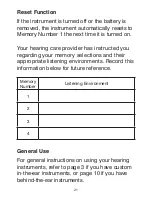
Page 26: ...provider has instructed you regarding your memory selections and their appropriate listening environments Record this information below for future reference Memory Number Listening Environment 1 2 3...

Page 27: ...Programmed A computer is used to adjust the instrument 2 Manually Adjustable Your provider adjusts your hearing instrument with small screw sets located on the face of the hearing instrument If you ar...

Page 28: ...should hold the instrument so it faces downward allowing the accumulated wax to fall away and not be pushed further into your hearing instrument Behind the Ear Hearing Instruments Inspect earmold dail...

Page 29: ...rdened tubing Open Fit Behind the Ear Hearing Instruments It is important that you inspect and maintain your instrument daily To remove wax or other debris from the Open Fit hearing instrument use the...

Page 30: ...Open Tube by pulling toward the Open Tip before reattaching the Open Tube to the hearing instrument Reattach the Open Tube to the hearing instrument using a gentle clockwise rotation The small number...

Page 31: ...ur Open Tube and Open Tip have been measured to fit your ear only Never allow others to wear or try on your instrument All Hearing Instruments Take care not to drop the instruments on hard surfaces as...

Page 32: ...ur hearing care provider for follow up care is a very important part of your maintenance schedule Health Considerations If you develop skin irritation or soreness in either ear or if excessive earwax...

Page 33: ...y an otolaryngologist or ear specialist before dispensing an instrument if he or she observes or detects any of the following conditions Visible congenital or traumatic deformity of the ear History of...

Page 34: ...uments having maximum sound levels exceeding 132 dB there may be associated risks of impairment to remaining hearing ability at these output levels if the fitted instruments are inappropriate for loss...

Page 35: ...y will be provided without charge Other services will be at owner s expense Defective parts will be replaced with new or rebuilt equivalent for the warranty period Any replacement parts are warranted...

Page 36: ...ance of the warranty period will apply to the replacement instrument Instruments that have been replaced cannot be returned for credit If a replacement instrument is issued for a lost device and the o...

Page 37: ...For your records information about your hearing instruments may be recorded below Warranty Register To Warranty Expiration Model Description Serial Number Battery Size Hearing Care Provider Hearing C...

Page 38: ...the battery as well as current discharge if the instrument is not fully turned off Always carry spare batteries in the event your battery goes dead Each spare battery should be placed in an individual...

Page 39: ...children or pets In the event a battery is accidentally swallowed seek prompt medical attention at the nearest emergency center or call collect The National Battery Registry at 202 625 3333 Always dis...

Page 40: ...ersal Package Tab Color Full Shell FS 13 or 312 Orange Brown Half Shell HS 312 Brown Canal CA 312 or 10A Brown Yellow Mini Canal MC 10A Yellow Completely in the Canal CC 10A Yellow Ultra Helix UH 10A...

Page 41: ...ophone or receiver Clear wax guard Volume setting set too low Turn up volume Not placed in ear properly Reposition instrument Feedback instrument whistles Volume too high Turn volume down Obstruction...

Page 42: ...P O Box 521727 Longwood FL 32752 1727 www electoneonline com 2006 Electone Inc 7130 0276 6 11 2006 Your Hearing Care Provider...

Reviews: