background image


OPERATION 

1. Turn on the power, the product will be in standby mode, the display will show (- -); 

2. Press the function button, then press the heat levels 

to start the unit’s operation: 

(L1-L2-L3-L4- standby - off)


REMOTE CONTROL 

Inserting Batteries 

Insert 2 AAA type batteries into your remote control 

1.  Flip the backside of your remote control and pull out battery cover. Insert the batteries in 

accordance with the instructions and polarity the batteries. 

2.  Change the batteries in the same way depicted above. 
 

NOTICE: 

1.  Replace the old batteries with the same type batteries. Otherwise, your heater may not 

function well. 

2.  Pull out the batteries in case of long terms of disuse to prevent leakage which may 

impair your remote control. 

3.  Do not allow water or liquid to get into the remote control. 
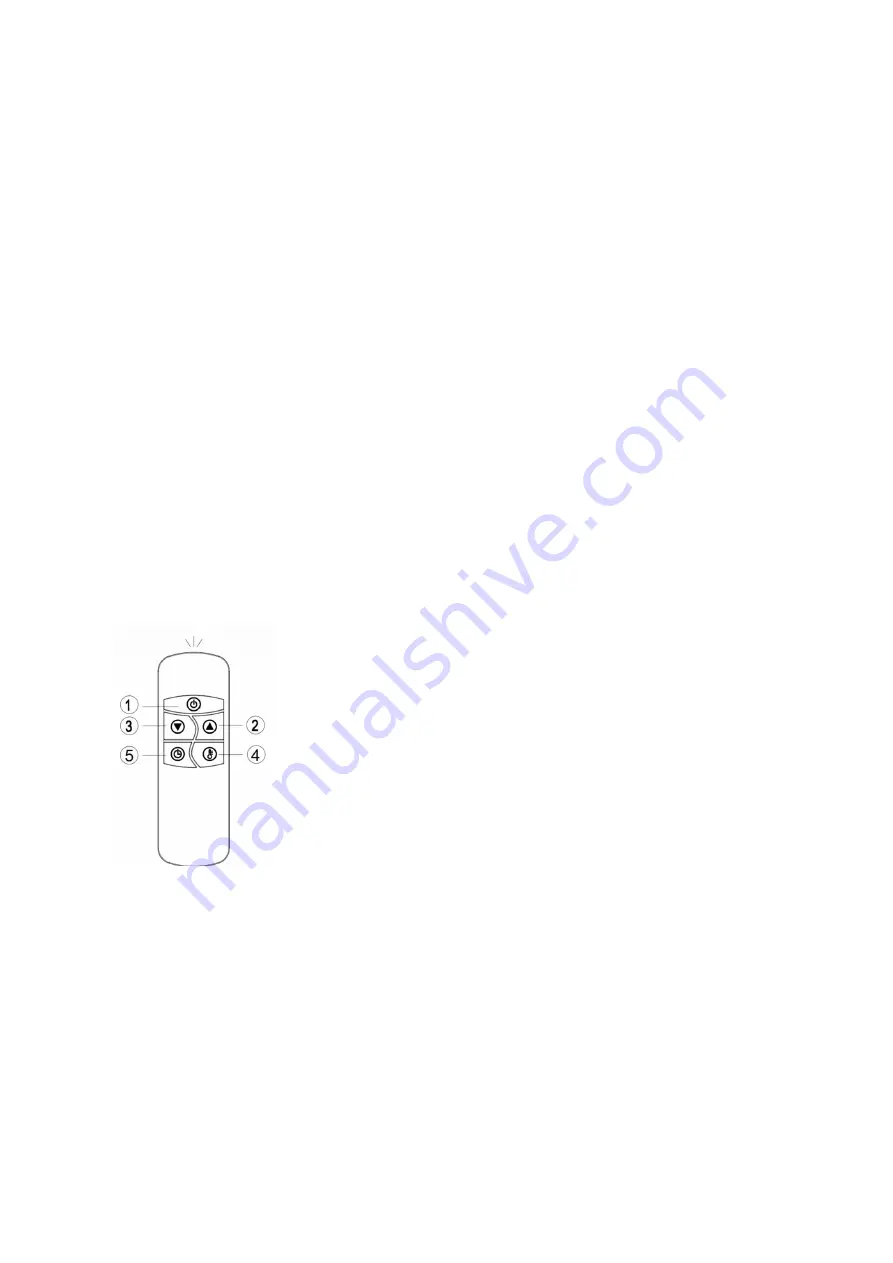


1. 

POWER BUTTON: 

Turn the heater off.


2. 

UP BUTTON: 

Increase timer and level.


3. 

DOWN BUTTON: 

Decrease timer and level.


4. 

LEVEL BUTTON: 

Use to adjust the heat levels(L1-L4).


Press the Level button then use the up and down 
buttons (buttons 2 and 3) to increase or decrease the 
heating level. 

5. 

TIMER BUTTON: 

To set the timer from 0H-24H, which is 

the number of hours it will run. 0H will display and then 
adjust to the number of hours you would like to set, 
using the up and down buttons (2 and 3).


Summary of Contents for 1572945

Page 1: ...USER MANUAL OUTDOOR WALL AND CEILING HANGING HEATER eiQSTAR Thank you for choosing electriQ Please read the manual before using this heater and keep it safe for future reference...

Page 2: ...or our entire product range CONTENTS SAFETY INSTRUCTIONS 3 PARTS LIST 5 ASSEMBLY 5 INSTALLATION 6 OPERATION 8 REMOTE CONTROL 8 CHANGING THE ORIENTATION 10 TROUBLESHOOTING 9 CLEANING AND MAINTENANCE 9...

Page 3: ...se of the appliance in a safe way and understand the hazards involved Children aged from 3 years and less than 8 years shall not plug in regulate or clean the appliance or perform user maintenance Chi...

Page 4: ...dry location when not in use Minimum distances should always be complied with from top 60 cm from sides 150 cm The heater should not face flammable substances or surfaces Heaters should not be install...

Page 5: ...eiling mounting the lowest part of the heater must be located at or above a minimum height of 2 4m from ground level so that the heater cannot be touched when in operation 3 When installed to the ceil...

Page 6: ...6 WALL MOUNTED INSTALLATION CEILING MOUNTED INSTALLATION...

Page 7: ...7 CORRECT WALL AND CEILING POSITION INSTALLATION WITH TRIPOD STAND optional...

Page 8: ...es with the same type batteries Otherwise your heater may not function well 2 Pull out the batteries in case of long terms of disuse to prevent leakage which may impair your remote control 3 Do not al...

Page 9: ...allation clearances E2 Tip over function Ensure the heater is less than 60 working angle and restart heater L1 2 3 4 Shows in display but no heat Bulb is damaged Contact the supplier CLEANING AND MAIN...

Page 10: ...elds Way Elland West Yorkshire HX5 9DA Disposal Do not dispose this product as unsorted municipal waste Collection of such waste must be handled separately as special treatment is necessary Recycling...

Reviews: