background image

19 


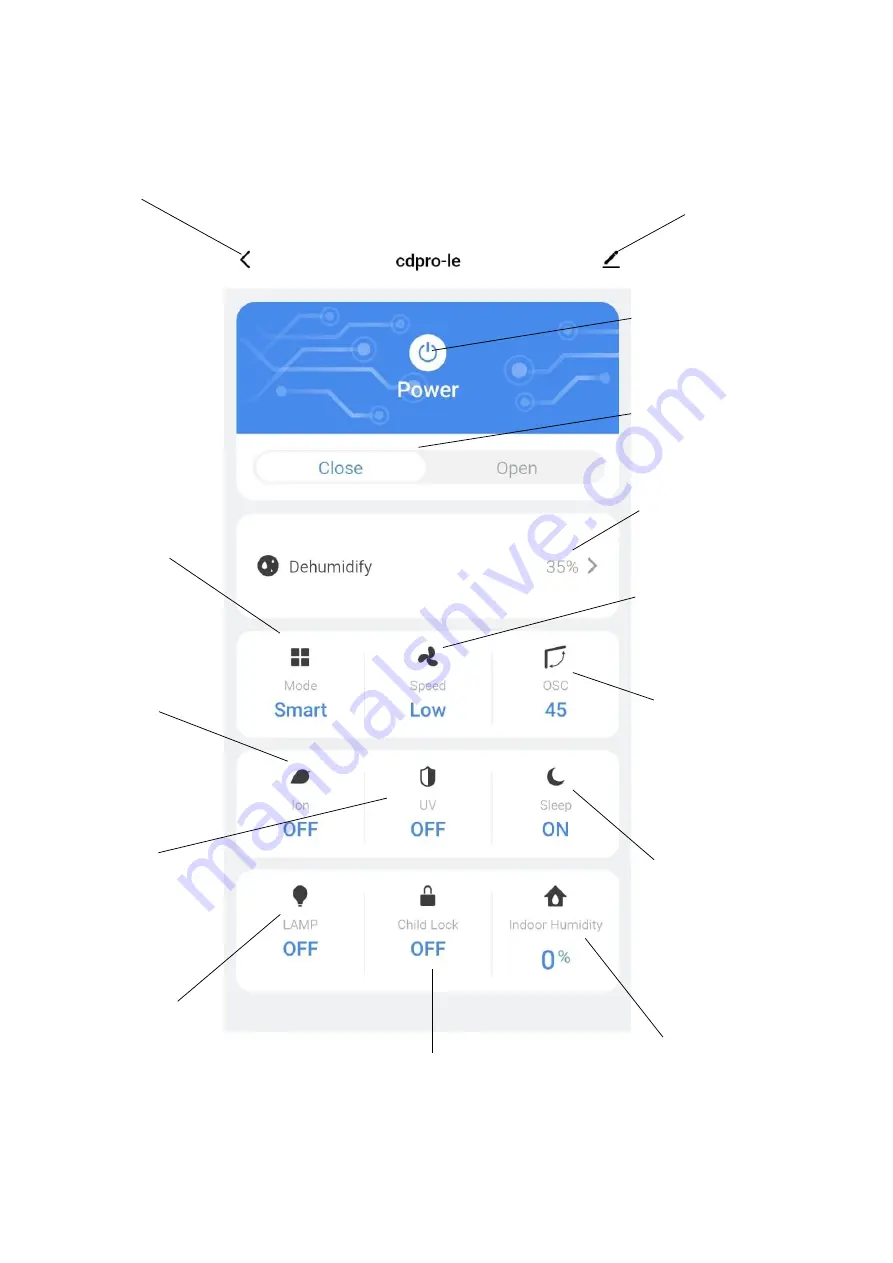
DEVICE SCREEN 

The device screen is the main control screen for the dehumidifier, providing access to the controls to 
amend the functions of the dehumidifier


Profile: 

Use to change the 

name of the dehumidifier 
and amend user settings. 


Back: 

Return to the Home 

Screen 


On / Off Slider: 

Shows if the unit is 
turned On or Off.


Mode: 

Change the 

operating mode 
between Smart, 
dehumidify, Air purify 
and laundry. 


Desired Humidity: 

Change the desired 
humidity between 
35°C and 80°C 


Oscillation: 

Set the 

position of the louvres 


Room Humidity: 

Shows the current 
room humidity.


Lamp: 

Turns the 

humidity indicator 
light On and Off. 


Ioniser: 

Allows the 

Ioniser to be turned 
on and off 


UV Light: 

Allows the 

UV Light to be turned 
on and off 


On / Off Button: 

Use to 

turn the dehumidifier On 
and Off. 


Speed: 

Set the fan 

speed of the 
appliance. 


Sleep: 

Turn the sleep 

mode On and Off. 


Child Lock: 

Turn the 

Child lock On and Off.


Summary of Contents for CD12PRO-LE

Page 1: ... 12 Litres per day CD20PRO LE 20 Litres per day CD25PRO LE 25 Litres per day Thank you for choosing electriQ Please read this user manual before using this innovative dehumidifier and keep it safe for future reference Visit our page www electriQ co uk for our entire range of Intelligent Electricals ...

Page 2: ...NEL 7 OTHER FEATURES AND INDICATORS 9 QUICK REFERENCE GUIDE 10 POSITIONING THE DEHUMIDIFIER 11 WATER DRAINAGE 12 SETTING UP THE WIFI APP 13 CONNECTING USING QUICK CONNECTION 16 CONNECTING USING AP MODE 17 CONTROLLING YOUR DEVICE THROUGH THE APP 18 SMART SCENES 20 AUTOMATION 21 CONNECTION TROUBLESHOOTING 22 CARE AND MAINTENANCE 23 TROUBLESHOOTING 24 TECHNICAL DATA 25 SUPPORT 26 ...

Page 3: ...utlet using an extension cord If a power outlet is not available one should be installed by a qualified electrician Never operate this appliance if the power cord or plug is damaged Ensure the power cord is not stretched or exposed to sharp objects edges A damaged power supply cord should be replaced by the manufacturer or a qualified electrician in order to avoid a hazard Any service other than r...

Page 4: ...he unit by a suitably qualified engineer Before opening and servicing the unit the authorized engineer must be in possession of a copy of the manufacturer s service manual and must follow the safety information contained within it to ensure all hazards are minimized The refrigerant system should not be perforated or punctured Do not place the unit next to heat sources e g electrical fires fireplac...

Page 5: ...utants include bacteria viruses dust mites and pollen Emissions from electronic office equipment Many studies including those from EPA and the University of California Berkley have reported that emissions from office equipment such as computers and printers include VOCs ultra fine particles and ozone These emissions have been proven to have a negative effect on the health of many people which can ...

Page 6: ...R Replacement filters are available from the retailer under code ACFIL CDLEX HEPA FILTER Filters are available from the retailer under code HEPA CDLEX Note Diagrams are for illustrative purposes only The design of the parts may vary from what is shown ...

Page 7: ...r is easy to move around on castors and is designed to extract unwanted humidity while saving money due to it s power saving logic It features an intelligent humidistat where the desired relative humidity can be adjusted in increments of 5 between 35 and 80 ensuring the air in your room is not too dry and that power is not wasted INSTALLATION Remove any water from within the water tank before star...

Page 8: ...possible This is ideal for drying clothes WIFI Press and hold the WiFi button for 3 seconds to turn on the WIFI function See the WiFi Section for more information UP DOWN HUMIDITY SETTING Press the UP and DOWN buttons to select the desired relative humidity level the default relative humidity is 55 When a relative humidity of 35 is selected the compressor will not stop until the water tank is full...

Page 9: ...tions to improve indoor air quality The relevant LEDs above the button will illuminate to show which function is currently activated LOCK Press and hold the FUNCTION button for 3 seconds to activate the child lock While activated the lock LED will illuminate and the buttons on the control panel are deactivated To turn off the lock press and hold the FUNCTION button for 3 seconds SWING SWING Button...

Page 10: ...room with a temperature between 12 C and 20 C it will enter the defrost mode roughly every 45 minutes HUMIDISTAT CONTROL AND FAN COMPRESSOR OPERATION When the humidity of the room is 2 lower than the desired humidity the compressor will turn off automatically but the fan will continue to operate to ensure that the air within the room is not stale The unit will use only a minimal amount of energy i...

Page 11: ...he fan moves the air around the room ensuring the entire air in the room is processed and humidity correctly measured DEHUMIDIFY MODE This is the standard operating mode for which the desired humidity can be set using the up and down buttons LAUNDRY MODE When drying clothes it is advised for the dehumidifier to operate continuously with maximum water extraction until the water tank is full Do not ...

Page 12: ...on for your dehumidifier If possible leave interior doors ajar to allow air circulation Alternatively if you have a serious problem in one area you can begin by positioning the dehumidifier there and moving it to a more central location at a later date For the most effective use run your dehumidifier with external doors and windows kept closed Please note the unit should not be placed directly aga...

Page 13: ... into the unit Banging the bucket against anything or failing to push it in securely into place may cause the unit not to operate Do not remove any parts from the water tank or tank enclosure The water full sensor will no longer be able to detect the water level correctly and water may leak from the water tank 2 CONTINUOUS DRAINAGE Water can be automatically plumbed in or drained into a sink a lar...

Page 14: ...our chosen store Android IOS CONNECTION METHODS AVAILABLE FOR SETUP The smart device has two different setup modes CF Quick Connection and AP Access Point The quick connection is a quick and simple way to set the unit up AP connection uses a direct local WiFi connection between your phone and the dehumidifier to upload the network details Before starting the setup please ensure that your dehumidif...

Page 15: ...email address or phone number and press continue to register 4 A verification code will be sent by the method selected in step 3 Enter the code into the app 6 The app is now registered It will automatically log you in following registration 5 Type in the password you would like to create This needs to be 6 20 characters with letters and numbers ...

Page 16: ... CREATING ROOMS 1 Press on the ADD HOME button 2 Type in a name for your home 3 Press on the location button to select the location of your home See SETTING YOUR LOCATION below 4 New rooms can be added by pressing the ADD ANOTHER ROOM option at the bottom See ADD ANOTHER ROOM below 5 Untick any rooms that are not required on the app 6 Press DONE in the top right corner SETTING YOUR LOCATION Use yo...

Page 17: ...p 2 Select the type of device as Dehumidifier in the Small Home Appliance tab 3 Ensure the WiFi light on the dehumidifier is flashing twice per second then press on the orange button at the bottom of the screen to confirm 5 This will then transfer the settings to the dehumidifier Wait for this to complete If this fails retry If still unsuccessful please review the troubleshooting section for furth...

Page 18: ...midifier 3 Press on the AP mode button in the top right of the screen 4 Ensure the WiFi light on the dehumidifier is slowly flashing once per second then press on the orange button at the bottom of the screen to confirm 5 Enter your WiFi password and press confirm 6 Go to network settings in your phone and connect to the SmartLife xxx connection There is no password to enter Then return back to th...

Page 19: ...18 CONTROLLING YOUR DEVICE THROUGH THE APP THE HOME SCREEN Add a device Choose the device to control Smart Scenes Automation User Profile ...

Page 20: ...ng mode between Smart dehumidify Air purify and laundry Desired Humidity Change the desired humidity between 35 C and 80 C Oscillation Set the position of the louvres Room Humidity Shows the current room humidity Lamp Turns the humidity indicator light On and Off Ioniser Allows the Ioniser to be turned on and off UV Light Allows the UV Light to be turned on and off On Off Button Use to turn the de...

Page 21: ...f preset configurations Below is an example of how to set up a scene 1 Press on the Smart Scene tab at the bottom of the Home screen 3 Select Scene to create a new Scene 2 Press on the Plus in the top right corner to add a smart scene 4 Press the Pen next to Please Enter Scene Name to input the name for your Scene Show on Dashboard Leave this on if you require the scene to be displayed as a button...

Page 22: ...next to Please Enter Scene Name to input the name for your Scene Press the Red Plus next to When any condition is satisfied to add the trigger Press the Red Plus next to Execute following actions to add the action required Then select the dehumidifier from the list of devices 6 Chose the function set the value for the function and then press the back button in the top right corner to return to the...

Page 23: ...you are also able to change settings related to the app itself CONNECTION TROUBLESHOOTING 1 Check whether the device is powered on and is in the correct standby mode if not please refer to the CHANGING BETWEEN CONNECTION MODES section on page 9 2 Ensure the wifi password has been entered into the app correctly Case sensitive 3 Check that the phone is connected to the wifi you are connecting the de...

Page 24: ...oover gently approximately every 2 3 weeks If the mesh filter is dirty hoover it if it is heavily soiled wash it with warm soapy water and dry thoroughly before reinserting it in the unit When filter cleaning is finished and filters are dry placed them back into the unit The optional filters should be replaced every 3 6 months NOTE While the HEPA and Carbon filters are optional never run the unit ...

Page 25: ...ure a distance of at least 20 cm between the unit walls Airflow seems weak Are the filters dirty or clogged Please service the filters regularly as per the user manual Unit is noisy during operation Is the unit on an uneven surface Please place on flat horizontal surface Where possible this should be soft such as rubber or carpet to prevent vibrations Is filter clogged Please service the filters r...

Page 26: ... ambient operating range is between 5 C and 35 C with a relative humidity ranging from 30 to 80 For maximum efficiency use the unit between 15 C and 32 C Sometimes cold and or hot air comes out from the air outlet grill why When the unit is in dehumidifying mode it absorbs humid air from room and freezes it to reduce the humidity During the cold cycle there should be cold air coming out of the uni...

Page 27: ...y Elland West Yorkshire HX5 9DA Recycling facilities are now available for all customers at which you can deposit your old electrical products Customers will be able to take any old electrical equipment to participating sites run by their local councils Please remember that this equipment will be further handled during the recycling process so please be considerate when depositing your equipment P...

Reviews: