background image

20 


SETTING THE UNIT TO WORK ON A TIMER 

The  automation  feature  within  TUYA  can  be  used  to  set  up  timed 
operation, this is done through the automation within SMART SCENES. 
Follow  the  steps  on  the  previous  page,  on  the  “SET  A  CONDITION” 
screen,  set  the  condition  as  schedule,  choose  the  time  and  days  you 
require the unit to turn on. Then press next and In the “SET UP A TASK” 
screen, choose the appliance, then the option to power the unit on, and 
the other settings required. Once the ON time is set, repeat the steps to 
set when the unit will turn off.


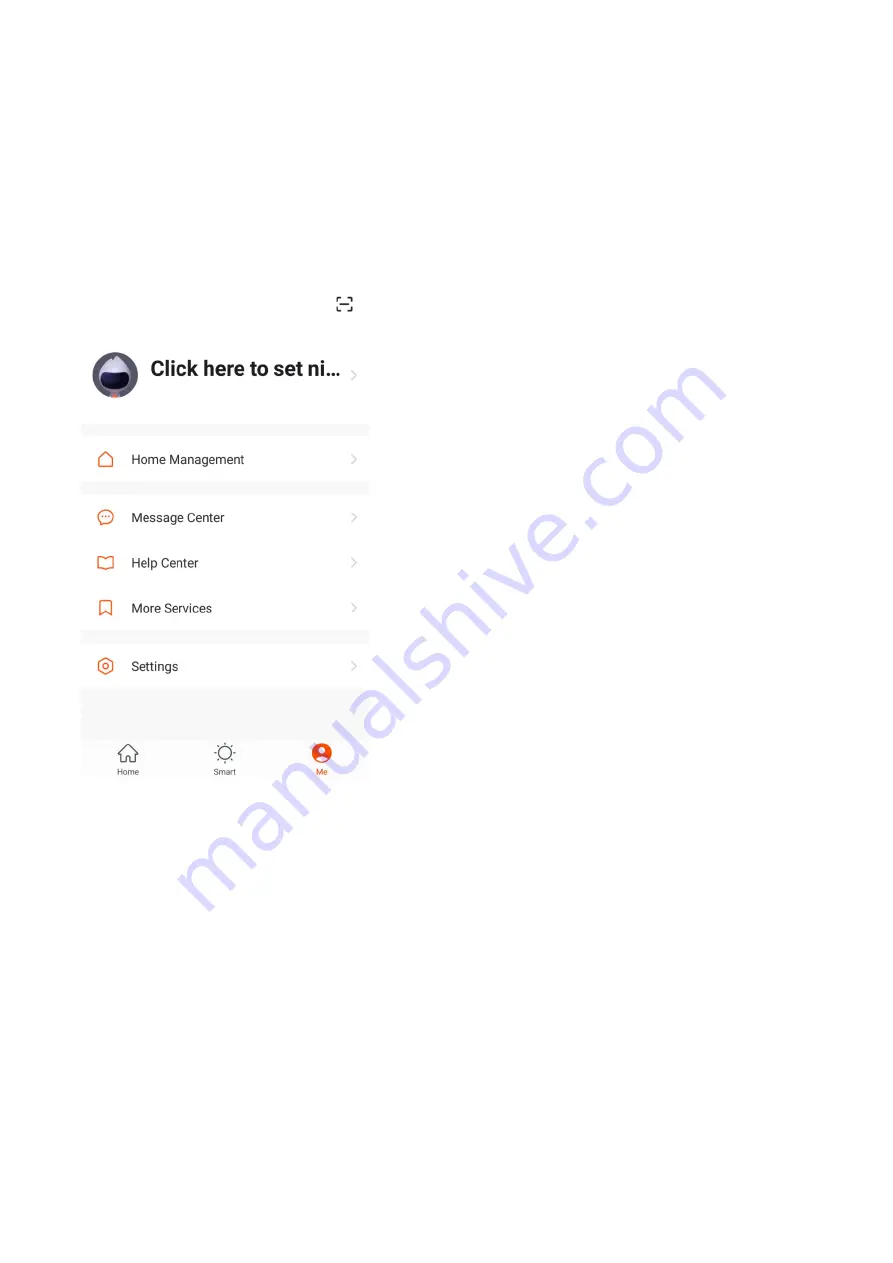
PROFILE TAB 

The profile tab gives  you the option to edit both 
your detail, and use the added features of the unit. 

 
HOME MANAGEMENT 

Home Management proves options for managing 
your TUYA account, giving options such as adding 
a home, adding and removing rooms, and sharing 
devices with family. 

 
MESSAGE CENTRE 

View notifications from devices, if alarms are set 
up (dependent on device) 

 
HELP CENTRE 

Provides assistance using the features provided 
within the app 

 
MORE SERVICES 

This  allows  the  unit  to  be  integrated  with  your 
favorite  home  automation  hardware  such  as 
Google Home and the Amazon Echo. 


CONNECTION TROUBLESHOOTING 

1.  Check whether the device  is powered on and is in  the correct Wi-Fi connection 

mode, if not please refer to the CHANGING BETWEEN CONNECTION MODES 
section. 

2.  Ensure  the  Wi-Fi  password  has  been  entered  into  the  app  correctly  (Case 

sensitive) 

3.  Check that the phone is connected to the Wi-Fi you are connecting the device to. 
4.  Ensure the network you are connecting it to is 2.4Ghz (5Ghz Wi-Fi networks are 

not supported), and that there is a strong Wi-Fi signal to the item.   

5.  If your router is dual band, ensure that the 2.4ghz network has a different network 

name (SSID).  Further  advice on changing router settings will be available from 
your Internet service provider / Router manufacturer. 

6.  Check  the  settings  on  the  router.  Encryption  should  be  WPA2-PSK  and 

authorisation type should be set to AES 

Try  using  the  alternative  connection  method.  i.e.  If  connection  is  failing  when 
attempting to connect through CF mode, try AP mode. 


Summary of Contents for EDR-TRD1025B

Page 1: ...RD1025B EDR TRD1025W Thank you for choosing electriQ Please read the manual before using this heater and keep it safe for future reference Visit our page www electriQ co uk for our entire product range THIS PRODUCT IS ONLY SUITABLE FOR WELL INSULATED SPACES OR OCCASIONAL USE ...

Page 2: ...2 ...

Page 3: ... PREPARING FOR USE 7 REMOTE CONTROL 7 CONTROL PANEL 8 OPERATING THE HEATER 9 CONNECTING THE APPLIANCE TO WIFI 11 CONTROLLING YOUR APPLIANCE THROUGH THE APP 16 CLEANING MAINTENANCE AND STORAGE 21 TROUBLESHOOTING 21 TECHNICAL SPECIFICATION 22 SUPPORT 22 PRODUCT FICHE 23 ...

Page 4: ...n Children aged from 3 years and less than 8 years shall only switch on off the appliance provided that it has been placed or installed in its intended normal operating position and they have been given supervision or instruction concerning use of the appliance in a safe way and understand the hazards involved Children aged from 3 years and less than 8 years shall not plug in regulate or clean the...

Page 5: ... the heater Keep the heater clean Do not allow any object to enter the ventilation or exhaust opening as this may cause electric shock fire or damage to the heater There may be a trace of odour during the first few minutes of initial use or after a period of storage This is normal and will quickly disappear Do not use this heater in the immediate surroundings of a bath a shower or a swimming pool ...

Page 6: ...G Handle H Remote control I Heater J Castors KEY FEATURES 3 Power Settings 1000 1500 and 2500W Wi Fi connection for easy control Castors and handles for portability 24 Hour timer Easy to read touch screen display Anti tip Sensor for safety The appliance will turn off if not upright A B C D E F G H I J ...

Page 7: ...ances within 50cm of the unit Do not cover the heater CONNECTING THE HEATER Before inserting the plug into a suitable socket ensure that the appliance is intact properly assembled and that there are no signs of damage to the appliance or its power cable To avoid overloading a circuit do not use the appliance on a circuit with other high powered equipment unless you have confirmed the circuit is su...

Page 8: ...ate button DECREASE Press to decrease the desired room temperature or the duration of the timer following pressing the appropriate button STANDBY When the unit is plugged in and switched on press to start the unit and exit standby mode POWER INDICATOR Displays when the unit is plugged in and the power switch is on ECO MODE INDICATOR Displays when ECO mode is enabled TEMPERATURE INDICATOR When this...

Page 9: ...levels 5 Press the thermostat button then use the and buttons to select the desired room temperature CHANGING THE MODE 1 When the heater is first powered on the unit will start in ECO mode 2 To change the heating mode press the MODE button once to cycle through the available modes The heating modes are as follows MODE DISPLAY POWER W HIGH 2500 MEDIUM 1500 LOW 1000 ECO In ECO mode the power level i...

Page 10: ...period of time please note only one timer can be used at any time ON TIMER The timer will turn on the unit automatically after the time set has elapsed 1 With the unit in standby press the TIMER button then set the number of hours time you desire the unit to start using the and buttons 2 Once the set time has elapsed the unit will turn on automatically 3 Press the POWER button before the time has ...

Page 11: ...bile phone has both WiFi and Bluetooth enabled and simply plug the heater in and switch it on the unit should now be in connection mode with the WiFi indicator flashing If the indicator does not flash follow the step below to reset the WiFi within the unit We would advise that mobile data is turned off during the connection process The unit can also be set up using the Quick connection method with...

Page 12: ...r 4 A verification code will be sent by the method selected in step 3 Enter the code into the app 6 The app is now registered It will automatically log you in following registration 5 Type in the password you would like to create This needs to be 6 20 characters with letters and numbers 1 Press on the register button at the bottom of the screen ...

Page 13: ...Type in a name for your home 3 Press on the location button to select the location of your home See SETTING YOUR LOCATION below 4 New rooms can be added by pressing the ADD ANOTHER ROOM option at the bottom See ADD ANOTHER ROOM below 5 Untick any rooms that are not required on the app 6 Press DONE in the top right corner SETTING YOUR LOCATION Use your finger to move the orange HOME symbol When the...

Page 14: ...t your WiFi network and enter your WiFi password this is usually found on the back of your router 5 Your device will then begin to connect Once successfully connected press Done 1 Open app and enter the home screen Turn the unit on and on the app press add device 2 The heater will use Bluetooth to search for local devices Press the Add button to add a device using bluetooth 3 The heater will use B...

Page 15: ...ff during setup 2 Select the type of device as Heater WiFi within the Small Home Appliance tab 3 Press on the orange button at the bottom of the screen 5 Enter your Wi Fi password if requested and press confirm 6 This will then transfer the settings to the heater Wait for this to complete If this fails retry 1 Open app and press to add device or use the add device button 4 Confirm the light is fla...

Page 16: ...ther changes Smart Scene Allows you to program intelligent behaviour based on the internal and external environment Add Device Add a device to the app and go through the setup process Profile Provides the option for changing settings Name of Heater Press to enter the Device Screen Home Return to home screen from the Smart Scene and Profile screens Voice Control Press to give verbal instructions fo...

Page 17: ...me Screen SWITCH Use to turn the unit on or off MODE Use to change between Eco Low Medium and High Heat TIMER Use to set up a scheduled start or stopping time for the unit Device Name Current Mode Shows the mode the heater is currently working in Desired Room Temperature Displays what has been set as the target room temperature Decrease desired Temperature Temperature range 5 30C Increase Desired ...

Page 18: ...eset configurations Below is an example of how to set up a scene 3 Press the Pen next to Please Enter Scene Name to input the name for your Scene Show on Dashboard Leave this on if you require the scene to be displayed as a button on the Home Screen Press the Red Plus to add the action required Then select the heater from the list of devices 4 Chose the function set the value for the function and ...

Page 19: ...xt to Please Enter Scene Name to input the name for your Scene Press the Red Plus next to When any condition is satisfied to add the trigger Press the Red Plus next to Execute following actions to add the action required Then select the heater from the list of devices 6 Chose the function set the value for the function and then press the back button in the top right corner to return to the previou...

Page 20: ...s assistance using the features provided within the app MORE SERVICES This allows the unit to be integrated with your favorite home automation hardware such as Google Home and the Amazon Echo CONNECTION TROUBLESHOOTING 1 Check whether the device is powered on and is in the correct Wi Fi connection mode if not please refer to the CHANGING BETWEEN CONNECTION MODES section 2 Ensure the Wi Fi password...

Page 21: ...to the outside of the dial Desired room temperature is set too low Turn the thermostat to MAX and check if the unit operates Power cord is disconnected Ensure the plug is fully inserted into the socket There is no power from socket Ensure the socket is turned on and is functioning with other devices The fuse has blown Replace the fuse in the plug Odour emission from unit When the unit is used for ...

Page 22: ...pecial treatment is necessary Recycling facilities are now available for all customers at which you can deposit your old electrical products Customers will be able to take any old electrical equipment to participating civic amenity sites run by their local councils Please remember that this equipment will be further handled during the recycling process so please be considerate when depositing your...

Page 23: ... At minimum heat output elmin N A kW single stage heat output and no room temperature control No In standby mode elSB 1 44 W two or more manual stages no room temperature control No with mechanical thermostat room temperature control No with electronic room temperature control Yes with electronic room temperature control plus day timer No with electronic room temperature control plus week timer No...

Reviews: