background image

13 


TROUBLESHOOTING 

PROBLEM    

CONDITION    

FIX 

Pilot won’t light   

Cylinder valve is closed 

Open valve 

Blockage in orifice or pilot tube 

Clean or replace orifice or pilot tube 

Air in the gas line 

Open gas line and bleed it (pressing 

control dial in) for not more than 1-

2 minutes or until you smell gas 

Low gas pressure 

Gas cylinder low or empty 

Ignition fails 

Use match to light pilot, and obtain new 

ignitor and replace. (See below pictures) 

Pilot won’t stay lit   

Dirt build up around the pilot   

Clean dirt from around the pilot 

Connection between the 

gas valve and pilot assembly is loose 

Tighten the connection and perform a 

leak test 

Bad thermocouple 

Replace the thermocouple 

Burner won’t light   

Gas pressure is low 

Replace the gas cylinder 

Blockage in the orifice 

Clear the blockage 

Control dial is not in the 

"HIGH" position 

Turn control dial to the "HIGH" position 

Burner flame is low   

Note: Do not operate 

heater below 5

(40

°F

) 

Gas pressure is low 

Replace the gas cylinder 

Tank is almost empty. 

Replace the gas cylinder 

Supply hose is bent or kinked   

Straighten hose and perform leak test on 

the hose 

Control dial is fully " ON"   

Turn control dial to "OFF", let it cool to 

room temperature and check burner and 

orifices for blockage 

Emitter glows uneven   

Note: Bottom 2.5cm of 

emitter does not 

normally glow   

Gas pressure is low   

Replace the gas cylinder 

Base is not on a level surface   

Place heater on a level surface   

Heater not level 

Level the heater 

Carbon build-up   

Dirt or film on 

the reflector and/or emitter   

Clean the reflector and emitter   

Thick black smoke   

Blockage in burner 

Turn the control dial to the 

OFF

 position, let 

it cool to room temperature and remove 

blockage and clean burner inside and 

outside. 


IN  THE  EVENT  OF  ANY  PROBLEM,  PLEASE  CONSULT  THE 

SUPPLIER. 

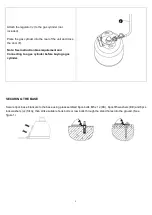
If for some reasons your ignition fails to deliver a spark, the heater 

can be started by inserting a lit match using supplied match holder 

through the burner hole (see left photo) while pushing the control 
dial in the “PILOT” position.


Summary of Contents for EQODHMBL

Page 1: ...USER MANUAL GAS PATIO HEATER EQODHMSS EQODHMBL WARNING FOR OUTDOOR USE ONLY OR IN WELL VENTILATED AREAS PLEASE KEEP THE MANUAL FOR FUTURE REFERENCE...

Page 2: ...2 CONTENTS SAFETY 3 PARTS LIST 5 ASSEMBLY 6 SECURING THE BASE 9 OPERATION 10 LEAK TESTING 11 GAS INFORMATION 11 MAINTENANCE 12 STORAGE 12 TROUBLESHOOTING 13 SPECIFICATIONS 14 SUPPORT 14...

Page 3: ...ground Turn off the gas cylinder if gas leak is suspected Parts sealed by the manufacturer must not be altered by the user No modifications should be made to any part of this heater and repairs and m...

Page 4: ...items on this heater DO NOT operate this heater unless it is fully assembled with its reflector in place Respect the minimum clearances from combustible materials GENERAL INFORMATION FOR SUCCESSFUL A...

Page 5: ...r of Housing Preassembled 1 I Gas Pipe 1 J Hose Regulator 1 K Post 1 L Base Preassembled 1 M Wheel Kit 1 PART DESCRIPTION IMAGE QTY PART DESCRIPTION IMAGE QTY AA M8 flange 2 GG Cap Nut 12 BB M8x16mm b...

Page 6: ...wheel assembly M with the corresponding holes on base L Then insert M8 x 16 mm bolts BB through the holes Hand tighten with the M8 flange nuts AA Be sure the wheel assembly M is parallel to the base L...

Page 7: ...this point Attach the Reflector Panels A together using the M6 x 8mm Screws FF 6 Washers DD and Cap Nuts GG Do not fully tighten at this point Note In order to achieve proper alignment of reflector s...

Page 8: ...t the hose regulator assembly I J through top of housing E and Post K tighten gas pipe I to head assembly C Secure head assembly C to the post K using bolts M5 x 10 HH lock washer JJ and 5 washers EE...

Page 9: ...instruction Gas requirement and Connecting to a gas cylinder before buying a gas cylinder SECURING THE BASE Secure 3pcs base brackets to the base using preassembled 6pcs bolts M5 x 12 KK 6pcs 5 washe...

Page 10: ...E PATIO HEATER Before lighting the patio heater the pilot light should be lit with the dial set to PILOT Press the dial and turn anti clockwise to the HIGH position When the mesh glows the dial can be...

Page 11: ...r with a damaged body valve collar or foot ring A dented or rusty gas cylinder may be hazardous and should be checked by a gas supplier Never connect this appliance to an unregulated gas source When t...

Page 12: ...may create a fire hazard If any carbon deposits develop clean the dome and burner with warm soapy water Note In environments with a high salt content such as near the sea corrosion occurs more quickly...

Page 13: ...operate heater below 5 40 F Gas pressure is low Replace the gas cylinder Tank is almost empty Replace the gas cylinder Supply hose is bent or kinked Straighten hose and perform leak test on the hose C...

Page 14: ...NO PT SE SI SK RO TR CZ FR GB GR IE PT PL AT CH DE AT CH DE NL Category I3 28 30 37 I3B P 30 I3P 37 I3B P 37 I3B P 50 I3P 50 Gas G30 G31 G30 G31 G31 G30 G31 G30 G31 G31 Pressure mbar 28 30 37 30 37 3...

Reviews: