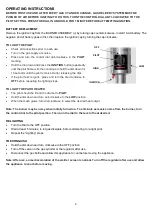
background image

10 


LEAK TESTING 

NEVER USE A NAKED FLAME TO CHECK FOR LEAKS.  

NEVER LEAK TEST WHILE SMOKING. 

The gas connections on this appliance are leak tested at the factory prior to 

shipment.  

This appliance needs to be periodically checked for leaks and an immediate 

check is required if the smell of gas is detected. 


Make a soap solution using 1 part of liquid dish-washing soap to 3 parts 

water. The soap solution can be applied with a soap bottle, brush, or rag 

to the leak tested points shown in the figure above.  


The  valve  of  the  gas  cylinder  should  be  in  the 

OFF 

position.  Once  the 

soapy  solution  is  applied  to  the  gas  connections,  the  valve  of  the  gas 

cylinder needs to be turned to the 

ON 

position.  


Soap bubbles will begin to form in the soapy solution if a leak is present. 


In case of a leak, turn off the gas supply. Tighten any leaking fittings, then 

turn the gas supply on and recheck. 


GAS REQUIREMENTS 


The regulator and hose assembly used must conform to local safety requirements. 


Never  use  a  gas  cylinder  with  a  damaged  body,  valve,  collar,  or  foot  ring. A  dented  or  rusty  gas  tank  may  be 
hazardous and should be checked by a gas supplier. 


Never connect this appliance to an unregulated gas source. 


When the appliance is not in use, turn the gas cylinder OFF, before disconnecting it. 


Always perform a leak test on gas connections whenever a cylinder is connected. If bubbles form in the leak test 
solution, do not use. Never use a flame to test for leaks.  


CONNECTING TO A GAS CYLINDER


Use a 9 kg gas cylinder. 

Please refer to your gas supplier for suitable gas cylinder. 


Refer to your gas supplier for instructions on the use of your gas cylinder. 


Only change gas cylinders outdoors or in a well-ventilated area away from naked flames and any other source of 

ignition. 


The gas cylinder must always be used in an upright position.  


Close the heater control dial by turning fully clockwise. 


Close the gas cylinder tap and then attach the regulator onto the gas cylinder.  


Tighten all connections firmly and with a spanner where appropriate. The cylinder should be located on the cylinder 

base. 


Check for leaks at all joints using soapy water. If a leak is found, tighten the joint and then re-test.
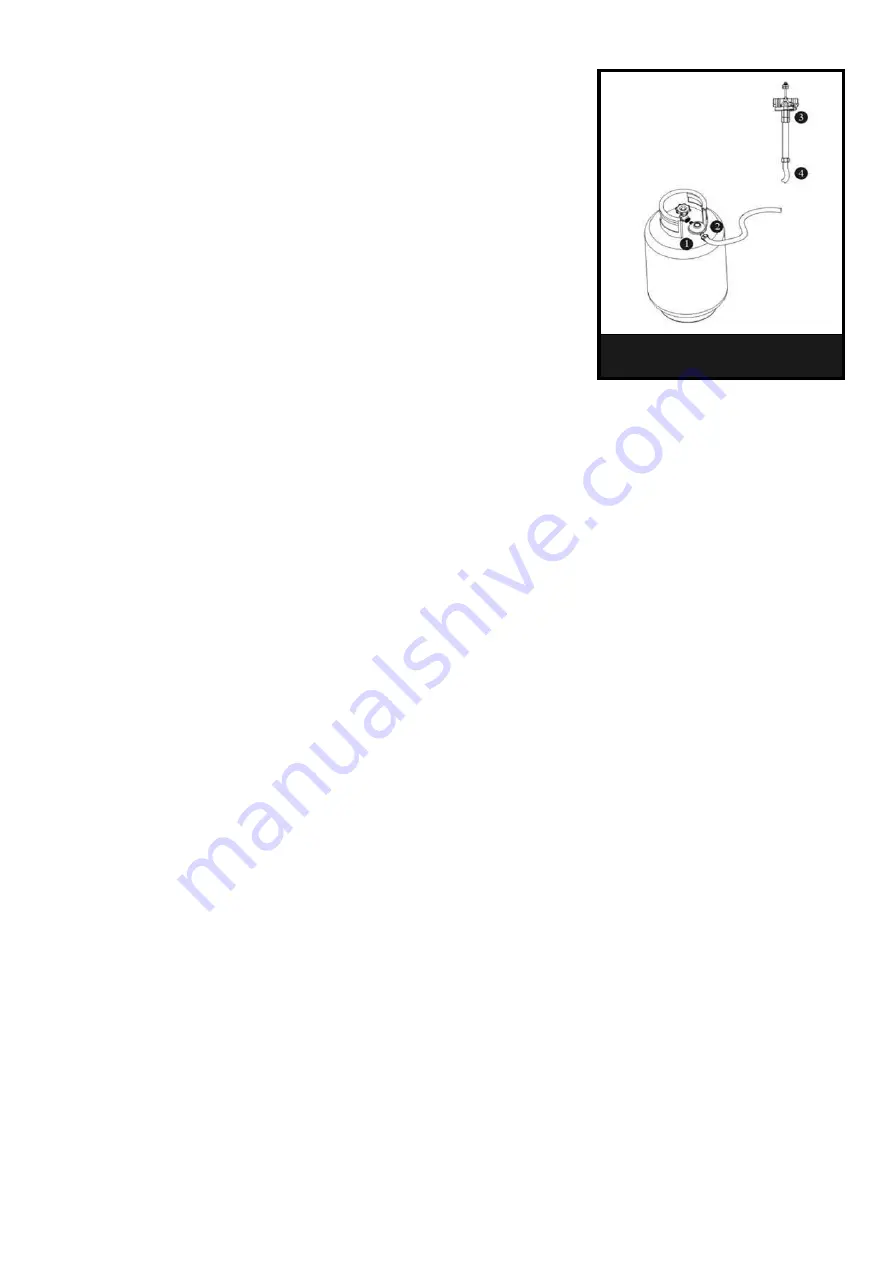


Leak Test Point 


Summary of Contents for EQODHMBR

Page 1: ...USER MANUAL GAS PATIO HEATER WARNING FOR OUTDOOR USE ONLY OR IN WELL VENTILATED AREAS PLEASE KEEP THE MANUAL FOR FUTURE REFERENCE EQODHMBR EQODHMGR...

Page 2: ...2 CONTENTS SAFETY 3 PARTS LIST 5 ASSEMBLY 6 OPERATION 9 LEAK TESTING 10 GAS INFORMATION 10 MAINTENANCE 11 STORAGE 11 TROUBLESHOOTING 12 TECHNICAL SPECIFICATIONS 13 SUPPORT 13...

Page 3: ...ground Turn off the gas cylinder if gas leak is suspected Parts sealed by the manufacturer must not be altered by the user No modifications should be made to any part of this heater and repairs and m...

Page 4: ...ammable items on this heater DO NOT operate this heater unless it is fully assembled Respect the minimum clearances from combustible materials GENERAL INFORMATION FOR SUCCESSFUL ASSEMBLY Please read t...

Page 5: ...5 PRODUCT OVERVIEW PART DESCRIPTION QUANTITY A Reflector Panel 3 B Reflector Plate 1 C Burner head Assembly 1 D Deck Ring 1 E Wicker table 1 F Wicker tank housing assembly 1 G Post 1 H Wheel kits 1...

Page 6: ...l and any transmit protection must be moved Small deviations in equipment may occur This is no lack of quality but subject to improvements 1 Fix the post G onto the top of wicker tank housing assembly...

Page 7: ...ry to loosen the preassembled bolts prior to assembly and retighten once complete 5 Attach the reflector plate B to reflector panels A using M6 x 8mm screws FF 6 washers DD and cap nuts GG Secure loos...

Page 8: ...e post G using preassembled bolts M5 x 10 HH lock washer JJ and 5 washers EE Note The pressure regulator and hose assembly to be used must conform to local standard codes 8 Secure gas hose and regulat...

Page 9: ...e pilot fails to ignite press and turn the dial clockwise to OFF before repeating the lighting steps TO LIGHT THE PATIO HEATER The pilot should be lit and the dial set to PILOT Hold the dial down and...

Page 10: ...der with a damaged body valve collar or foot ring A dented or rusty gas tank may be hazardous and should be checked by a gas supplier Never connect this appliance to an unregulated gas source When the...

Page 11: ...may create a fire hazard If any carbon deposits develop clean the dome and burner with warm soapy water Note In environments with a high salt content such as near the sea corrosion occurs more quickly...

Page 12: ...Control dial is not in the HIGH position Turn control dial to the HIGH position Burner flame is low Note Do not operate heater below 5 40 F Gas pressure is low Replace the gas cylinder Tank is almost...

Page 13: ...T NL NO PT SE SI SK RO TR CZ FR GB GR IE PT PL AT CH DE AT CH DE NL Category I3 28 30 37 I3B P 30 I3P 37 I3B P 37 I3B P 50 I3P 50 Gas G30 G31 G30 G31 G31 G30 G31 G30 G31 G31 Pressure mbar 28 30 37 30...

Reviews: