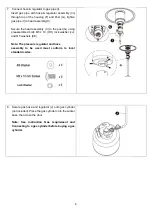
background image


7. 

Connect hose & regulator to gas pipe (I). 

Insert  gas  pipe  with  hose  &  regulator  assembly  (I/J) 
through top of the housing (F) and Post (G),  tighten 
gas pipe (I) to head assembly(C). 
 
Secure the head assembly (C) to the post (G) using 
preassembled bolts M5 x 10 (HH), lock washer (JJ), 
and Φ5 washers (EE). 


Note: The pressure regulator and hose  
assembly  to  be  used  must  conform  to  local 
standard codes. 


8. 

Secure gas hose and regulator (J) onto gas cylinder 
(not included). Place the gas cylinder on to the wicker 
base, then close the door  

 
Note:  See  instruction  Gas  requirement  and 
Connecting to a gas cylinder before buying a gas 
cylinder. 


Summary of Contents for EQODHMBR

Page 1: ...USER MANUAL GAS PATIO HEATER WARNING FOR OUTDOOR USE ONLY OR IN WELL VENTILATED AREAS PLEASE KEEP THE MANUAL FOR FUTURE REFERENCE EQODHMBR EQODHMGR...

Page 2: ...2 CONTENTS SAFETY 3 PARTS LIST 5 ASSEMBLY 6 OPERATION 9 LEAK TESTING 10 GAS INFORMATION 10 MAINTENANCE 11 STORAGE 11 TROUBLESHOOTING 12 TECHNICAL SPECIFICATIONS 13 SUPPORT 13...

Page 3: ...ground Turn off the gas cylinder if gas leak is suspected Parts sealed by the manufacturer must not be altered by the user No modifications should be made to any part of this heater and repairs and m...

Page 4: ...ammable items on this heater DO NOT operate this heater unless it is fully assembled Respect the minimum clearances from combustible materials GENERAL INFORMATION FOR SUCCESSFUL ASSEMBLY Please read t...

Page 5: ...5 PRODUCT OVERVIEW PART DESCRIPTION QUANTITY A Reflector Panel 3 B Reflector Plate 1 C Burner head Assembly 1 D Deck Ring 1 E Wicker table 1 F Wicker tank housing assembly 1 G Post 1 H Wheel kits 1...

Page 6: ...l and any transmit protection must be moved Small deviations in equipment may occur This is no lack of quality but subject to improvements 1 Fix the post G onto the top of wicker tank housing assembly...

Page 7: ...ry to loosen the preassembled bolts prior to assembly and retighten once complete 5 Attach the reflector plate B to reflector panels A using M6 x 8mm screws FF 6 washers DD and cap nuts GG Secure loos...

Page 8: ...e post G using preassembled bolts M5 x 10 HH lock washer JJ and 5 washers EE Note The pressure regulator and hose assembly to be used must conform to local standard codes 8 Secure gas hose and regulat...

Page 9: ...e pilot fails to ignite press and turn the dial clockwise to OFF before repeating the lighting steps TO LIGHT THE PATIO HEATER The pilot should be lit and the dial set to PILOT Hold the dial down and...

Page 10: ...der with a damaged body valve collar or foot ring A dented or rusty gas tank may be hazardous and should be checked by a gas supplier Never connect this appliance to an unregulated gas source When the...

Page 11: ...may create a fire hazard If any carbon deposits develop clean the dome and burner with warm soapy water Note In environments with a high salt content such as near the sea corrosion occurs more quickly...

Page 12: ...Control dial is not in the HIGH position Turn control dial to the HIGH position Burner flame is low Note Do not operate heater below 5 40 F Gas pressure is low Replace the gas cylinder Tank is almost...

Page 13: ...T NL NO PT SE SI SK RO TR CZ FR GB GR IE PT PL AT CH DE AT CH DE NL Category I3 28 30 37 I3B P 30 I3P 37 I3B P 37 I3B P 50 I3P 50 Gas G30 G31 G30 G31 G31 G30 G31 G30 G31 G31 Pressure mbar 28 30 37 30...

Reviews: