01/10/2008 4
HI321
WIRING INSTALLATION
High Voltage
Please reference manual EI707 pages 2 and 3.
Low Voltage
WarmFlo II Sensors
Located within each WarmFlo control are two sensing probes,
OT (outdoor sensing)
and
ST (supply
sensing)
necessary for proper operation and installation of the WarmFlo systems.
Without proper
installation of these probes the WarmFlo system will not operate correctly.
Note : With WF-EMA chip the outdoor sensor(OT) is not required. Installation is optional. If at
some later date this system is converted to heat pump or another chip code, the sensor would be
available for use at that time.
Outdoor Sensor (OT)
is identified by the longer cable and the metal mounting bracket.
1.
Determine best location for the OT sensor using the following ground rules.
a.
Locate on the outside of the house to sample outside temperature least affected by sun.
b.
Locate sensor away from other objects that produce a heat or cool effect such as heat
pump freon line sets, drier vents, direct sunlight, steel siding, or other miscellaneous
objects that affect the air temperature.
c.
Do not install sensor in an enclosure which may have a “heat build up” or insulation
effect.
2.
Disconnect OT and ST sensor cable from Warmflo Controller noting the screw locations for
future re-hookup.
3.
The factory supplied OT cable is approximately 25’. Determine necessary length of cable to
route to the predetermined outside location. If the sensor wire cable is too short, you must use
the following rules for extending the cable.
a.
Use unshielded (low capacitance, prefer twisted) 3 or 4 wire low voltage cable,
35 foot
maximum.
b.
Do not under any circumstances use leftover wires within the thermostat cable going to
the outdoor unit.
4.
Mount OT sensor with sensor tip up (cable downward)
5.
Drill ¼” hole near the outside sensor location. Routing the cable along the freon tubing often
makes the easiest installation.
6.
Route wire from outside making sure not to crimp, cut, staple, or damage cable in any way.
7.
Keep the sensor cables at least 12” away from any line voltage wiring, Romex, etc. Do not,
under any circumstances, use part of existing thermostat cable, leftover wires, for the sensor
cable.
8.
Do not reconnect sensor wires to the 4-screw terminal block until both sensors are properly
installed.
Warm Air
Supply Sensor
(ST)
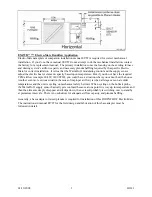
1.
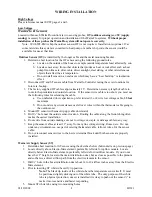
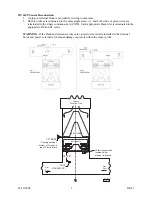
Determine best location for ST sensor using the sketches below (horizontal is on previous page).
2.
Locate directly above Electro-Mate
element, preferably left side for upflow models. Locate
directly below Electro-Mate element, preferably left side for downflow models. If you do not
have the 12” height, locate in the major distribution duct, but as close as possible to the plenum
and so there is a direct airflow path from the electric element to the sensor.
3.
Drill ½” hole in the hot air distribution duct about 14 to 18 airflow inches away from the Electro-
Mate element.
4.
Prior to inserting ST white tube verify tip position
Note:
The black tip inside of the white tube is the temperature sensor itself. It must
be positioned slightly sticking out of the white tube. The only purpose of the white
tube is physical protection; once it is installed it is okay to push out the sensor ½”to
make it more sensitive and faster responding.
5.
Mount ST white tube using two mounting holes.
Summary of Contents for WARMFLO II
Page 28: ......


