background image

28

Warning:

To avoid risk of fire or electric shock, do not expose this appliance to rain or moisture.

Verify line voltage before use.

Do not remove cover. No user serviceable parts inside. Refer servicing to qualified service personal.

The warranty is void if the product is tampered with by non-authorised personnel. Use only 

authorized Electrocompaniet service center. 

LOCAL DEALER

DEALER

STICKER

HERE

Summary of Contents for ECT 3

Page 1: ...ECT 3 RF Remote Control Owner s Manual Owner s Manual EN ...

Page 2: ...the remote control 9 10 Preamplifiers EC 4R EC 4 5 EC 4 6 EC 4 7 11 EC 4 8 12 13 EC 4 9 14 15 CD players ECC 1 and EMC 1UP 16 EMP 1 S 17 Integrated amplifiers ECI 3 ECI 4 ECI 5 18 Digital analog converter PD 1 19 Function on buttons in different modes 20 Multi player EMP 1 21 22 How to update firmware 23 24 How to reset the system 25 If service is needed 26 ...

Page 3: ...sent day 1 2 Package contents ECT 3 remote control Manual USB cable Inspection card 1 3 Important References In this manual we have used some simple rules to make it easier to understand the meaning of the text SELECT We use capital letters for all references to buttons on the ECT 3 Balance Italic lower case letters is used to describe text on the ECT 3 screen Balance Bold Italic lower case letter...

Page 4: ...re using the ECT 3 for the first time The procedure is described in the chapter charging the batteries page 6 However you don t need a full charge to use the ECT 3 Step 2 When you are finished with step 1 you are ready for the first setup of your ECT 3 When starting up the remote control for the first time the main ECT 3 page will be the only accessible page unit The picture underneath shows the m...

Page 5: ...ate extended remote features on the selected device VOLUME Main volume control VOLUME Main volume control OK Confirm your selection WHEEL SELECTOR Wheel selector and 4 directional navigator Wheel used to select input source change volume and to navi gate in menus DEVICE Select the device to control 1 5 ECT 3 Illustration ...

Page 6: ...nnect this cable on the rear side of EC4 8 EC4 9 or use any USB port PC usb charger etc If the EC4 8 EC4 9 is turned off please turn on the system to start the charging You can supervise the charging process by inspecting the main screen on the ECT 3 Rear view of EC4 8 General use ECT 3 Buzzer On Batt Vol EC4 8 49 V 2 02 Battery Level Batt 49 ...

Page 7: ...eans the volume and buttons on your remote control will always control this unit regardless of the chosen page or menu In most cases you will only find one product in this list and this unit will automatically have the volume priority Press MENU button and ECT 3 menu page will appear 1 Create a list of devices you want to manage Buzzer off Batt Vol ECI 4 5 77 ECT 3 V 2 05 Setup ECT 3 Volume Priori...

Page 8: ...n the ECT3 and a RF controlled Electrocompaniet unit See chapter 1 8 for detailed description 6 Acceleration sensor Change the sensitivity of the touch control wheel by pressing arrow left or right 7 Deep sleep Press OK for activating deep sleep Attention The reset button or a USB connection must be used for waking up the ECT3 from deep sleep This function is meant for transportation and air shipm...

Page 9: ...following products from Electrocompaniet has a RF connection EC 4 8 EC 4 9 and EMP 1 M and S The remote controller uses a two way communication system To know what prod uct to control the remote controller has to learn a unique serial number stored in each product With this number the ECT 3 knows which units to control Press MENU button Go to SETUP ECT 3 CONNECT Press OK Press and hold button 1 wh...

Page 10: ...while still pressing down the down button 3 The display on EC4 9 will show the message searching for remote after power on 4 Now at the same time press the Connect option in the Setup ECT 3 Menu 5 On the EC4 9 the display will change to Remote found with serial number product serial number 6 Finally turn off the EC 4 9 wait 5 seconds and power up again Now the units are connected Searching EC 4 9 ...

Page 11: ...ess arrow right Balance left press arrow left Volume Up press arrow up Volume Down press arrow down Balance right press arrow right Balance left press arrow left By using the wheel you can scroll through all inputs of the EC4 7 Pressing OK will acti vate the chosen input Press the FUNCTION button to enter a MUTE function ECI 4 5 EC4 6 EC4R ECI 4 5 EC4 6 EC4R EC 4 7 CD TUN TAP DVD VCR AUX EC 4 7 MU...

Page 12: ...t levels from different sources or for compen sating level differences between bal anced and unbalanced connections Use arrow up and down for choos ing the source Use arrow left and right for adjust ing the source to the wanted input level L R Balance 2 channel Left 2 0 dB Right 9 0 dB EC 4 8 CD 1 2 Setup EC 4 8 Balance Control Input Level Amp Data Source Names By using the wheel you can scroll to...

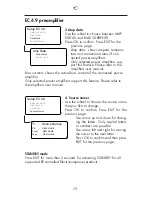
Page 13: ...e names Use the wheel to choose the source name that you like to change Press OK to confirm Press EXIT for the previous page Use arrow up and down for changing the letters Only capital letters or numbers are possible Use arrow left and right for mov ing the curser to the next letter Press OK to confirm and then press EXIT for the previous page STANDBY mode Press EXIT for more then 2 seconds for ac...

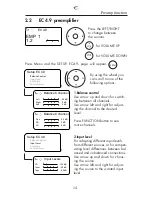
Page 14: ...erent sources or for compen sating level differences between bal anced and unbalanced connections Use arrow up and down for choos ing the source Use arrow left and right for adjust ing the source to the wanted input level EC 4 9 EMP 1 1 2 By using the wheel you can scroll to one of the following options Input Levels CD 12 5 dB Tuner 3 5 dB Tape 9 0 dB 2 2 EC 4 9 preamplifier Setup EC 4 9 Balance C...

Page 15: ...Use the wheel to choose the source name that you like to change Press OK to confirm Press EXIT for the previous page Use arrow up and down for chang ing the letters Only capital letters or numbers are possible Use arrow left and right for moving the curser to the next letter Press OK to confirm and then press EXIT for the previous page STANDBY mode Press EXIT for more then 2 seconds for activating...

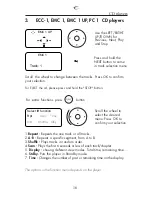
Page 16: ...eats the one track or all tracks 2 A B Repeats a specific segment from A to B 3 Shuffle Plays tracks in random order 4 Scan Plays the first 6 seconds or less of each track chapter 5 Display chosing deferent view modes Total time remaining time 6 Stdby Puts the player in Standby mode 7 Time Changes the number of past or remaining time on the display The options in the function menu depends on the p...

Page 17: ...ON OFF the EMP 1 S 2 Shuffle Plays tracks in random order 3 Repeat Repeats the one track or all tracks 4 A B Repeats a specific segment 5 Audio Changes the Hybrid SA CD playback layer 6 Scan Plays the first 6 seconds or less of each track chapter Scroll the wheel to select the desired menu Press OK to confirm your selection For EJECT the cd please press and hold the STOP button EMP 1 12 02 56 1 2 ...

Page 18: ...ng and deactivating MUTE Press and hold OK for Stdby For extra functions press button ECI 4 5 CD TUN TAP DVD VCR HT By using the wheel you can scroll through all inputs of the ECI4 5 Pressing OK will activate the chosen input By using the wheel you can scroll through all inputs of the PI 1 2 Pressing OK will activate the chosen input ECI 4 5 MUTE for VOLUME UP for VOLUME DOWN PI 1 2 CD TUN HT AUX ...

Page 19: ...sing OK will activate the chosen function 1 DIM use to select from 3 different brightness levels for the display 2 STDBY use for Standby mode 3 MUTE use for muting the sound PD 1 Media player Select IR function DIM STBY MUTE Press the LEFT RIGHT to change between the sources Prees UP DOWN to adjust the volume Press the LEFT RIGHT to change between the tracks Press UP for PLAY and PAUSE Press DOWN ...

Page 20: ... Menu Setup NORMAL OSD EXTRA EMP 1 Track 1 NORMAL OSD EXTRA Use the LEFT RIGHT UP DOWN for Previous Next Play and Stop Press and hold the NEXT button to come in track selection menu Scroll the wheel to change between the tracks Press OK to confirm your selection For being able to control a multitude of features of the EMP1 with only a few buttons the ECT 3 has been set up with three different menu...

Page 21: ...io language or format selector 4 Subtitile Selects the language for subtitles 5 S Mode Selects a sound mode Selects a sound mode Stereo Virtual Surround or Multi channel Changes the SA CD playback area 6 Mute for activating and deactivating MUTE function Read more about functions of the buttons in different modes page 22 For extra functions press button twice EMP 1 Power Repeat Audio Subtitle S Mo...

Page 22: ...Device Used for selection of products Wheel selector 1 Used to navigate on the menus on the televi sion screen menu 2 Used for slow mode and fast mode while playing video Vol Used for adjusting the volume Vol Used for adjusting the volume OK Confirm of choice Menu Used to select on screen menu and root DVD menu Device Used for selection of products Wheel selector Scrool bring you trough all possib...

Page 23: ...from Electrocompaniet home page Then select Software Updater zip and download the updater software Save the file on your disk and unzip 1 Firmware update Please follow the instruction on screen 2 Get latest firmware Download the latest firmware The firmware will be saved on your hard drive 3 Install drivers The drivers should be installed automatically In other case install necessary drivers to yo...

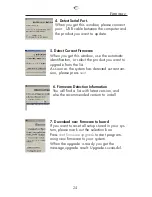
Page 24: ...the list As soon as the system has detected current ver sion please press next 6 Firmware Detection Information You will find a list with latest version and also the recommended version to install 7 Download new firmware to board If you want to reset all setup stored in your sys tem please mark out the selection box Press start firmware upgrade to start program ming new firmware to your system Whe...

Page 25: ...et the remote controller If you for some reason want to reset the ECT 3 press the reset button on the right side of the remote controller This is only a reset of the ECT 3 processor You do not loose any setup or preset values Reset button ...

Page 26: ...e importation and duty charges When shipping a product to the factory for service always include the following 1 A sales slip or other proof of purchase if repair is claimed under warranty 2 A proforma invoice with value of goods stating that the remote control is being returned to Norway for repair 3 An accompanying letter describing faults symptoms or problems with the unit 4 Always ship the uni...

Page 27: ...27 ...

Page 28: ...re Verify line voltage before use Do not remove cover No user serviceable parts inside Refer servicing to qualified service personal The warranty is void if the product is tampered with by non authorised personnel Use only authorized Electrocompaniet service center LOCAL DEALER DEALER Sticker HERE ...

Reviews: