11
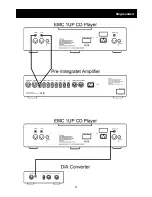
Single ended
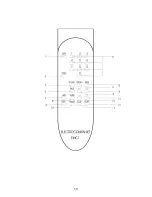
Remote control
1.
STANDBY
2.
DISC
– No function.
3.
SCAN
– Play 10 seconds of each track.
4.
PROG
a
. Set the CD player in
STOP MODE
.
b
. Select tracks with the numeric buttons (9), or step to the number using buttons
no.
14
or
15
.
c
. Press the
PROG (4)
button – the track is programmed.
Repeat
b
and
c
until all the tracks you wish to program is done.
After each track is programmed, the total playtime will be shown in the display.
If a track with number higher than 13 is programmed, the total playtime will not be
shown.
You can browse through the tracks with the buttons
14
and
15
. On the tracks that
already are programmed, you will see a “P” shown in the display.
If you wish to remove a track from your program, choose the track number and
press
PROG (4
).
To monitor what is being programmed. Go back to
STOP MODE
.
Press
PROG (4)
– The display will now show the programmed tracks in the new
order.
The tracks are now stored in the order you programmed them and not in the
original numeric order.
If you press
STOP (17)
two times your program sequence will be erased.
5.
FAST
– press this button before you use the search buttons
(6 or 13).
The search
will go faster.
6.
SEARCH BACKWARDS
7.
A/B
– Repeat a segment of the disc/track. Press the button once to mark the start
of the portion to be repeated. Press it again at the end of the desired sequence.
The selected area will play continuously until the
STOP (17)
button is pressed.
8.
SHUF
- The tracks will be played in a random order.
9.
REP
– Press this button once and all the tracks on the disc will be repeated.
The display will show
“REPEAT”.
Press the button again, and it will only repeat the current track.
The display will show
“REPEAT 1”
10.
PAUSE
– Pause on/off.
11.
NUMERIC CONTROLS
– Press these buttons to select a specific track on the disc.
For tracks 10 and above, the second digit of the number must be pressed within
one second.
12.
TIME
– Press once - shows total played time.
Press once more - shows total remaning time of disc.
Press once more - back to normal. (shows played time of single track)
13.
SEARCH FORWARD
14.
NEXT TRACK
15.
PREVIOUS TRACK
16.
PLAY
17.
STOP
Summary of Contents for EMC 1UP
Page 1: ...EMC 1UP Owner s Manual UK UK UK...
Page 2: ...emc1up_v1 1_knekkt...
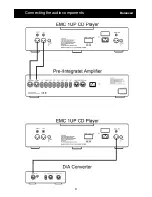
Page 8: ...8 Connecting the audio components Balanced...
Page 9: ...9 Single ended...
Page 10: ...10...

