background image

- 19 -

DVD OPERATION - TV/DVD COMBO MODELS ONLY

MENU OPERATION

• 

Press the DVD SETUP button on the remote control, the 
SETUP MENU will be displayed

• 

After accessing the setup menu, press the 

▲▼


buttons to select an option

• 

Press the 

 button to enter the submenu

• 

Press the ENTER button to confirm. Press the 

◄ 

button to return to the previous level menu

• 

To exit the menu, press the menu button

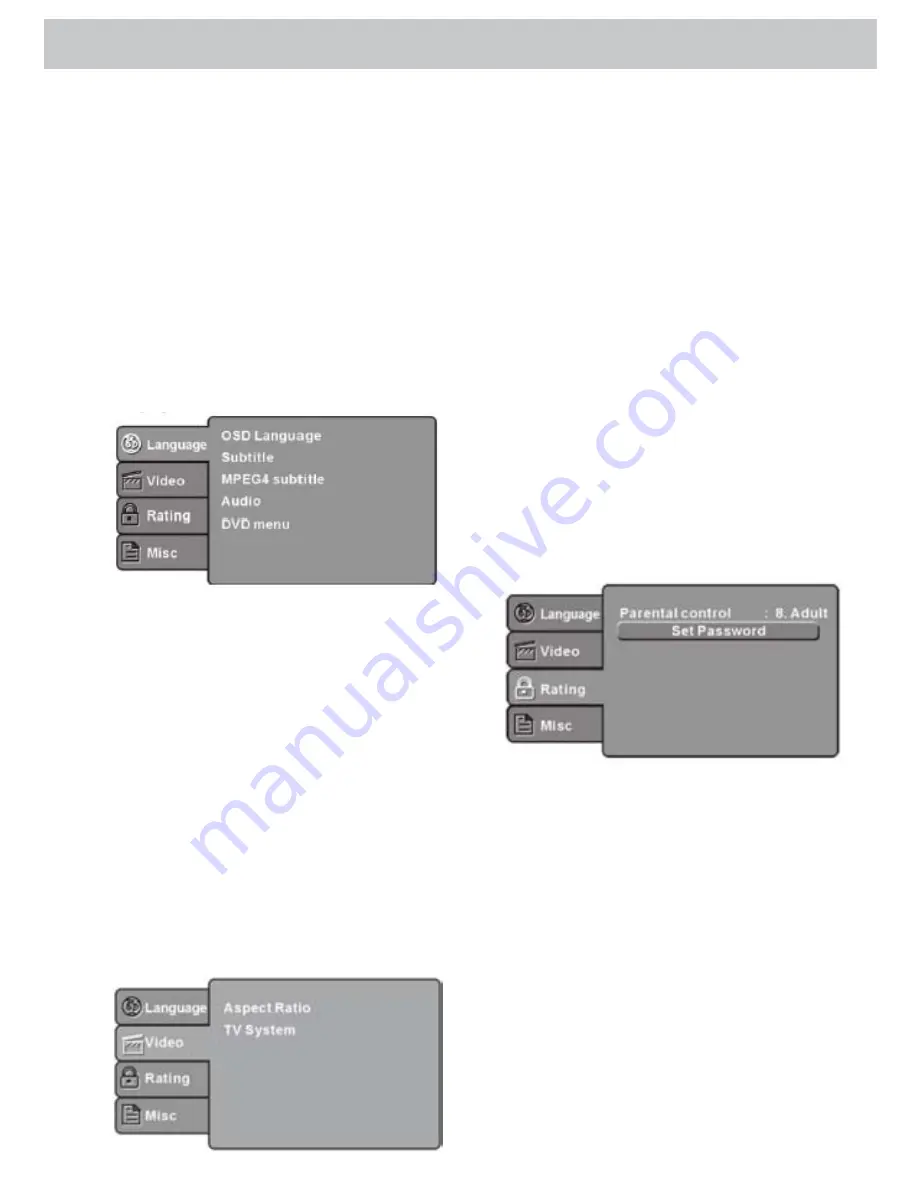
1.  Language Setup

Select the language tab in the setup menu to display 
the language menu:

OSD Language

Use this option to select the language of the setup menu and 
screen display.

Subtitle

This option shows the preset subtitle language.

MPEG4 Subtitle (optional)

Select different MPEG4 subtitle encoding options.

Audio

Select the built-in disc dubbing language options.

DVD Menu

This option controls the film’s menu language options.

2.  Video Setup

Select the video tab in the setup menu, to display the 
video menu:

SYSTEM SETUP

Aspect Ratio

Select the aspect ratio.

Note:  

The image display ratio is related to the recorded disc 
format. Some discs can not display images in the 
aspect ratio you choose. If you play a disc recorded 
in 4:3 format on a wide screen TV, black bars will 
appear on the left and right side of the screen. You 
must adjust the screen setting depending on the 
type of television you have.

TV System

Select the different TV system.

Note:  

The DVD player setting should be matched to your TV 
set. For more information of output format, refer to 
the instructions of your TV set.

3.  Rating Setup

Select the rating tab in the setup menu to display
the rating menu:

Parental Control

Set the parental control feature of the player

Note:  

Password is needed before setting parental control.

Set Password

Input four digits, then press ENTER/OK to confirm.

Note:

   If you forget your password, please use the universal 

password 6666 to unlock.

4.  MISC Setup

Select the MISC tab in the setup menu, to display the  
MISC menu:

DVD OPERATION - TV/DVD COMBO MODELS ONLY

Summary of Contents for 19

Page 1: ...at de cet appareil Electrohome S il vous plaît lisez ce manuel attentivement avant de faire fonctionner l appareil pour vous assurer de l utiliser correctement Conservez ce manuel dans un endroit sûr afin de pouvoir vous y référer au besoin www electrohome com INSTRUCTION MANUAL GUIDE D UTILISATION 19 22 24 26 32 Slim LED HDTV with Digital ATSCTuner 19po 22po 24po 26po 32po HDTV DEL Mince avec syn...

Page 2: ...asonable protection against harmful interference in a residential installation This equipment generates uses and can radiate radio frequency energy and if not installed and used in accordance with the instructions may cause harmful interference to radio communications However there is no guarantee that interference will not occur in a particular installation If this equipment does cause harmful in...

Page 3: ...or has been dropped 16 Apparatus should not be exposed to dripping or splashing and objects filled with liquids such as vases should not be placed on the apparatus 17 An outside antenna system should not be located in the vicinity of overhead power lines or other electric light or power circuits or where it can fall into such power lines or circuits When installing an outside antenna system extrem...

Page 4: ...ldren WALL MOUNTING IFYOU DECIDETOWALL MOUNTYOUR FLAT PANEL DISPLAY ALWAYS Use a mount that has been recommended by the display manufacturer and or listed by an independent laboratory such as UL CSA ETL Follow all instructions supplied by the display and wall mount manufacturers If you have any doubts about your ability to safely install your flat panel display contact your retailer about professi...

Page 5: ...d attach where indicated in the drawing right This manufacturer recommends professional installation Utilize an appropriate bracket and fasteners sufficient to accommodate the size and weight of the unit Assure the wall to which the unit is to be mounted will safely support the size and weight of the unit using the bracket and fasteners you have selected Keep cords and cables connected to this fla...

Page 6: ...d on the television receiver When the television receiver is not used for an extended period of time it is advisable to disconnect the AC power cord from the AC outlet Do not block the ventilation holes in the back cover Adequate ventilation is essential to prevent failure of electrical components Avoid exposing the television receiver to direct sunlight and other sources of heat Do not stand the ...

Page 7: ...ed 6 Buttons and Connections TV 7 Buttons and Connections Remote 8 Installation 9 Antenna 9 PC Setup 9 Attaching Power to theTV 10 PC Preset Mode 10 HDMI Setup 11 Y Pb Pr Setup 11 Operation 12 Picture Menu 12 Audio Menu 12 Setup Menu 12 Channel Menu 15 Multimedia Menu 16 Troubleshooting 17 DVD Manual 18 SupportedVideo Formats 18 DVD ModelTV Controls 18 DVD Operation TV DVD Combo Models Only 19 Men...

Page 8: ...by 美工丝印图 备注 0 3MM厚PVC黑色底 银色丝印 VER SHEET 1 OF 1 DWG NO MSAV1931 MG18 01 PART NO 123C1931117 SCALE 1 1 A5 SIZE MODEL 美规 MSAV1931 MG18 01 318 TITLE APPRD CHECKED 2 CHECKED 1 DESIGN 张玉萍 A PVC贴片 后端子 QR RD 015B FRAME NO TV2231 SJ25 02 SHENZHEN MTC CO LTD POWER CVBS R L Y Pb Pr Rear Connections The connections are from left to right POWER INPUT AV INPUT CVBS LEFT AND RIGHT AUDIO INPUT Y Pb Pr INPUT Note ...

Page 9: ...DVD CD is playing press the return button to exit the menu 29 Display Show current information about the track that is playing 30 II Play or pause the current track 31 CC Enable or disable closed captioning Or press to scan in reverse press play to return to normal 32 REPEAT Press to select between different repeat modes 33 GOTO For DVD s choose a desired title or chapter and search title time and...

Page 10: ... Connect aVGA and audio cable to the back of your computer 3 Connect the other ends of theVGA and audio cables to theVGA and PC audio connections on the side of the LEDTV 4 Power on theTV press source to switch to PC mode 5 Power on the PC Note This sequence is very important Outdoor antenna Indoor antenna CATV net Twin lead feeder Not included ...

Page 11: ...the back of the LEDTV 2 Plug the other end into any available wall outlet PC Preset Mode RESOLUTION V FREQ Hz H FREQ kHz 1 720 480 70 31 47 2 640 480 60 31 47 3 640 480 75 37 50 4 800 600 60 37 88 5 800 600 75 46 88 6 1024 768 60 48 36 7 1024 768 70 56 48 8 1024 768 75 60 02 9 1280 1024 60 63 98 10 1280 1024 75 80 00 ...

Page 12: ...MI cable s into the HDMI1 and HDMI2 connections on the side of the LEDTV Y Pb Pr Setup 1 Plug the RCA cables not included into theY Pb and Pr connections on the video audio source 2 Plug the other ends of the RCA cable s into theY Pb Pr connections on the back of the LEDTV Video outputs Video equipment Audio outputs Video equipment withYPbPr ...

Page 13: ... buttons to select AdvancedVideo press the button and the screen will display as follows 2 Audio Menu The second option of the menu is AUDIO MENU You can adjust sound here Press to select press to adjust press MENU to exit Note Audio Language is available in ATSC program 3 Setup Menu The third option of the menu is SETUP MENU You can change system settings here Press to select press to adjust pres...

Page 14: ... Guidance TV 14 Parents Strongly Cautioned TV MA Mature Audiences Only Use the enter key to switch between locked unlocked Rating Content Content FV V S L D Suggested Age TV Y TV Y7 X TV G TV PG X X X X TV 14 X X X X TV MA X X X 2 MPAA Switch the movie rating control level Rating Description Age G General audiences All ages permitted PG Parental guidance suggested Some material may not be suitable...

Page 15: ...tothedevelopmentofplot characterorthemes are intended for adult viewing Could contain graphic language and portrayals of sexuality and nudity 2 Canada French switch the French language rating control level Rating Description Age E Exempt programming G General All ages and children contains minimal directviolence butmaybeintegratedintotheplotina humorous or unrealistic manner 8 ans General but inad...

Page 16: ...st this item 5 Auto Auto adjust to fit the screen 4 Channel Menu The fourth item of the menu is the Channel MENU You can adjust the digital and analogTV settings Press the buttons to select options Press the buttons to adjust 1 Air Cable Select AirTV or cableTV signal 2 Auto Scan If it s the first time you use theTV you should scan all theTV channels first press the button to confirm the screen wi...

Page 17: ...Playback Select the music tab the MP3 list will display like the screen below Use the buttons to select the MP3 files or folders use the enter button to play use the menu button to stop playing or go to the upper menu Play Pause Stop Fast Back Previous Next Fast Forward Repeat All Random Play Note The LED TV panel is built with very high precision technology giving you fine picture details in vibr...

Page 18: ...se to theTV car motorcycle fluorescent light Normal Picture Muted Volume check if mute is ON or if the audio system connections are not correct No Picture Muted Power cord is not attached Power is not ON Check contrast and brightness Press standby key on remote control to checkTV status No Color Normal Audio Color control Picture Breaking Up Normal or Weak Audio Re tune channels in main menu No Co...

Page 19: ...es only unless otherwise authorized by Rovi Corporation Reverse engineering or disassembly is prohibited The product complies with the KODAK Picture CD format and will display KODAK Picture CDs The KODAK Picture CD Compatible logo is a trademark of Eastman Kodak Company and is used with permission Manufactured under license from Dolby Laboratories Dolby and the double D symbol are trademarks of Do...

Page 20: ...b in the setup menu to display the video menu SYSTEM SETUP Aspect Ratio Select the aspect ratio Note The image display ratio is related to the recorded disc format Some discs can not display images in the aspect ratio you choose If you play a disc recorded in 4 3 format on a wide screenTV black bars will appear on the left and right side of the screen You must adjust the screen setting depending o...

Page 21: ... has been played 3 Edit Mode In edit mode press the button to move the cursor to the directory press the ENTER button to choose a desired track and then press Add to program When you have chosen all desired tracks press the button to display programmed tracks and press the ENTER button to start playback 4 Program view Display programmed tracks 5 Browser view Display track directory 6 Add to progra...

Page 22: ...yed Ensure the disc is not warped damaged or deformed Ensure the disc is not badly stained or dirty Ensure the disc format is compatible with the player Please check whether you have tried to play a software CD If so please restart the player Remote not working Make sure the main unit s power is ON Ensure the remote batteries are not dead Point the remote control directly at the player s IR sensor...

Page 23: ...h 109 5kWh 138 7kWh Power Consump On Mode for Energy Star 49 29kWh year 60kWh year 60kWh year 69 35kWh year 105 85kWh year Power Consump Standby Mode for Energy Star 1 825kWh year 1 825kWh year 1 825kWh year 1 1kWh year 1 1kWh year Regulation and Standards Compliance VESA Hole Pitch 100 X 100 200 X 100 Power Power Consumption in Operation max 35W 55W 90W Weights and Measurements Dimensions Approx ...

Page 24: ...isonnable contre toute interférence préjudiciable dans une installation résidentielle Cet appareil produit emploie et peut être la cause d un rayonnement radioélectrique et si l installation et l emploi ne sont pas conformes aux instructions risque de présenter un brouillage nuisible aux radiocommunications Toutefois il est impossible de garantir qu aucune interférence ne sera produite par une ins...

Page 25: ...anière que ce soit tel qu un cordon ou une fiche endommagé du liquide déversé ou des objets tombés dans I appareil I appareil a été exposé à la pluie ou a I humidité un appareil qui ne fonctionne pas normalement ou qui est tombé 16 L appareil ne doit pas être exposé à des égouttements d eau ou des éclaboussures et de plus aucun objet rempli de liquide tel que des vases ne doit être placé sur I app...

Page 26: ...ux ne puissent les saisir ou les tirer MONTAGE MURAL SIVOUS DÉCIDEZ DE MONTERVOTRE ÉCRAN PLAT AU MUR APPLIQUEZTOUJOURS LES RÈGLES SUIVANTES Utilisez un support de montage recommandé par le fabricant de l écran ou homologué par un laboratoire indépendant comme l UL la CSA l ETL Suivez toutes les instructions fournies par les fabricants de l écran et du support mural Si vous n êtes pas certain de po...

Page 27: ...cher un support de fixation mural non fournie Attache où indiqué dans le diagram ci haut Le fabricant recommande une installation professionnelle Utilisez un support et des attaches qui conviennent à la taille et au poids de l appareil Assurez vous que le mur auquel l appareil sera monté pourra supporter en toute sécurité la taille et le poids de l appareil utilisant le support et les attaches que...

Page 28: ...ucun liquide sur le récepteur de télévision Lorsque le récepteur de télévision n est pas utilisé pendant une longue période de temps il est prudent de débrancher le cordon d alimentation de la prise CA Ne bloquez pas les trous de ventilation sur le couvercle arrière Une ventilation adéquate est essentielle pour prévenir l échec de composants électriques Évitez d exposer le récepteur de télévision ...

Page 29: ...de 30 Installation 31 Antenne 31 Configuration avec PC 31 Brancher le courant à la télévision 32 Mode de préréglage pour PC 32 Configuration HDMI 33 ConfigurationY Pb Pr 33 Fonctionnement 34 Menu de réglage d image 34 Menu de réglage audio 34 Menu de configuration 34 Menu de réglage de canaux 37 Menu de réglage multimédia 38 Dépannage 39 Manuel pour lecteur DVD 40 Formats vidéo supportés 40 Contrô...

Page 30: ... audio reçoit du canal audio AV Y Pb Pr 美工丝印图 备注 0 3MM厚PVC黑色底 银色丝印 VER SHEET 1 OF 1 DWG NO MSAV1931 MG18 01 PART NO 123C1931117 SCALE 1 1 A5 SIZE MODEL 美规 MSAV1931 MG18 01 318 TITLE APPRD CHECKED 2 CHECKED 1 DESIGN 张玉萍 A PVC贴片 后端子 QR RD 015B FRAME NO TV2231 SJ25 02 SHENZHEN MTC CO LTD POWER CVBS R L Y Pb Pr 1 Source Affiche le menu de source en entrée En mode menu appuyez sur la touche pour confir...

Page 31: ...fiché Télécommande pourTÉLÉ DVD intégré 28 Return LorsqueleDVD CDestenlecture appuyezsurlatoucheretourpourquitterle menu 29 Display Affiche les informations courantes sur la piste en cours de lecture 30 II LECTURE Pause Lecture ou pause de la piste en cours 31 CC Activezoudésactivezlesous titrage Appuyezpourscruterensens inverseetsurLECTURE Pause pourreveniràlanormale 32 REPEAT Appuyez pour choisi...

Page 32: ...bouts des câblesVGA et audio aux connexionsVGA et PC audio sur le panneau latéral du téléviseur DEL 4 Allumez la télévision appuyez sur SOURCE pour passer au mode PC 5 Allumez le PC Note Suivre cet ordre est très important INSTALLATION Note Connexions aériennes CEI femelle Entrée d impédance 75 Ω déséquilibré Adaptateur pas inclus Transformateur d adaptation 300 Ω Antenne extérieure Antenne intéri...

Page 33: ...rière du téléviseur DEL 2 Branchez l autre bout dans une prise murale disponible Mode de préréglage pour PC RÉSOLUTION FRÉQ V Hz FRÉQ H kHz 1 720 480 70 31 47 2 640 480 60 31 47 3 640 480 75 37 50 4 800 600 60 37 88 5 800 600 75 46 88 6 1024 768 60 48 36 7 1024 768 70 56 48 8 1024 768 75 60 02 9 1280 1024 60 63 98 10 1280 1024 75 80 00 ...

Page 34: ... le panneau latéral du téléviseur DEL ConfigurationY Pb Pr 1 Branchez le câble RCA pas compris dans les sortiesY Pb et Pr de la source audio vidéo 2 Branchez l autre extrémité du des câble s dans les connexions RCA Y Pb Pr à l arrière du téléviseur DEL INSTALLATION Équipment vidéo avecYPbPr Jaune vidéo Blanc audio G Rouge audio D ou Pr Bleu Pb Vert Y Équipment vidéo Sorites vidéo Sorties audio ...

Page 35: ...ectionner Vidéo Avancée appuyez sur la touche et l écran s affiche comme ci dessous 2 Menu de réglage audio La deuxième option du menu est Mode son Vous pouvez régler le son ici Appuyez sur pour sélectionner appuyez sur pour régler appuyez sur MENU pour quitter Note Le langage audio est disponible dans le programme ATSC 3 Menu de configuration La troisième option du menu est le Mode paramètres Vou...

Page 36: ...s fortement prévenus TV MA Public adulte uniquement Utilisez la touche ENTER pour passer de verrouillé déverrouillé Contenu de classement Contenu FV V S L D Âgesuggéré TV Y TV Y7 X TV G TV PG X X X X TV 14 X X X X TV MA X X X 2 MPAA Change le niveau de contrôle de classement de films Classement Description Âge G Audiences général Tous les âges permis PG Surveillance parentale recommandée Certaines...

Page 37: ...nés aux adultes Peut contenir du langage graphique et des représentations de la sexualité et la nudité 2 Français canadien Change le niveau de contrôle de classement en français Classement Description Âge E Programmation exempt G Général Tous les âges et les enfants contient de la vio lence directe minimale mais pourrait être intégré dans le complot dans une manière amusante ou peu réaliste 8 ans ...

Page 38: ...er ce point 5 Auto Réglage automatique pour taille écran 4 Menu de réglage des canaux Le menu des canaux vous permet d ajuster les paramètres numérique et analogique Appuyez sur les touches pour sélectionner les options Appuyez sur les touches pour ajuster 1 Antenne Câble Sélectionnez antenne ou câble 2 Balayage automatique Recherchez tous les canaux si c est la première fois que vous utilisez le ...

Page 39: ...et musique la liste MP3 s affiche comme à l écran ci dessous Utilisez les touches pour choisir soit les fichiers MP3 ou les dossiers utilisez la touche ENTER pour jouer utilisez la touche menu pour cesser de jouer ou pour aller au menu supérieur Lecture Pause Arrêt Retour rapide Précédent Suivant Avance rapide Fonction répétition Lecture aléatoire Note Le téléviseur à écran DEL est construit avec ...

Page 40: ...mage normale Sourdine MUTE Volume vérifier si sourdine MUTE est activée ou si les connexions du système audio ne sont pas correctes Aucune Image Sourdine MUTE Le cordon d alimentation n est pas connecté Il n y a pas de pouvoir Vérifiez le contraste et l éclat Appuyez la touche de veille sur la télécommande pour vérifier l état de la télé Aucune Couleur Audio normal Contrôle des couleurs L image es...

Page 41: ...tible est une marque déposée de Eastman Kodak Company et est utilisé avec permission Fabriqué sous licence des Laboratoires Dolby Dolby et le symbole double D sont des marques déposées des Laboratoires Dolby Travaux confidentiels non publiés 1992 1997 Dolby Laboratories Inc Tous droits réservés Formats vidéo supportés Dolby Digital Multi Angle Photo CD Kodak Choix de sous titres Fichiers MP3 sur C...

Page 42: ... 3 sur un téléviseur à grand écran des barres noires apparaissent à la gauche et droite de l écran Vous devez ajuster le réglage de l écran en fonction du type de téléviseur que vous avez Système de télévision Sélectionnez le système de télévision différentes Note Le réglage du lecteur DVD doit être adapté à votre téléviseur Pour plus d informations sur le format de sortie reportez vous aux instru...

Page 43: ...épertoire appuyez sur la touche ENTER pour choisir une piste désirée ensuite choisissez ajouter au programme Lorsque vous avez sélectionné toutes les pistes souhaitées appuyez sur la touche pour afficher les pistes programmées et appuyez sur la touche ENTER pour commencer la lecture 4 Vue du program Affichage de pistes programmé 5 Vue du navigateur Affichage du répertoire 6 Ajouter au programme Ch...

Page 44: ...est pas gondolé endommagé ou déformé Vérifiez que le disque n est pas tachée ou sale Assurez vous que le format du disque est compatible avec le lecteur S il vous plaît vérifiez si vous avez essayé de lire un CD de logiciel Si oui s il vous plaît redémarrer le lecteur La télécommande ne fonctionne pas Assurez vous que l alimentation de l appareil principale est en marche Assurez vous que les piles...

Page 45: ...r Oui Estimation de la consommation d énergie annuelle 64kWh 78kWh 91 25kWh 109 5kWh 138 7kWh Consomm d énergie mode en fontion Energy Star 49 29kWh année 60kWh année 60kWh année 69 35kWh année 105 85kWh année Consomm d énergie mode en attente Energy Star 1 825kWh année 1 825kWh année 1 825kWh année 1 1kWh année 1 1kWh année Conformité aux normes et règlements Espacement d orificesVESA 100 X 100 2...

Page 46: ... 45 NOTES ...

Page 47: ...ros de modèle et de série ni les étiquettes et attestations de l ACNOR de l ULC de l ULI de l ETL au Canada et aux États Unis H Tout appareil utilisé à des fins commerciales ou de location I Tous les frais d installation d ajustement et ou de programmation Si cet appareil de marque MAGNASONIC devient défectueux au cours de la période de garantie une réparation peut être obtenue conformément aux te...

Page 48: ... Any product received without appropriate model serial number and CSA cUL cULus cETL cETLus markings H Any products used for rental or commercial purposes I Any installation setup and or programming charges Should this ELECTROHOME product fail to operate during the warranty period warranty service may be obtained upon delivery of the ELECTROHOME product together with proof of purchase and a copy o...

Reviews: