MAINTENANCE
VistaGRAPHX 2500 User's Manual
4-5
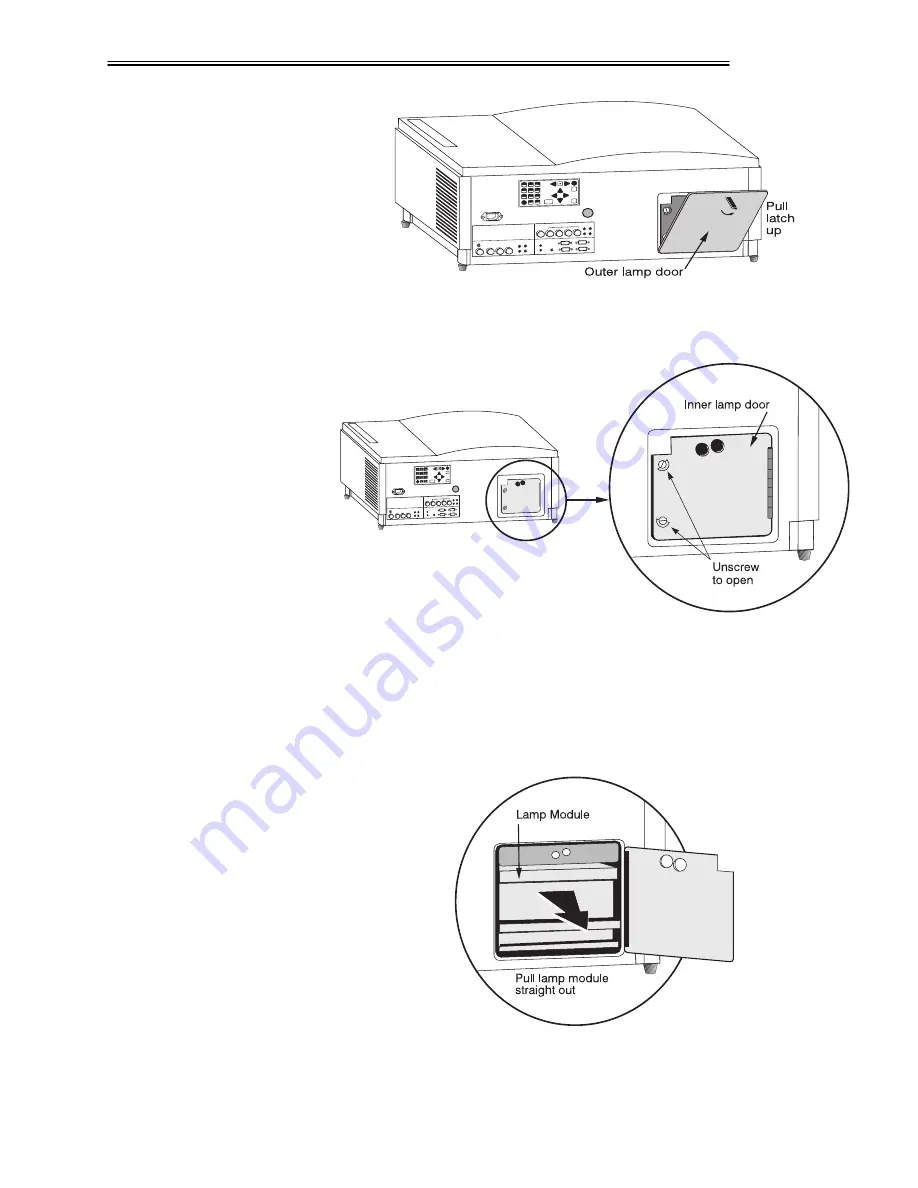
Figure 4.2. Remove Outer Lamp Door
Then unlatch the inner lamp door by unscrewing the metal rings and swinging
the door open (Figure 4.3).
Figure 4.3. Remove Inner Lamp Door
Remove the old lamp assembly
Grasp the lip of the lamp assembly and pull straight out to free it from its friction
fit within the projector. Pull firmly while keeping your grip level so that the
housing does not tilt in any direction. Safely discard the old lamp assembly per
instructions provided with the lamp/filter replacement kit.
Figure 4.4. Remove old lamp assembly
STEP 4
'
Summary of Contents for VistaGRAPHX 2500
Page 81: ...KEYPAD REFERENCE B 2 VistaGRAPHX 2500 User s Manual Figure B 2 Built in Keypad ...
Page 82: ...Appendix C Menu Tree VistaGRAPHX 2500 User s Manual C 1 ...
Page 84: ...SERIAL COMMUNICATION CABLES D 2 VistaGRAPHX 2500 User s Manual ...
Page 87: ...THROW DISTANCE CHARTS E 2 VistaGRAPHX 2500 User s Manual ...
Page 88: ...THROW DISTANCE CHARTS VistaGRAPHX 2500 User s Manual E 3 ...
Page 89: ...THROW DISTANCE CHARTS E 4 VistaGRAPHX 2500 User s Manual ...
Page 90: ...THROW DISTANCE CHARTS VistaGRAPHX 2500 User s Manual E 5 ...
Page 91: ...THROW DISTANCE CHARTS E 6 VistaGRAPHX 2500 User s Manual ...
Page 92: ...THROW DISTANCE CHARTS VistaGRAPHX 2500 User s Manual E 7 ...
Page 93: ...THROW DISTANCE CHARTS E 8 VistaGRAPHX 2500 User s Manual ...
Page 94: ...THROW DISTANCE CHARTS VistaGRAPHX 2500 User s Manual E 9 ...


