


110
Tennamen nut
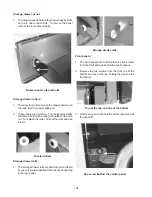
Removing bodyside panels:
1. Disconnect power and remove the back of the control
panel and the back cover.
2. Place a rug or padding under the range to protect
the floor.
3. Remove the backguard end cap on the side of the
range that the bodyside is being removed.
4. Remove the oven door and drawer.
6. Remove five screws holding the bodyside panel to
the back of the range.
Bodyside back screws
6. Remove one screw in the back holding the
bodyside panel to bottom rail.
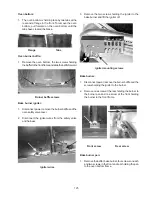
7. Remove five screws from the front. It is not necessary
to remove the two short screws holding the heat
shield in the upper corner, but you do need to transfer
this to the replacement panel if the panel is being
replaced.
Bodyside bottom rail screw
Bodyside front screws
8. Remove the top locating pin and the two screws
holding the bodyside to the burner pan.
Bodyside top screws and pin
9. With one hand in the oven and the other in the back
lift the side of the range with the bodyside you are
removing. Slide the bodyside down and the bottom
of the panel out.
Summary of Contents for 30" GAS FREESTANDING RANGES
Page 43: ...43 SAMPLE SCHEMATIC FOR ES100 CONTROL SYSTEM ...
Page 50: ...50 SAMPLE SCHEMATIC FOR ES 200 CONTROL SYSTEM ...
Page 60: ...60 SAMPLE SCHEMATIC FOR ES 300 CONTROL SYSTEM ...
Page 72: ...72 SAMPLE SCHEMATIC FOR ES 400 CONTROL SYSTEM ...
Page 84: ...84 SAMPLE SCHEMATIC FOR ES 450 CONTROL SYSTEM ...
Page 93: ...93 Sample schematic for 36 gas range ...
Page 130: ...130 NOTES ...
Page 131: ...131 NOTES ...
Page 132: ...132 ...


