


111
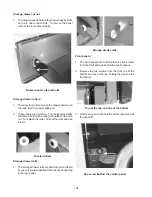
Removing the storage drawer front panel:
1. Remove two screws upper inside panel.
Two inside screws
2. Remove two screws bottom edge of the panel.
Two bottom edge screws
Removing inside drawer panel:
1. Remove four screws, two on each side, holding the
inner panel to the drawer.
Two screws on each side
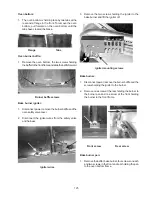
Removing drawer glides:
There are four drawer glides mounted to the drawer, one
on each side in the front and one on each side in the
rear:
1. Press in on the locking tab and pull the glide
from the drawer.
Locking tab
There are two drawer glides mounted to the frame of the
range, one on each side in the front.
Drawer glide
1. To remove the glide it is necessary to get behind the
frame of the range, but when reinstalling, it snaps
into place. If the glide is going to be replaced break
it out. If the same glide has to be reinstalled it is
necessary to remove the bodyside to get to the tab.
Removing the warmer drawer:
1. Pull the drawer out to the stop.
2. There is a latch on each of the drawer glides. Lift the
latch on the right side and push down on the latch on
the left side and pull the drawer the rest of the way
out.
Summary of Contents for 30" GAS FREESTANDING RANGES
Page 43: ...43 SAMPLE SCHEMATIC FOR ES100 CONTROL SYSTEM ...
Page 50: ...50 SAMPLE SCHEMATIC FOR ES 200 CONTROL SYSTEM ...
Page 60: ...60 SAMPLE SCHEMATIC FOR ES 300 CONTROL SYSTEM ...
Page 72: ...72 SAMPLE SCHEMATIC FOR ES 400 CONTROL SYSTEM ...
Page 84: ...84 SAMPLE SCHEMATIC FOR ES 450 CONTROL SYSTEM ...
Page 93: ...93 Sample schematic for 36 gas range ...
Page 130: ...130 NOTES ...
Page 131: ...131 NOTES ...
Page 132: ...132 ...


