background image

WARM & SERVE DRAWER INSTALLATION INSTRUCTIONS

3

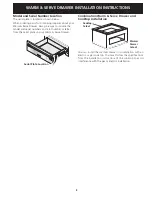
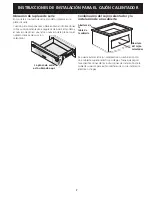
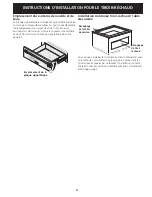
Model and Serial Number Location

The serial plate is located as shown below.
When ordering parts for or making inquiries about your 
Warm & Serve Drawer, always be sure to include the 
model and serial numbers and a lot number or letter 
from the serial plate on your Warm & Serve Drawer.

Serial Plate Location

Combination Warm & Serve Drawer and 
Cooktop Installation

You can install the warmer drawer in combination with an 
electric or gas cooktop. You must follow the specifications 
from the installation instructions of the cooktop to avoid 
interference with the gas or electric installation.

Cooktop
Cutout

Warmer
Drawer
Cutout

Summary of Contents for 318201810

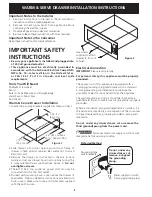
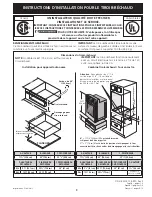
Page 1: ...t be lower than the warmer drawer cutout A HEIGHT B WIDTH C Depth 11 28 6 cm 30 76 2 cm 23 3 8 59 4 cm D cutout height E cutout width F cutout depth Min 9 7 8 25 1 cm 28 72 4 cm 24 61 cm Max 10 26 cm 28 73 cm A HEIGHT B WIDTH C Depth 11 28 6 cm 30 76 2 cm 23 3 8 59 4 cm D cutout height E cutout width F cutout depth G HEIGHt Min 9 7 8 25 1 cm 28 72 4 cm 24 61 cm 1 4 4 cm Max 10 26 cm 28 73 cm Depen...

Page 2: ...al cord 3 Remove the drawer as instructed in the Use Care Guide and secure drawer housing to cabinet using the 3 nickel plated screws supplied see Figure 2 Do not overtighten screws 4 The 60 152 4 cm appliance power cord can now be connected into the 120 Volt outlet 5 Proceed with mounting built in oven above the drawer if applicable Follow installation instructions provided with built in oven Mak...

Page 3: ...and serial numbers and a lot number or letter from the serial plate on your Warm Serve Drawer Serial Plate Location Combination Warm Serve Drawer and Cooktop Installation You can install the warmer drawer in combination with an electric or gas cooktop You must follow the specifications from the installation instructions of the cooktop to avoid interference with the gas or electric installation Coo...

Page 4: ...WARM SERVE DRAWER INSTALLATION INSTRUCTIONS 4 Notes ...

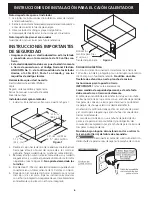
Page 5: ...alentador A ALTO B ANCHO C LARGO 11 28 6 cm 30 76 2 cm 23 3 8 59 4 cm D ALTURA DE LA ABERTURA E ANCHO DE LA ABERTURA F LARGO DE LA ABERTURA MÍn 9 7 8 25 1 cm 28 72 4 cm 24 61 cm Máx 10 26 cm 28 73 cm A ALTO B ANCHO C LARGO 11 28 6 cm 30 76 2 cm 23 3 8 59 4 cm D ALTURA DE LA ABERTURA E ANCHO DE LA ABERTURA F LARGO DE LA ABERTURA G ALTO Min 9 7 8 25 1 cm 28 72 4 cm 24 61 cm 1 4 4 cm Máx 10 26 cm 28 ...

Page 6: ...4 El cable de 60 152 cm del electrodoméstico puede ahora conectarse en un tomacorriente de 120 voltios con tierra 5 Proceda con el montaje del horno integrado por encima del cajón si es el caso Siga las instrucciones provistas con el horno integrado Asegúrese de usar las abrazaderas antideslizantes provistas con el horno integrado Figura 2 Utilizar los tornillos para fijar el cajón al frente del g...

Page 7: ...tra o número de la placa con el número de serie de su cajón calentador La placa de serie está ubicada aquí Combinación del cajón calentador y la instalación de una cubierta Se puede instalar el cajón calentador en combinación con una cubierta superior eléctrica o de gas Tiene que seguir las especificaciones de las instrucciones de instalación de la cubierta superior para evitar interferencia con l...

Page 8: ...8 INSTRUCCIONES DE Instalación PARA EL Cajón CALENTADOR Notas ...

Page 9: ...nsion critique et doit être respectée A hauteur B LARGEUR C PROFONDEUR 11 28 6 cm 30 76 2 cm 23 3 8 59 4 cm D HAUTEUR DU DÉCOUPAGE E LARGEUR DU DÉCOUPAGE F PROFONDEUR DU DÉCOUPAGE Min 9 7 8 25 1 cm 28 72 4 cm 24 61 cm Max 10 26 cm 28 73 cm A HAUTEUR B LARGEUR C PROFONDEUR 11 28 6 cm 30 76 2 cm 23 3 8 59 4 cm D HAUTEUR DU DÉCOUPAGE E LARGEUR DU DÉCOUPAGE F PROFONDEUR DU DÉCOUPAGE G HAUTEUR Min 9 7 ...

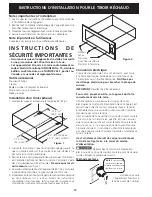
Page 10: ...océdezmaintenantaumontagedufourencastrésuperposé au tiroir réchaud s il y a lieu Suivez les instructions d installation fournies avec le four encastré Assurez vous d utiliser les crochets anti bascule fournis avec le four c c 25 5 16 64 3 cm 24 61 cm Max 23 5 8 60 cm Min c c 12 21 32 32 2 cm Figure 1 Figure 2 Utilisez les vis fournies pour fixer le châssis du tiroir à l armoire Connexion électriqu...

Page 11: ...s numéros de modèle et de série inscrits sur la plaque signalétique de votre appareil Emplacement de la plaque signalétique Installation combinée tiroir réchaud table de cuisson Vous pouvez installer le tiroir réchaud en combinaison avec une table de cuisson électrique ou gaz en respectant les contraintes imposées par le feuillet d installation de cette table afin d éviter certaines interférences ...

Page 12: ...12 INSTRUCTIONS D INSTALLATION POUR LE TIROIR RÉCHAUD Notes ...

Reviews: