12
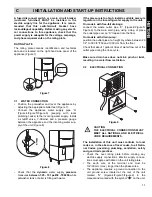
The ground wire must have a cross section of AWG
6/13,3 mm
2
. Do not use the wiring conduit or other
piping for ground connections. If necessary, have the
electrician supply the ground wire.
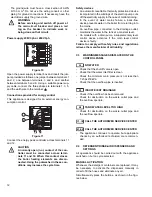
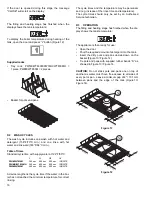
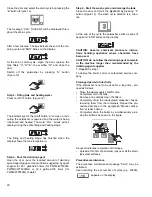
Power supply 208V 3ph or 240V 3ph
Figure 10
Open the power supply terminal box and insert the jum-
pers provided as follows: one jumper between terminals 1
and 2, one between terminals 3 and 4 and another
between terminals 5 and 6. Using a suitable power sup-
ply cable, connect the three phases to terminals 1, 3, 5,
and the earth wire to the terminal
.
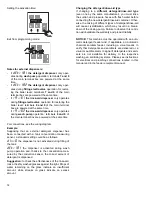
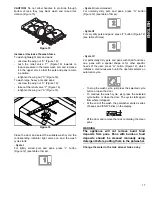
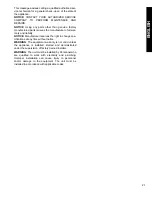
Connections provided for energy control
This appliance is designed for an external energy con-
sumption control.
Figure 11
Connect the energy peak controller across terminals 11
and 12.
Safety devices
•
An automatic resettable thermally protectived device
incorporated in the windings of the electric pump cuts
off the electricity supply in the case of malfunctioning.
•
In the event of water mains failure, a back-flow
device prevents water in the boiler from returning into
the mains.
•
An overflow pipe, connected to the drainage outlet,
maintains the water in the tank at a constant level.
•
On models with a drain pump, a supplementary level
control device activates if the main level control
device is faulty.
Failure to comply with safety rules and regulations
relieves the manufacturer of all liability.
C3
WARNING MESSAGES DISPLAYED ON THE
CONTROL PANEL
NO WATER
-
Check that the shutoff valve is open
-
Check that the water inlet filter is clean
-
Check the minimum main pressure is not less than
7.25 psi/50kPa
-
Check that the overflow pipe is inserted
INSUFFICIENT DRAINAGE
-
Check if the overflow has been removed.
-
Check for obstruction on the waste outlet pipe and
the overflow aperture.
TANK WATER LEVEL TOO HIGH
-
Check for obstruction on the waste outlet pipe and
the overflow aperture.
CALL THE AUTHORIZED SERVICE CENTER
CALL THE AUTHORIZED SERVICE CENTER
-
The appliance continues to operate, but appropriate
checks by an authorized technician are recommen-
ded.
C4
DETERGENT/RINSE-AID DISPENSERS AND
SETTINGS
All operations should be carried out with the appliance
switched on but no cycle selected.
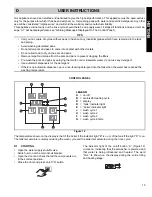
MANUAL ACTIVATION
Whenever the detergent containers are replaced, it may
be necessary to activate the dispensers manually in
order to fill the hoses and eliminate any air.
Simultaneously press the buttons, as shown in the figu-
res below.
WARNING
Before servicing unit switch off power at
the main circuit breaker and place a red
tag on the breaker to indicate work is
being done on that circuit.
CAUTION
A normally open (n.o.) contact of the con-
troller must be connected across termi-
nals 11 and 12. When this contact closes
the boiler heating elements are discon-
nected. Using the potwasher in these con-
ditions may increase the cycle time.
!
L1
L2
L3
11
12
!
A1
B1
B2
C1..C8
E1..E8

