background image

4

Ceramic hotplates

• Remove all spilt food and fat with the supplied razor

blade scraper, while the ceramic glass is still warm
but not hot. Wipe clean with dishwashing detergent
on a damp cloth.

• If aluminium foil, plastic items or high sugar content

are allowed to melt on the ceramic glass, clean
immediately with the supplied razor blade scraper
before the surface has cooled down, otherwise
pitting of the surface can occur.

Note: Items with high sugar content not only include jam and fruit, but also vegetables

such as peas, tomatoes and carrots.

• When the ceramic glass is cool, apply a suitable cleaner (supplied with the unit).

• It is important to follow the cleaner manufacturers instructions. Remove any cleaning

residue from the surface as staining of the cooktop may occur.

• Do not use abrasive sponges or scourers, as they may scratch the cooktop.

• Any pitting, staining, scratches or other surface deterioration is excluded from

the warranty.

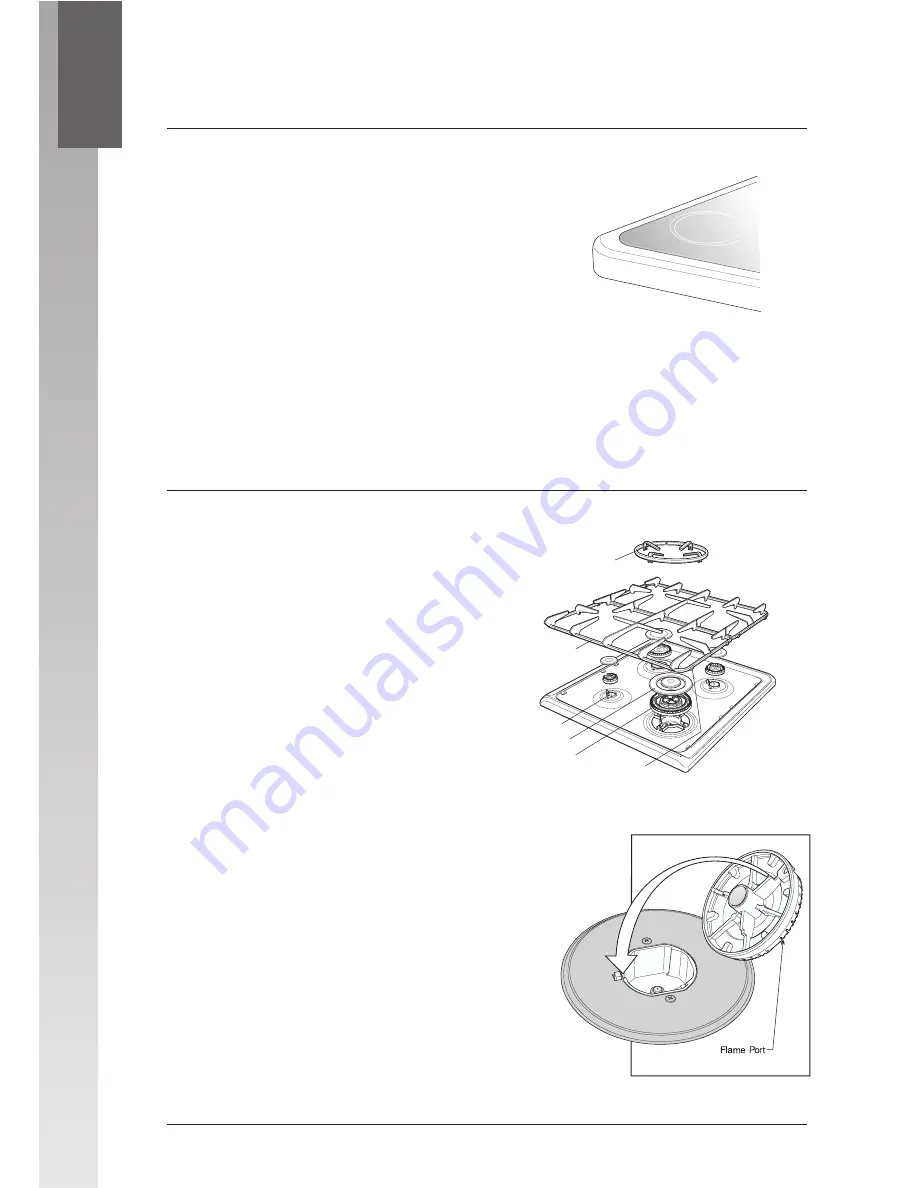
Gas hotplates

Removing trivets

• The trivets locate on the hob with rubber

feet.

• They can be removed for cleaning by

carefully lifting them from the hob.

• Clean by washing with warm soapy water.

• Take care when replacing the trivets as

dropping them may damage the hob or
the trivet.

• The wok support should only be used

when wok cooking and should be
removed when using flat bottom pans.

Removing burners

• The burner caps and crowns are removable

for cleaning.

• Flame port blockage should be removed by means of

a match stick or brush.

• If the caps, crowns and cups are heavily soiled, use a

non-abrasive cleaning compound.

• Do not clean them with abrasive or caustic type

cleaners, or clean in a dishwasher.

Refitting burner crowns and caps

• The burner crown must be fitted correctly into the

burner cup or damage will occur during operation.

• To do this, ensure that the rib next to the side hole

of the burner crown is positioned into the slot in the
burner cup. The burner cap is simply positioned over
the top of the burner crown.

Note: When the burner is correctly fitted it will sit

level on the hob.

C L E A N I N G   T H E   H O T P L AT E S

16

wok support

trivet

burner cup

burner cap

burner crown

rubber foot

Summary of Contents for 6653

Page 1: ...600MM WIDE INTEGRATED FREESTANDING COOKERS ...

Page 2: ...oil or place cookware there Hotplates generally Do not allow pots to boil dry as damage to both pan and hotplate may result Do not operate the hotplates for an extended period of time without a utensil on the hotplate Do not allow large cookware to overhang the hob onto the adjacent benchtop This will cause scorching to the benchtop surface Do not allow cooking utensils to intrude into the area wh...

Page 3: ...6 Cleaning the oven Safety warnings for cleaning 17 Cleaning products 17 Cleaning enamel 17 Cleaning stainless steel 17 Removing the oven door 17 Replacing the oven door 17 Cleaning the shelves 18 Removing the shelf supports 18 Removing the fan cover and oven light glass 18 Releasing the element 18 Catalytic self clean panels 19 Solving problems 20 Service Spare Parts 21 Installing the Cabinet app...

Page 4: ...our cooker compare the controls in this diagram with the control panel of your cooker Check your model number on the control panel Multi function electric oven with ceramic hotplate and programmable clock Model No 6633 General safety warnings Do not let children play with the oven Do not let children or infirm people use the oven if you are not with them Do not use the oven as a heater Do not spra...

Page 5: ...Function knob Turns oven light on Sets the function you want Note You must use the oven temperature control knob as well to use cooking functions 4 Oven indicator lamp Comes on when oven temperature knob is turned on Turns off when oven reaches set temperature Cycles on and off automatically when you are baking 5 Oven temperature control knob Sets temperature for rapid heat fan forced bake base he...

Page 6: ...as damage to both pan and hotplate may result Do not use the cooktop as extra bench space or as a cutting board Do not allow children on or near the cooktop at any time Do not allow large cookware to overhang the cooktop onto the adjacent benchtop This will cause scorching to the benchtop surface Use pans with smooth clean and dry bottoms to avoid scratching or burning residue into the glass Ensur...

Page 7: ...e control knob toward the LOW position In the absence of electrical power carry out the ignition directly to the burner with a hand held ignition source 1 Low heat burner 5 1 Mj h Used for simmering and for use with small cookware items 2 High heat burner 12 4 Mj h Used for fast heating with large size cookware items 3 Intense heat wok burner 15 0 Mj h Used for very fast heating with woks and othe...

Page 8: ...Whilst holding these buttons press the or buttons to set the time of day When the time of day has been entered the manual cook symbol will appear in the display and the clock will advance minute by minute NOTE The clock has a 24 hour display Setting the minute minder 1 Press the TIMER button briefly 2 Set the countdown time you want by using the or buttons You will see the time of day and the time...

Page 9: ...Setting the delayed start cooking time 1 Program the cooking time and cooking stop time as described in the relevant sections After 4 seconds the time of day and A will display but the cook symbol will not display until the oven automatically turns on On completion of cooking The heat source will turn off the timer will beep the cooking symbol will disappear and the A symbol will flash 1 Turn the ...

Page 10: ...ter than baking Please note that some variation in browning is normal Bake Heat comes from two elements one above and one below the food The bottom element is a clean heat element and is below the floor of the oven Both elements are controlled by the thermostat and will turn on and off to maintain the set temperature You can use the bake function for single trays of biscuits scones muffins cakes s...

Page 11: ...at steak chops sausages fish cheese toasties and other quick cooking foods Grill with the oven door closed Preheat your grill for 3 minutes to get the best results This will help seal in the natural juices of steak chops etc for a better flavour You can slide your grill dish into either of the 2 spaces within the upper pairs of support rails Maxi Grill Maxi grill directs radiant heat from 2 powerf...

Page 12: ...f air and better cooking Do not open the oven door more than necessary Do not place foods with a lot of liquid into the oven with other foods This will cause food to steam and not brown After the oven is turned off it retains heat Use this heat to cook custards or to dry bread Do not use a lot of cooking oil when roasting Too much oil will splatter the sides of the oven Use brightly finished alumi...

Page 13: ... or foil to prevent fats and oils from splattering making it easier to clean your oven 2 Use the grill oven dish and smokeless grill insert Place the meat on the insert 3 Do not pierce the meat as this will allow juices to escape 4 When the meat is cooked take the roast out of the oven wrap in aluminum foil and leave to stand for about 10 minutes This will help retain the juices when the meat is c...

Page 14: ...g process For better grilling results follow these easy instructions 1 Remove oven grill dish and smokeless grill insert and preheat grill for about 5 minutes 2 Choose only prime cuts of meat or fish If the cut is less than 5mm thick it will dry out If the cut is more than 40mm thick the outside may burn whilst the inside remains raw 3 Do not place aluminium foil under the food as this prevents fa...

Page 15: ...rtions of Ingredients incorrect in the recipe Opening door too early in baking Poor hot air circulation Grill dish affecting thermostat Select shelf that puts food in the centre of the oven Experiment with other trays or dishes Centre trays Rotate food during cooking Remove grill dish from oven on bake modes Preheat the oven Use correct size tins Stagger baking tins at least 3cm between tins and t...

Page 16: ...ing trivets The trivets locate on the hob with rubber feet They can be removed for cleaning by carefully lifting them from the hob Clean by washing with warm soapy water Take care when replacing the trivets as dropping them may damage the hob or the trivet The wok support should only be used when wok cooking and should be removed when using flat bottom pans Removing burners The burner caps and cro...

Page 17: ... a soft lint free cloth Use a stainless steel cleaner only where the stainless steel is extremely dirty and or discoloured A suitable cleaner can be purchased from Electrolux Service or Spares Note Make sure you follow the polish or brushing lines in the steel Removing the oven door Remove the oven door for better access when cleaning 1 Open the door fully 2 Rotate the two stirrups forwards so the...

Page 18: ...e the front peg into the front hole and push firmly Removing the fan cover and oven light glass 1 Hold fan cover by the two sides near the top 2 Pull towards you 3 To replace the fan cover insert the two tabs at the bottom of the fan cover into their corresponding holes and then push to top in firmly 4 After cleaning the fan cover must be replaced 5 Turn the oven light glass anti clockwise to remo...

Page 19: ...oven 3 Separate the catalytic liners from the shelf supports 4 Soak the liners in hot soapy water for at least two hours 5 Wipe clean with a soft cloth 6 To replace the liners align them to the shelf support by aligning the rails to the holes see diagram opposite 7 Make sure that the catalytic surface is facing the shelf support 8 Clip the shelf support to the liner 9 Fit the liner and the shelf s...

Page 20: ...on building up when baking Smells when first using oven Timer flashing Door can not be replaced after removal Gas hotplates not working Possible causes Power not turned on Household fuse blown Controls incorrectly set Circuit breaker tripped Clock not set Foil or trays on bottom of oven Timer not in manual mode Timer not in manual mode Household fuse is blown Household fuse blown Circuit breaker t...

Page 21: ...ffer guaranteed approved parts and a full labour warranty If you need service or a replacement part quote the Model the Model Number the Serial Number You will find these on the data plate at the bottom of the ovenfront when the oven door is open SPARE PARTS Phone 131 350 If you need spare parts contact the people who know your appliance best Electrolux Home Products ABN 51 004 762 341 If you need...

Page 22: ...olux Home Products cannot accept responsibility for damage caused by installation into low temperature tolerant cabinets Recommended cabinet design Installation sequence 1 Check that the required services are correctly positioned see electrical and gas services requirements section and cabinet requirements section 2 Ensure that cabinetry has correct details see cabinet requirements section 3 Unpac...

Page 23: ...e rear wall for the feet to be engaged in brackets If cooker cannot be located against rear wall adjust anti tilt brackets forward accordingly 10 Slide the cooker back into the anti tilt brackets so that the splashback rests against rear wall 11 Check for height and level of the product Pull the cooker forward adjust the levelling feet and return to final position 12 Connect services and commissio...

Page 24: ...services provided fit within the space defined in Diagram below Flexible gas connections are not permitted See diagram below for service connection point for 6653 models see diagram over the page for 6633 models ELECTRICAL AND GAS SERVICES REQUIREMENTS Gas supply pipe Service cord Gas inlet Window for supply pipe BSP external fitting wall floor 400 435 85 45 80 ...

Page 25: ...fault appears to be dangerous the appliance should be disconnected When satisfied with the installation and that the unit is operating correctly fit the kick panel using 2 screws provided or fit the cabinet kick rail Note Where a kick rail is used check that the 15mm recess has been cut from the rail as shown on page 22 and that the rail is easily removed for service Turn the unit off and instruct...

Page 26: ...liance should be disconnected When satisfied with the installation and that the unit is operating correctly fit the kick panel using 2 screws provided or fit the cabinet kick rail Note where a kick rail is used check that the 15mm recess has been cut from the rail as shown on page 22 and that the rail is easily removed for service Turn the unit off and instruct the customer on correct operation As...

Page 27: ...t if supply pressure is above 1 20 kPa then proceed as follows refer below 1 Turn all burners on to maximum 2 Adjust the screw so that the test point pressure reads 0 85 kPa and tighten the nut slightly 3 Turn smallest burner to minimum and all others off Gently tap the regulator until test point pressure is stable and read pressure 4 Turn all burners on to maximum and read pressure Evaluate the d...

Page 28: ...dpaths 55 Ferry Road Christchurch 03 379 0446 Prime Distributors Ltd Unit One 15 Talfourd Place Christchurch 03 377 1009 DUNEDIN South City Champion 590 Hillside Road Dunedin 03 455 5443 SERVICE CENTRES PLEASE PHONE 0800 106 610 FREE CALL New Zealand only For your nearest approved Service Centre please look in the Yellow Pages under Appliance Repairs OR Call 0800 106 610 P No 342 1 510 ECN 03A117A...

Reviews: