background image

11

To save energy

Place dishes in the machine immediately after every
meal and wait until the dishwasher is full before
washing.

If necessary run the Rinse and Hold programme (see
"Washing Programmes" chart) so that any food scraps
do not become caked on the dishes while you are
waiting to run the complete wash programme.

Do not prewash dishes under running water.

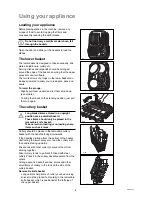
For best washing and drying results

Before loading, remove all scraps of food and soak
very heavily soiled pots and pans.

Arrange saucepans, cups and glasses etc. upside-
down.

Tilt items with convex or concave surfaces so that the
water drains off easily.

Avoid contact between the dishes as far as possible.

Wait a few minutes before removing the dishes; in this
way they will be cooler and the drying will be
improved.

Empty the lower basket first and then the upper one;
this will avoid water dripping from the upper basket
onto the dishes in the lower one.

You will improve drying results by leaving the
dishwasher door ajar for at least 15-30 minutes as
soon as the programme finishes.

Items not suitable for
dishwashers

The following items should not be washed in
the dishwasher (unless they are sold as
dishwasher proof):

- Cutlery with wooden or horn handles or 

glued parts

- bronze cutlery

- saucepans with wooden handles

- aluminium ware

- crystal ware

- leaded glass

- plastic items

- antique or fine decorated china

Certain types of decoration can discolour when
washed in a dishwasher.

Crystal-ware and plastic objects, if not guaranteed
dishwasher proof should be washed by hand.

Certain types of glass can also become opaque 
after being washed several times in a dishwasher.

A chemical reaction can occur between silver
cutlery and stainless steel cutlery. As a precaution,
do not wash together.

Iron and cast iron objects can rust and stain other
items.

Aluminium tends to go black, copper, pewter and 
brass tend to stain.

If in doubt check with manufacturer of 
the item.
When buying new dishes, ensure that 
they are dishwasher proof.

CON06en

Hints and tips

BRILLIANT

FOR A

SHINE

R I N S E

C O N C E N T R AT E D   D I S H WA S H E R   D E T E R G E N T

ACTION

N E W

DOUBL

E

L I Q U I D   G E L

P O W D E R

EASY

POURING

PACK

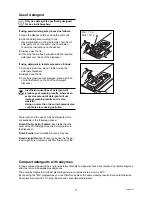
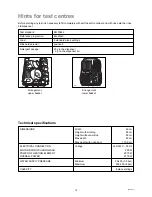
For best results we recommend the use of Finish detergents, rinse aid and salt.

DE15

Summary of Contents for DW 80

Page 1: ...GB D i s h w a s h e r INSTRUCTION BOOK Model DW 80 152985 68 0 ...

Page 2: ... External cleaning 15 Prolonged periods of non operation 15 Frost precautions 15 Moving the machine 15 Something not working 16 Service and spare parts 17 Customer Care Department 17 Guarantee conditions 18 Hints for test centres 19 Technical specifications 19 For the installer Installation instructions 20 Water supply connections 20 Water outlet hose connection 21 Electrical connection 22 Adjusti...

Page 3: ...open door Isolate the appliance from the power supply and turn off the water supply after use Care should be taken when cleaning the bottom door seal and hinge area as any exposed metal edges may cut if care is not taken This product should be serviced by an authorised Service engineer and only genuine spare parts should be used Under no circumstances should you attempt to repair the machine yours...

Page 4: ...Upper basket 11 Levelling spacers 12 Worktop 1 On Off push button 2 Main wash temperature push button 3 Programme guide 4 Door handle 5 Programme marker 6 Programme selector dial 7 Programme sequence indicator As the programme progresses the programme selector dial turns to show the phase in the wash programme the appliance has reached Prewash Rinse and hold Wash Cold rinse Hot rinse Drying 8 Main...

Page 5: ...er Authority can advise you on the hardness of the water in your area The dishwasher is factory set at level 2 If this level is not suitable for your area the softener should be adjusted To adjust the water softener Level 1 If your water is level 1 it is already soft and therefore there is no need to use salt Levels 3 and 5 water softener adjustment If your water is level 3 or 5 proceed as follows...

Page 6: ...ly before filling with salt for the first time 3 Using the funnel provided pour in the salt until the container is full Do not worry if water over flows from the unit when filling with salt this is quite normal 4 Replace the cap making sure that there is no trace of salt on the screw thread or on the gasket 5 Screw on the cap tightly The salt container will require topping up periodically You are ...

Page 7: ...d when the indicator B becomes clear Ensure that the lid is closed after every refill Do not put liquid detergent in the rinse aid compartment Clean up any rinse aid spilt during filling with an absorbent cloth to avoid excess foaming during the next wash Adjusting the dose According to the finish and drying results obtained adjust the dose of rinse aid by means of the 6 position selector C positi...

Page 8: ... basket Long bladed knives stored in an upright position are a potential hazard These items should only be placed in the removable knife basket Take care when loading or unloading sharp items such as knives Cutlery should be placed in the removable cutlery basket with the handles facing downwards If the handles protrude from the bottom of the basket obstructing the lower spray arm load the cutlery...

Page 9: ...reely Adjusting the height of the upper basket If washing very large plates over 27 cm and up to 31 cm in diameter you can load them in the lower basket after moving the upper basket to the higher position To move to the higher position proceed as follows 1 Move the front runner stops A of the upper basket outward and slide the basket out 2 Refit the basket in the higher position and replace the s...

Page 10: ...ssive amount of detergent will not improve washing results and is also wasteful Using no more than the correct amount also contributes to reducing pollution We recommend the use of Finish detergents which are available in the following options Finish Double Action Tablets Each tablet has the exact amount of detergent required simply place in the dispenser Finish Powder recommended for every day us...

Page 11: ...tes as soon as the programme finishes Items not suitable for dishwashers The following items should not be washed in the dishwasher unless they are sold as dishwasher proof Cutlery with wooden or horn handles or glued parts bronze cutlery saucepans with wooden handles aluminium ware crystal ware leaded glass plastic items antique or fine decorated china Certain types of decoration can discolour wh...

Page 12: ... description Power Wash Normal Wash Bio Wash Rapid Wash Prewash Cold prewash Main wash up to 65 C 1 cold rinse 1 hot rinse Drying Cold prewash Main wash up to 50 C 1 cold rinse 1 hot rinse Drying Main wash up to 50 C 1 cold rinse 1 hot rinse Main wash up to 65 C 1 cold rinse 1 hot rinse Drying 1 cold rinse to avoid food scraps from sticking together This is a special programme for quick washing a ...

Page 13: ...mperature of the main wash according to the instructions in the Washing programmes chart see Required push buttons 8 Start the programme Depress the On Off push button The On Off indicator light will come on and the machine will start If you wish to interrupt the washing programme at any time press this button again 9 At the end of the washing programme At the end of the programme the dishwasher w...

Page 14: ...fting up the outer one B pulling the central funnel upwards the smaller filter C can be removed by pressing the two tongues D Once cleaned refit the filters by pressing them down until they click into place Cleaning the large filter Once a month Clean the large filter A on both sides under running water using a brush To take it out remove the spray arm by pressing the two tongues E turn the ring F...

Page 15: ... the rinse aid dispenser 3 Leave the door ajar to prevent the formation of any unpleasant smells 4 Leave the inside of the machine clean Frost precautions Avoid placing the machine in a location where the temperature is below 0 C If this is unavoidable empty the machine close the appliance door disconnect the water inlet pipe and empty it Moving the machine If you have to move the machine moving h...

Page 16: ...ed correctly The dishwasher will not drain The drain hose may be squashed or bent Reposition the hose The sink may be blocked Clear any blockages The drain hose extension is not correct Follow the instructions for connecting to the waste There is no vent in the end of the drain hose The machine is noisy Dishes are rattling against each other refer to Loading your machine The spray arms are knockin...

Page 17: ... Force Centre by telephoning 08705 929929 Your telephone call will be automatically routed to the Service Centre covering your post code area Before calling out an engineer please ensure you have read the details under the heading Something Not Working and have the model number and purchase date to hand In guarantee customers should ensure that the checks under the heading Something Not Working ha...

Page 18: ...ts incurred for calls to put right an appliance which is improperly installed or calls to appliances outside the United Kingdom Appliances found to be in use within a commercial environment plus those which are subject to rental agreements Products of Electrolux manufacture which are not marketed by Electrolux European Guarantee If you should move to another country within Europe then your guarant...

Page 19: ... dosage 20 g in the dispenser 5 g on the dispenser lid UI57 US62 Arrangement upper basket Arrangement lower basket DIMENSIONS Width 45 cm Height with worktop 85 cm Height without worktop 82 cm Max depth 60 cm Max depth with open door 115 9 cm ELECTRICAL CONNECTION Voltage 220 240 V 50 Hz MOTOR RATING DURING WASH 200 W POWER OF HEATING ELEMENT 2570 W OVERALL POWER 2770 W WATER SUPPLY PRESSURE Minim...

Page 20: ...ts given in the technical specifications Your local Water Authority will advise you on the average mains pressure in your area The dishwasher features fill and drain hoses which can be turned either to the left or the right to suit the installation The locknut must be correctly fitted to avoid water leaks Avoid bends or kinks in the hose which could prevent or slow down the water supply If the mac...

Page 21: ...ht or left of the dishwasher Ensure the hose is not bent or squashed as this could prevent or slow down the discharge of water If you use a drain hose extension it must be no longer than 2 metres and its internal diameter must be no smaller than the diameter of the hose provided Likewise the internal diameter of the couplings used for connections to the waste outlet must be no smaller than the dia...

Page 22: ...ug which is marked with the letter E or the earth symbol or coloured green and yellow 2 Connect the Blue neutral wire to the terminal in the plug which is marked with the letter N or coloured black 3 Connect the Brown live wire to the terminal in the plug which is marked with the letter L or coloured red The plug moulded onto the lead incorporates a 13amp BSI362 fuse Only ASTA or BSI fuses should ...

Page 23: ...drain hoses are not kinked or squashed Levelling Good levelling is essential for correct closure and sealing of the door When the appliance is correctly levelled the door will not catch on the levelling spacers on either side of the cabinet If the door does not close correctly loosen or tighten the adjustable feet until the machine is perfectly level Fitting a decor panel on the door The door of t...

Page 24: ......

Reviews: