6-7
Component Teardown
Control Removal
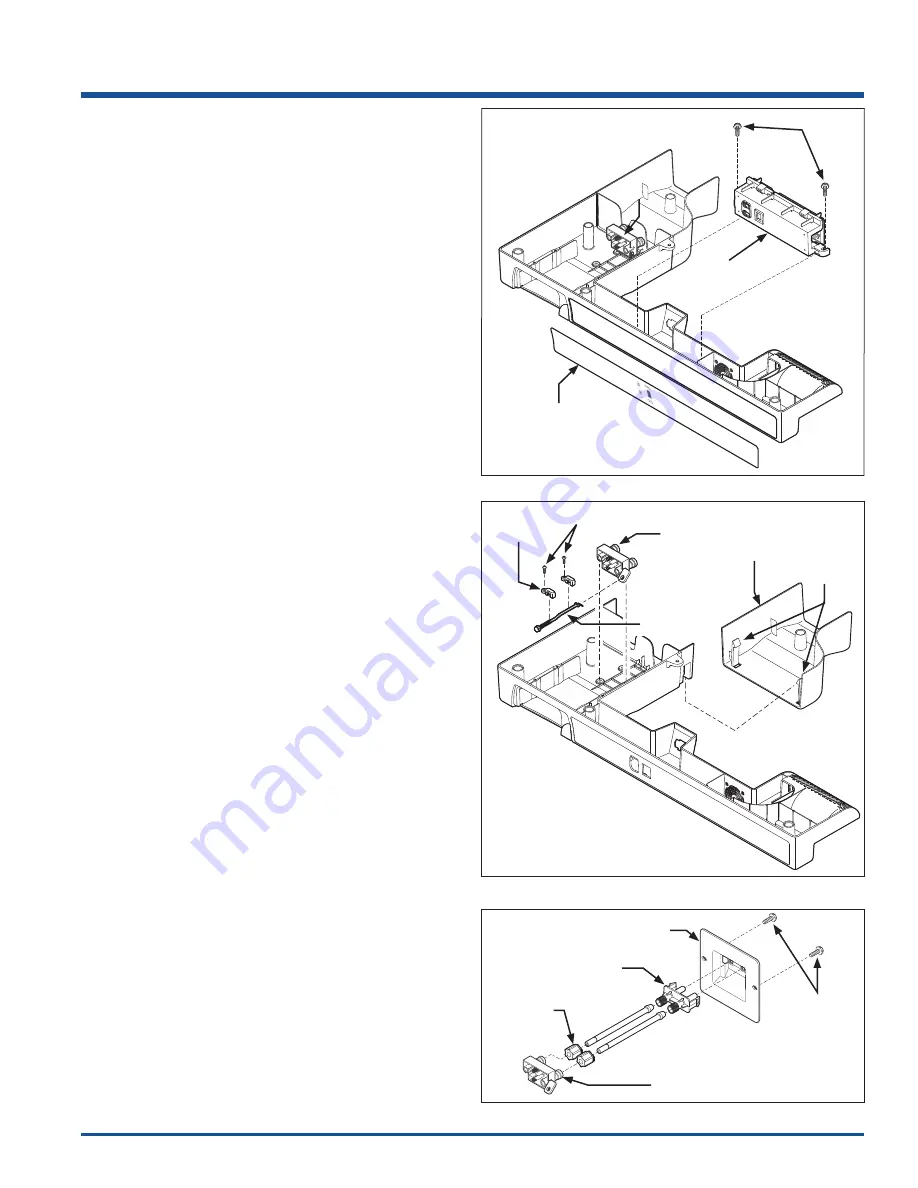
To remove the control:
1. Disconnect power from unit.
2. Remove control box from refrigerated compartment.
3. Extract the two screws securing the control to the
control box. (See Figure 6-15)
4. Pull the front of the control box away from the
control while pulling the control up and out from its
installation position.
5. Disconnect the two wire harness connections from
the control board. Control is now free.
Water Filter Base Components
The water fi lter base is secured with two screws to the
underside of the control box. The water fi lter release
mechanism is secured with two screws and clamps to the
inside of the control box assembly.
To remove the control:
1. Disconnect power from unit.
2. Remove control box from refrigerated compartment.
3. Remove water filter raceway by pressing in on the
retaining latches and separating the raceway from
the control box assembly. (See Figure 6-16)
4. Extract the two screws from the underside of the
control box assembly securing the water filter base
to the inside of the control box assembly.
5. Extract the screw from each retainer securing
the release rod to the control box assembly. Lift
retainers off release rod. (See Figure 6-16)
6. Lift water filter base and release rod from control
box assembly. Turn release rod 90° to remove from
water filter base.
7. The water lines are removed from the hose junction
mounted to the rear wall by turning the nylon nuts
counter clockwise and then pulling the water lines
from the hose junction. (See Figure 6-17)
8. The hose junction may be removed by first
disconnecting the water lines from the rear of the
unit. Then, press in on the retaining latches while
pushing the hose junction through the cabinet wall.
(See Figure 6-17)
9. Remove the hose junction retainer by extracting the
two screws from the rear of the unit, then pull the
retainer from the unit. (See Figure 6-17)
Figure 6-16. Light Fixture and Control Removal
Water Filter
Raceway
Water Filter
Base
Retainers
Screws
Control Box
Figure 6-15. Light Fixture and Control Removal
Screws
Control Box
Overlay
Control
Control Box
Release
Rod
Retaining
Latches
Figure 6-17. Light Fixture and Control Removal
Screws
Hose Junction Retainer
Hose Junction
Water Filter
Base
Nuts
Summary of Contents for E32AR75FPS
Page 2: ......
Page 10: ...1 8 Basic Information All Freezer Specifications ...
Page 12: ...1 10 Basic Information Notes ...
Page 24: ...Installation Information 2 12 Figure 2 21 Figure 2 22 ...
Page 25: ...Installation Information 2 13 Figure 2 23 Figure 2 24 ...
Page 28: ...Installation Information 2 16 Notes ...
Page 43: ...Ice Maker 4 13 ...
Page 44: ...Ice Maker 4 14 ...
Page 62: ...Sealed System 5 18 HFC 134a CFC 12 Pressure Temperature Chart ...
Page 90: ...Component Teardown 6 26 Notes ...
Page 92: ...Parts List 7 2 All Freezer Pro Cabinet Exploded View Model E32AF75FPS ...
Page 94: ...Parts List 7 4 All Freezer Pro System Exploded View Model E32AF75FPS ...
Page 96: ...Parts List 7 6 Ice Maker Exploded View Model E32AF75FPS ...
Page 98: ...Parts List 7 8 All Refrigerator Pro Door Exploded View Model E32AR75FPS ...
Page 100: ...Parts List 7 10 All Refrigerator Pro Cabinet Exploded View Model E32AR75FPS ...
Page 102: ...Parts List 7 12 All Refrigerator Pro System Exploded View Model E32AR75FPS ...
Page 104: ...Parts List 7 14 Notes ...
Page 108: ...Troubleshooting 8 4 Notes ...
Page 109: ...9 1 Wiring Schematics Ice Maker Schematic ...
Page 110: ...Wiring Schematics 9 2 All Freezer Pro Wiring Diagram ...
Page 111: ...Wiring Schematics 9 3 All Refrigerator Pro Wiring Diagram ...
Page 112: ...Wiring Schematics 9 4 Notes ...


