background image

43

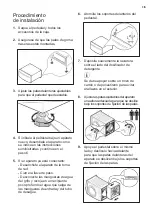
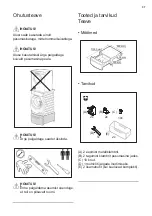
Poista jalusta ja kaikki tarvikkeet 

laatikosta.

Varmista, että takakumijalat on 

asennettu.

Tee jalustasta vakaa säätämällä 

etu- ja takajalkoja.

Jos asennat jalustan uuden koneen 

alle, poista kone pakkauksesta sen 

mukana toimitettujen ohjeiden 

mukaan ja siirry sitten vaiheeseen 6.

Jos kone on jo kytketty:

- Irrota pistoke pistorasiasta.

- Sulje vesihana.

- Irrota vedenottoletku(t) vesihanasta 

ja anna veden virrata vedenotto-

letku(i)sta ja poistoletkusta matalaan 

astiaan.

Asennus

3


Installation Procedure


1. 

Remove the pedestal and all 

accessories form the box.


2. 

Make sure that the rear rubber 

feet are mounted.


3. 

Adjust the front adjustable feet to 

make the pedestal stable.


4. 

If you install the pedestal under a 
brand new appliance, unpack the 

appliance as indicated in the 
instructions supplied with it and 

then proceed with step 6.


5. 

If the appliance is already 
connected:


- Disconnect the mains plug from 

the mains socket.


- For washing machine. Close the 

water tap.


- For washing machine. 

Disconnect the inlet hose(s) from 
the water tap and let the water 

flow out from the inlet hose(s) 
and the drain hose and collect it 

in a shallow basin.


- For tumble dryer. Empty the 

water container in a wash basin 

or, if available, activate the direct 
drain system to let the water flow 

out.


6. 

Screw the front brackets on the 
pedestal.


7. 

For washing machine. Gently lay 

the washing machine on its 
detergent dispenser side.


Lay it on cardboard or on a piece 

of polystyrene to avoid scratching 
the cabinet.


1.

2.

3.

4.

5.

6.

7.

8.

9.

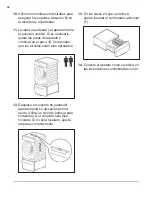
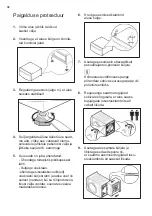
Kierrä jalustan etukiinnikkeet 

paikoilleen.

Aseta pesukone varovasti kyljelleen 

pesuainelokeropuoli lattiaa vasten.

Aseta se pahvin tai vaahtomuovipalan 

päälle, jotta kaappi ei naarmuunnu.

Säädä koneen säädettävät jalat 

sopivalle korkeudelle, jotta se 

voidaan liu’uttaa jalkojen 

lukituskiinnikkeiden alle.

Aseta jalusta samalle puolelle ja 

työnnä sitä eteenpäin niin, että 

koneen etujalat liukuvat jalkojen 

lukituskiinnikkeiden alle.

4


8. 

For washing machine. Adjust the 

appliance adjustable feet at a 
suitable height to allow it to slide 
under the foot locking brackets.


9. 

For washing machine. Lay the 
pedestal on the same side and 

slide it forward so that the 
appliance front feet slides under 

foot locking brackets.


11. 

For washing machine. Put the 

pedestal and appliance in vertical 
position. If necessary, adjust the 
appliance feet and go to step 16. 
Check that the screws are firmly 
screwed.


12. 

For tumble dryer. Unscrew and 

retain the two bottom screws from 
the back of the appliance.


10. 

For washing machine. Use the 
screws supplied to secure the rear 

brackets (B) on both the washer 
and the pedestal.


13. 

For tumble dryer. Screw the rear 

brackets (C) on the pedestal by 
using the screws supplied in the 

stand box.


Summary of Contents for E6WHPED2

Page 1: ... 152 Інструкція з установки 158 Model E6WHPED3 2 7 12 17 22 27 32 37 42 47 52 57 62 67 72 77 82 87 92 97 102 107 112 117 122 127 132 Model E6WHPED3 E6WHPED2 Pedestal with drawer Поставка с чекмедже Podstavec se zásuvkou Sokkel med skuffe Unterbausockel mit Schublade Βάζε κε ζπξηάξη Pedestal con cajón Sahtliga alus Vetolaatikolla varustettu jalusta Socle avec tiroir Podnožje s ladicom Fiókos talapz...

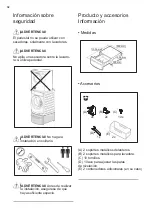
Page 2: ... to adjust the levelling feet 2 additional containers where included Safety Information Product Accessories WARNING Do not stack a dryer on top of washing machine if using a pedestal Information Dimension 1000 mm 595 mm 535 mm 305 mm Accessories WARNING Do not install it alone A B C 2x 2x 2x D 10x E 1x F 2x WARNING Before proceeding with installation make sure there is enough room A B C D E F 2 fr...

Page 3: ...nnect the inlet hose s from the water tap and let the water flow out from the inlet hose s and the drain hose and collect it in a shallow basin 6 Screw the front brackets on the pedestal 7 For washing machine Gently lay the washing machine on its detergent dispenser side Lay it on cardboard or on a piece of polystyrene to avoid scratching the cabinet 3 Adjust the front adjustable feet to make the ...

Page 4: ... If necessary adjust the appliance feet and go to step 16 Check that the screws are firmly screwed 12 For tumble dryer Unscrew and retain the two bottom screws from the back of the appliance he he rear sher 13 For tumble dryer Screw the rear brackets C on the pedestal by using the screws supplied in the stand box 5 ance e er ear t the 16 Move the Pedestal Appliance assembly to its permanent locati...

Page 5: ...le containers to recycle it Help protect the environment and human health and to recycle waste of electrical and electronic appliances Do not dispose appliances marked with the symbol with the household waste Return the product to your local recycling facility or contact your municipal office ...

Page 6: ...6 Note ...

Page 7: ...djust the levelling feet 2 additional containers where included Safety Information Product Accessories WARNING Do not stack a dryer on top of washing machine if using a pedestal Information Dimension 1000 mm 595 mm 535 mm 305 mm Accessories WARNING Do not install it alone A B C 2x 2x 2x D 10x E 1x F 2x WARNING Before proceeding with installation make sure there is enough room A B C D E F 2 front m...

Page 8: ...eady connected Disconnect the mains plug from the mains socket For washing machine Close the water tap For washing machine Disconnect the inlet hose s from the water tap and let the water flow out from the inlet hose s and the drain hose and collect it in a shallow basin For tumble dryer Empty the water container in a wash basin or if available activate the direct drain system to let the water flo...

Page 9: ...ontainer F 18 Connect the appliance as indicated in the instructions supplied with the appliance 5 14 For tumble dryer Lift the appliance and slide backwards so that the appliance front feet slides under foot locking brackets 15 For tumble dryer Screw the rear brackets C to the back of the appliance by using the screws removed in step 12 and adjust the appliance feet if required 16 Move the Pedest...

Page 10: ...де рециклирана Помогнете за опазването на околната среда и здравето на хората както и за рециклирането на отпадъци от електрически и електронни уреди Не изхвърляйте уреди отбелязани със символа заедно с битовите отпадъци Върнете продукта в местно съоръжение за рециклиране или се свържете със службата на Вашата община ...

Page 11: ...11 Забележка ...

Page 12: ... to adjust the levelling feet 2 additional containers where included Safety Information Product Accessories WARNING Do not stack a dryer on top of washing machine if using a pedestal Information Dimension 1000 mm 595 mm 535 mm 305 mm Accessories WARNING Do not install it alone A B C 2x 2x 2x D 10x E 1x F 2x WARNING Before proceeding with installation make sure there is enough room A B C D E F 2 fr...

Page 13: ...a piece of polystyrene to avoid scratching the cabinet 3 Adjust the front adjustable feet to make the pedestal stable 4 If you install the pedestal under a brand new appliance unpack the appliance as indicated in the instructions supplied with it and then proceed with step 6 5 If the appliance is already connected Disconnect the mains plug from the mains socket For washing machine Close the water ...

Page 14: ...ecessary adjust the appliance feet and go to step 16 Check that the screws are firmly screwed 12 For tumble dryer Unscrew and retain the two bottom screws from the back of the appliance he he rear sher 13 For tumble dryer Screw the rear brackets C on the pedestal by using the screws supplied in the stand box 5 ance e er ear t the 16 Move the Pedestal Appliance assembly to its permanent location Us...

Page 15: ...padních kontejnerů k recyklaci Pomáhejte chránit životní prostředí a lidské zdraví a recyklovat elektrické a elektronické spotřebiče určené k likvidaci Spotřebiče označené příslušným symbolem nelikvidujte spolu s domovním odpadem Spotřebič odevzdejte v místním sběrném dvoře nebo kontaktujte místní úřad ...

Page 16: ...16 Poznámka ...

Page 17: ...spanner to adjust the levelling feet 2 additional containers where included Safety Information Product Accessories WARNING Do not stack a dryer on top of washing machine if using a pedestal Information Dimension 1000 mm 595 mm 535 mm 305 mm Accessories WARNING Do not install it alone A B C 2x 2x 2x D 10x E 1x F 2x WARNING Before proceeding with installation make sure there is enough room A B C D E...

Page 18: ...m the inlet hose s and the drain hose and collect it in a shallow basin For tumble dryer Empty the water container in a wash basin or if available activate the direct drain system to let the water flow out 6 Screw the front brackets on the pedestal 7 For washing machine Gently lay the washing machine on its detergent dispenser side Lay it on cardboard or on a piece of polystyrene to avoid scratchi...

Page 19: ...u can insert the additional container F 15 For tumble dryer Screw the rear brackets C to the back of the appliance by using the screws removed in step 12 and adjust the appliance feet if required 17 Where included you can insert the additional container F 18 Connect the appliance as indicated in the instructions supplied with the appliance Brug de medfølgende skruer til at fastgøre de bageste besl...

Page 20: ... at genbruge den Hjælp med at beskytte miljøet og sundheden og med henblik på at genbruge affald fra elektriske og elektroniske apparater Apparater der er mærket med symbolet må ikke bortskaffes sammen med husholdningsaffald Returnér produktet til den lokale genbrugsstation eller kontakt kommunen ...

Page 21: ...21 Note ...

Page 22: ...ews will be sufficient 1 spanner to adjust the levelling feet 2 additional containers where included Safety Information Product Accessories WARNING Do not stack a dryer on top of washing machine if using a pedestal Information Dimension 1000 mm 595 mm 535 mm 305 mm Accessories WARNING Do not install it alone A B C 2x 2x 2x D 10x E 1x F 2x WARNING Before proceeding with installation make sure there...

Page 23: ...ct the inlet hose s from the water tap and let the water flow out from the inlet hose s and the drain hose and collect it in a shallow basin 6 Screw the front brackets on the pedestal 7 For washing machine Gently lay the washing machine on its detergent dispenser side Lay it on cardboard or on a piece of polystyrene to avoid scratching the cabinet 3 Adjust the front adjustable feet to make the ped...

Page 24: ... Put the pedestal and appliance in vertical position If necessary adjust the appliance feet and go to step 16 Check that the screws are firmly screwed 12 For tumble dryer Unscrew and retain the two bottom screws from the back of the appliance he he rear sher 13 For tumble dryer Screw the rear brackets C on the pedestal by using the screws supplied in the stand box 5 ance e er ear t the 16 Move the...

Page 25: ...n entsprechenden Recyclingcontainern Recyceln Sie zum Schutz der Umwelt und der menschlichen Gesundheit elektrische und elektronische Geräte Entsorgen Sie Geräte mit dem Symbol nicht mit dem Hausmüll Entsorgen Sie das Produkt über Ihre örtlichen Recyclingstelle oder wenden Sie sich an Ihre Gemeindebehörde ...

Page 26: ...26 Hinweis ...

Page 27: ... 8 screws will be sufficient 1 spanner to adjust the levelling feet 2 additional containers where included Safety Information Product Accessories WARNING Do not stack a dryer on top of washing machine if using a pedestal Information Dimension 1000 mm 595 mm 535 mm 305 mm Accessories WARNING Do not install it alone A B C 2x 2x 2x D 10x E 1x F 2x WARNING Before proceeding with installation make sure...

Page 28: ...ed with it and then proceed with step 6 5 If the appliance is already connected Disconnect the mains plug from the mains socket For washing machine Close the water tap For washing machine Disconnect the inlet hose s from the water tap and let the water flow out from the inlet hose s and the drain hose and collect it in a shallow basin For tumble dryer Empty the water container in a wash basin or i...

Page 29: ...nnect the appliance as indicated in the instructions supplied with the appliance 5 14 For tumble dryer Lift the appliance and slide backwards so that the appliance front feet slides under foot locking brackets 15 For tumble dryer Screw the rear brackets C to the back of the appliance by using the screws removed in step 12 and adjust the appliance feet if required 16 Move the Pedestal Appliance ass...

Page 30: ...α γηα αλαθύθισζε Σπκβάιεηε ζηελ πξνζηαζία ηνπ πεξηβάιινληνο θαη ηεο αλζξώπηλεο πγείαο αλαθπθιώλνληαο ηηο άρξεζηεο ειεθηξηθέο θαη ειεθηξνληθέο ζπζθεπέο Μελ απνξξίπηεηε κε ηα νηθηαθά απνξξίκκαηα ζπζθεπέο πνπ θέξνπλ ην ζύκβνιν Δπηζηξέςηε ην πξντόλ ζηελ ηνπηθή ζαο κνλάδα αλαθύθισζεο ή επηθνηλσλήζηε κε ηε δεκνηηθή αξρή ...

Page 31: ...31 Σεκείσζε ...

Page 32: ...er to adjust the levelling feet 2 additional containers where included Safety Information Product Accessories WARNING Do not stack a dryer on top of washing machine if using a pedestal Information Dimension 1000 mm 595 mm 535 mm 305 mm Accessories WARNING Do not install it alone A B C 2x 2x 2x D 10x E 1x F 2x WARNING Before proceeding with installation make sure there is enough room A B C D E F 2 ...

Page 33: ... the water flow out from the inlet hose s and the drain hose and collect it in a shallow basin 6 Screw the front brackets on the pedestal 7 For washing machine Gently lay the washing machine on its detergent dispenser side Lay it on cardboard or on a piece of polystyrene to avoid scratching the cabinet 3 Adjust the front adjustable feet to make the pedestal stable 4 If you install the pedestal und...

Page 34: ...stal and appliance in vertical position If necessary adjust the appliance feet and go to step 16 Check that the screws are firmly screwed 12 For tumble dryer Unscrew and retain the two bottom screws from the back of the appliance he he rear sher 13 For tumble dryer Screw the rear brackets C on the pedestal by using the screws supplied in the stand box 5 ance e er ear t the 16 Move the Pedestal App...

Page 35: ...decuados para reciclarlo Ayude a proteger el medio ambiente y la salud pública así como a reciclar residuos de aparatos eléctricos y electrónicos No deseche los aparatos marcados con el símbolo junto con los residuos domésticos Lleve el producto a su centro de reciclaje local o póngase en contacto con su oficina municipal ...

Page 36: ...36 Nota ...

Page 37: ... 1 spanner to adjust the levelling feet 2 additional containers where included Safety Information Product Accessories WARNING Do not stack a dryer on top of washing machine if using a pedestal Information Dimension 1000 mm 595 mm 535 mm 305 mm Accessories WARNING Do not install it alone A B C 2x 2x 2x D 10x E 1x F 2x WARNING Before proceeding with installation make sure there is enough room A B C ...

Page 38: ...the drain hose and collect it in a shallow basin For tumble dryer Empty the water container in a wash basin or if available activate the direct drain system to let the water flow out 6 Screw the front brackets on the pedestal 7 For washing machine Gently lay the washing machine on its detergent dispenser side Lay it on cardboard or on a piece of polystyrene to avoid scratching the cabinet 3 Adjust...

Page 39: ...ted in the instructions supplied with the appliance 5 14 For tumble dryer Lift the appliance and slide backwards so that the appliance front feet slides under foot locking brackets 15 For tumble dryer Screw the rear brackets C to the back of the appliance by using the screws removed in step 12 and adjust the appliance feet if required 16 Move the Pedestal Appliance assembly to its permanent locati...

Page 40: ...endid vastavatesse konteineritesse Aidake hoida keskkonda ja inimeste tervist ja suunake elektri ja elektroonilised jäätmed ringlusse Ärge visake sümboliga tähistatud seadmeid majapidamisjäätmete hulka Viige seade kohalikku ringluspunkti või pöörduge abi saamiseks kohalikku omavalitsusse ...

Page 41: ...41 Märkus ...

Page 42: ... adjust the levelling feet 2 additional containers where included Safety Information Product Accessories WARNING Do not stack a dryer on top of washing machine if using a pedestal Information Dimension 1000 mm 595 mm 535 mm 305 mm Accessories WARNING Do not install it alone A B C 2x 2x 2x D 10x E 1x F 2x WARNING Before proceeding with installation make sure there is enough room A B C D E F 2 front...

Page 43: ...e cabinet 3 Adjust the front adjustable feet to make the pedestal stable 4 If you install the pedestal under a brand new appliance unpack the appliance as indicated in the instructions supplied with it and then proceed with step 6 5 If the appliance is already connected Disconnect the mains plug from the mains socket For washing machine Close the water tap For washing machine Disconnect the inlet ...

Page 44: ...he appliance feet and go to step 16 Check that the screws are firmly screwed 12 For tumble dryer Unscrew and retain the two bottom screws from the back of the appliance he he rear sher 13 For tumble dryer Screw the rear brackets C on the pedestal by using the screws supplied in the stand box 5 ance e er ear t the 16 Move the Pedestal Appliance assembly to its permanent location Use a spirit level ...

Page 45: ...tamalla se asianmukaiseen kierrätysastiaan Suojele ympäristöä ja ihmisten terveyttä kierrättämällä sähkö ja elektroniikkaromut Älä hävitä tunnuksella merkittyjä laitteita kotitalousjätteen mukana Palauta tuote paikalliseen kierrätyskeskukseen tai ota yhteyttä paikalliseen viranomaiseen ...

Page 46: ...46 Huomaa ...

Page 47: ...ws will be sufficient 1 spanner to adjust the levelling feet 2 additional containers where included Safety Information Product Accessories WARNING Do not stack a dryer on top of washing machine if using a pedestal Information Dimension 1000 mm 595 mm 535 mm 305 mm Accessories WARNING Do not install it alone A B C 2x 2x 2x D 10x E 1x F 2x WARNING Before proceeding with installation make sure there ...

Page 48: ...d let the water flow out from the inlet hose s and the drain hose and collect it in a shallow basin For tumble dryer Empty the water container in a wash basin or if available activate the direct drain system to let the water flow out 6 Screw the front brackets on the pedestal 7 For washing machine Gently lay the washing machine on its detergent dispenser side Lay it on cardboard or on a piece of p...

Page 49: ...ner F 15 For tumble dryer Screw the rear brackets C to the back of the appliance by using the screws removed in step 12 and adjust the appliance feet if required 17 Where included you can insert the additional container F 18 Connect the appliance as indicated in the instructions supplied with the appliance Utilisez les vis fournies pour fixer les supports arrière B sur le lave linge et sur le socl...

Page 50: ...inés à leur recyclage Participez à la protection de l environnement et des hommes en recyclant les déchets issus des appareils électriques et électroniques Ne jetez pas les appareils portant le symbole avec les déchets ménagers Rapportez le produit à votre centre de recyclage local ou bien contactez les services municipaux ...

Page 51: ...51 Remarque ...

Page 52: ...r to adjust the levelling feet 2 additional containers where included Safety Information Product Accessories WARNING Do not stack a dryer on top of washing machine if using a pedestal Information Dimension 1000 mm 595 mm 535 mm 305 mm Accessories WARNING Do not install it alone A B C 2x 2x 2x D 10x E 1x F 2x WARNING Before proceeding with installation make sure there is enough room A B C D E F 2 f...

Page 53: ...ne to avoid scratching the cabinet 3 Adjust the front adjustable feet to make the pedestal stable 4 If you install the pedestal under a brand new appliance unpack the appliance as indicated in the instructions supplied with it and then proceed with step 6 5 If the appliance is already connected Disconnect the mains plug from the mains socket For washing machine Close the water tap For washing mach...

Page 54: ...adjust the appliance feet and go to step 16 Check that the screws are firmly screwed 12 For tumble dryer Unscrew and retain the two bottom screws from the back of the appliance he he rear sher 13 For tumble dryer Screw the rear brackets C on the pedestal by using the screws supplied in the stand box 5 ance e er ear t the 16 Move the Pedestal Appliance assembly to its permanent location Use a spiri...

Page 55: ...e odložite u prikladne spremnike Pomozite u zaštiti okoliša i ljudskog zdravlja te u recikliranju otpada od električnih i elektroničkih ureĎaja UreĎaje označene simbolom ne odlažite zajedno s kućnim otpadom Proizvod odnesite na lokalno reciklažno mjesto ili kontaktirajte nadležnu službu ...

Page 56: ...56 Napomena ...

Page 57: ...he levelling feet 2 additional containers where included Safety Information Product Accessories WARNING Do not stack a dryer on top of washing machine if using a pedestal Information Dimension 1000 mm 595 mm 535 mm 305 mm Accessories WARNING Do not install it alone A B C 2x 2x 2x D 10x E 1x F 2x WARNING Before proceeding with installation make sure there is enough room A B C D E F 2 front metal br...

Page 58: ... and let the water flow out from the inlet hose s and the drain hose and collect it in a shallow basin For tumble dryer Empty the water container in a wash basin or if available activate the direct drain system to let the water flow out 6 Screw the front brackets on the pedestal 7 For washing machine Gently lay the washing machine on its detergent dispenser side Lay it on cardboard or on a piece o...

Page 59: ...upplied with the appliance 14 For tumble dryer Lift the appliance and slide backwards so that the appliance front feet slides under foot locking brackets 15 For tumble dryer Screw the rear brackets C to the back of the appliance by using the screws removed in step 12 and adjust the appliance feet if required 16 Move the Pedestal Appliance assembly to its permanent location Use a spirit level to ch...

Page 60: ...ív hulladékgyűjtőbe a készülék csomagolóanyagait Támogassa a környezet és egészségvédelmet és hasznosítsa újra az elektromos és elektronikus eszközök hulladékait Ne dobja a háztartási szemétbe a szimbólummal jelzett készülékeket Jutassa vissza a terméket a helyi újrahasznosító létesítménybe vagy forduljon az önkormányzathoz ...

Page 61: ...61 Jegyzetek ...

Page 62: ...e sufficient 1 spanner to adjust the levelling feet 2 additional containers where included Safety Information Product Accessories WARNING Do not stack a dryer on top of washing machine if using a pedestal Information Dimension 1000 mm 595 mm 535 mm 305 mm Accessories WARNING Do not install it alone A B C 2x 2x 2x D 10x E 1x F 2x WARNING Before proceeding with installation make sure there is enough...

Page 63: ...ose and collect it in a shallow basin For tumble dryer Empty the water container in a wash basin or if available activate the direct drain system to let the water flow out 6 Screw the front brackets on the pedestal 7 For washing machine Gently lay the washing machine on its detergent dispenser side Lay it on cardboard or on a piece of polystyrene to avoid scratching the cabinet 3 Adjust the front ...

Page 64: ... dryer Screw the rear brackets C to the back of the appliance by using the screws removed in step 12 and adjust the appliance feet if required 16 Move the Pedestal Appliance assembly to its permanent location Use a spirit level to check if the assembly is properly leveled If not leveled adjust feet to level properly 17 Where included you can insert the additional container F 18 Connect the applian...

Page 65: ...propriati per riciclarli Aiutate a proteggere l ambiente e la salute umana e a riciclare le apparecchiature elettriche ed elettroniche Non smaltire le apparecchiature contrassegnate con il simbolo con i rifiuti domestici Riconsegnare il prodotto al punto di raccolta locale o contattare il proprio ufficio municipale ...

Page 66: ...66 Nota ...

Page 67: ...o adjust the levelling feet 2 additional containers where included Safety Information Product Accessories WARNING Do not stack a dryer on top of washing machine if using a pedestal Information Dimension 1000 mm 595 mm 535 mm 305 mm Accessories WARNING Do not install it alone A B C 2x 2x 2x D 10x E 1x F 2x WARNING Before proceeding with installation make sure there is enough room A B C D E F 2 fron...

Page 68: ...nlet hose s and the drain hose and collect it in a shallow basin For tumble dryer Empty the water container in a wash basin or if available activate the direct drain system to let the water flow out 6 Screw the front brackets on the pedestal 7 For washing machine Gently lay the washing machine on its detergent dispenser side Lay it on cardboard or on a piece of polystyrene to avoid scratching the ...

Page 69: ...structions supplied with the appliance 14 For tumble dryer Lift the appliance and slide backwards so that the appliance front feet slides under foot locking brackets 15 For tumble dryer Screw the rear brackets C to the back of the appliance by using the screws removed in step 12 and adjust the appliance feet if required 16 Move the Pedestal Appliance assembly to its permanent location Use a spirit...

Page 70: ...kamus konteinerius kad jos būtų perdirbtos Padėkite saugoti aplinką ir žmonių sveikatą bei perdirbkite elektros ir elektroninių prietaisų atliekas Neišmeskite prietaisų pažymėtų simboliu kartu su buitinėmis atliekomis Grąžinkite gaminį į savo vietos perdirbimo įmonę arba susisiekite su savo savivaldybės tarnyba ...

Page 71: ...71 Pastaba ...

Page 72: ...o adjust the levelling feet 2 additional containers where included Safety Information Product Accessories WARNING Do not stack a dryer on top of washing machine if using a pedestal Information Dimension 1000 mm 595 mm 535 mm 305 mm Accessories WARNING Do not install it alone A B C 2x 2x 2x D 10x E 1x F 2x WARNING Before proceeding with installation make sure there is enough room A B C D E F 2 fron...

Page 73: ...mble dryer Empty the water container in a wash basin or if available activate the direct drain system to let the water flow out 6 Screw the front brackets on the pedestal 7 For washing machine Gently lay the washing machine on its detergent dispenser side Lay it on cardboard or on a piece of polystyrene to avoid scratching the cabinet 3 Adjust the front adjustable feet to make the pedestal stable ...

Page 74: ...nce by using the screws removed in step 12 and adjust the appliance feet if required 16 Move the Pedestal Appliance assembly to its permanent location Use a spirit level to check if the assembly is properly leveled If not leveled adjust feet to level properly 17 Where included you can insert the additional container F 18 Connect the appliance as indicated in the instructions supplied with the appl...

Page 75: ...i paredzētajās tvertnēs Palīdziet aizsargāt apkārtējo vidi un cilvēku veselību un pārstrādāt elektrisko un elektronisko iekārtu atkritumus Neizmetiet ierīces kuras ir marķētas ar šādu simbolu kopā ar mājsaimniecības atkritumiem Nododiet izstrādājumu vietējai pārstrādes rūpnīcai vai sazinieties ar pašvaldības dienestu ...

Page 76: ...76 Piezīme ...

Page 77: ... sufficient 1 spanner to adjust the levelling feet 2 additional containers where included Safety Information Product Accessories WARNING Do not stack a dryer on top of washing machine if using a pedestal Information Dimension 1000 mm 595 mm 535 mm 305 mm Accessories WARNING Do not install it alone A B C 2x 2x 2x D 10x E 1x F 2x WARNING Before proceeding with installation make sure there is enough ...

Page 78: ...from the water tap and let the water flow out from the inlet hose s and the drain hose and collect it in a shallow basin For tumble dryer Empty the water container in a wash basin or if available activate the direct drain system to let the water flow out 6 Screw the front brackets on the pedestal 7 For washing machine Gently lay the washing machine on its detergent dispenser side Lay it on cardboa...

Page 79: ...tructions supplied with the appliance 14 For tumble dryer Lift the appliance and slide backwards so that the appliance front feet slides under foot locking brackets 15 For tumble dryer Screw the rear brackets C to the back of the appliance by using the screws removed in step 12 and adjust the appliance feet if required 16 Move the Pedestal Appliance assembly to its permanent location Use a spirit ...

Page 80: ...mde afvalcontainers voor recyclage Help het milieu en de gezondheid van de mensen te beschermen en recycleer afval van elektrische en elektronische apparaten Zet apparaten met het symbool niet bij het huishoudelijk afval Breng het product naar uw plaatselijke recyclageverzamelpunt of neem contact op met uw afvalbeheerder ...

Page 81: ...81 Opmerking ...

Page 82: ...nt 1 spanner to adjust the levelling feet 2 additional containers where included Safety Information Product Accessories WARNING Do not stack a dryer on top of washing machine if using a pedestal Information Dimension 1000 mm 595 mm 535 mm 305 mm Accessories WARNING Do not install it alone A B C 2x 2x 2x D 10x E 1x F 2x WARNING Before proceeding with installation make sure there is enough room A B ...

Page 83: ...ect it in a shallow basin For tumble dryer Empty the water container in a wash basin or if available activate the direct drain system to let the water flow out 6 Screw the front brackets on the pedestal 7 For washing machine Gently lay the washing machine on its detergent dispenser side Lay it on cardboard or on a piece of polystyrene to avoid scratching the cabinet 3 Adjust the front adjustable f...

Page 84: ...nd adjust the appliance feet if required 16 Move the Pedestal Appliance assembly to its permanent location Use a spirit level to check if the assembly is properly leveled If not leveled adjust feet to level properly 17 Where included you can insert the additional container F 18 Connect the appliance as indicated in the instructions supplied with the appliance 14 For tumble dryer Lift the appliance...

Page 85: ... Hjelp med å beskytte miljøet og menneskelig helse og resirkuler avfall fra elektriske og elektroniske apparater Ikke kast produkter som er merket med symbolet sammen med husholdnings avfallet Produktet kan leveres der hvor tilsvarende produkt selges eller på miljøstasjonen i kommunen Kontakt kommunen for nærmere opplysninger ...

Page 86: ...86 Notater ...

Page 87: ...fficient 1 spanner to adjust the levelling feet 2 additional containers where included Safety Information Product Accessories WARNING Do not stack a dryer on top of washing machine if using a pedestal Information Dimension 1000 mm 595 mm 535 mm 305 mm Accessories WARNING Do not install it alone A B C 2x 2x 2x D 10x E 1x F 2x WARNING Before proceeding with installation make sure there is enough roo...

Page 88: ...e s and the drain hose and collect it in a shallow basin For tumble dryer Empty the water container in a wash basin or if available activate the direct drain system to let the water flow out 6 Screw the front brackets on the pedestal 7 For washing machine Gently lay the washing machine on its detergent dispenser side Lay it on cardboard or on a piece of polystyrene to avoid scratching the cabinet ...

Page 89: ...he instructions supplied with the appliance 14 For tumble dryer Lift the appliance and slide backwards so that the appliance front feet slides under foot locking brackets 15 For tumble dryer Screw the rear brackets C to the back of the appliance by using the screws removed in step 12 and adjust the appliance feet if required 16 Move the Pedestal Appliance assembly to its permanent location Use a s...

Page 90: ...stały poddane recyklingowi Należy zadbać o ponowne przetwarzanie odpadów urządzeń elektrycznych i elektronicznych aby chronić środowisko naturalne oraz ludzkie zdrowie Nie wolno wyrzucać urządzeń oznaczonych symbolem wraz z odpadami domowymi Należy zwrócić produkt do miejscowego punktu recyklingu lub skontaktować się z odpowiednimi władzami miejskimi ...

Page 91: ...91 Uwaga ...

Page 92: ... adjust the levelling feet 2 additional containers where included Safety Information Product Accessories WARNING Do not stack a dryer on top of washing machine if using a pedestal Information Dimension 1000 mm 595 mm 535 mm 305 mm Accessories WARNING Do not install it alone A B C 2x 2x 2x D 10x E 1x F 2x WARNING Before proceeding with installation make sure there is enough room A B C D E F 2 front...

Page 93: ... basin For tumble dryer Empty the water container in a wash basin or if available activate the direct drain system to let the water flow out 6 Screw the front brackets on the pedestal 7 For washing machine Gently lay the washing machine on its detergent dispenser side Lay it on cardboard or on a piece of polystyrene to avoid scratching the cabinet 3 Adjust the front adjustable feet to make the ped...

Page 94: ...the appliance by using the screws removed in step 12 and adjust the appliance feet if required 16 Move the Pedestal Appliance assembly to its permanent location Use a spirit level to check if the assembly is properly leveled If not leveled adjust feet to level properly 17 Where included you can insert the additional container F 18 Connect the appliance as indicated in the instructions supplied wit...

Page 95: ...ecolha adequados para reciclagem Ajude a proteger o ambiente e a saúde pública através da reciclagem de resíduos de equipamentos elétricos e eletrónicos Não elimine os aparelhos que estiverem marcados com o símbolo juntamente com residuos domésticos comuns Entregue o produto em instalações de reciclagem locais ou contacte o seu município ...

Page 96: ...96 Nota ...

Page 97: ...anner to adjust the levelling feet 2 additional containers where included Safety Information Product Accessories WARNING Do not stack a dryer on top of washing machine if using a pedestal Information Dimension 1000 mm 595 mm 535 mm 305 mm Accessories WARNING Do not install it alone A B C 2x 2x 2x D 10x E 1x F 2x WARNING Before proceeding with installation make sure there is enough room A B C D E F...

Page 98: ...from the inlet hose s and the drain hose and collect it in a shallow basin For tumble dryer Empty the water container in a wash basin or if available activate the direct drain system to let the water flow out 6 Screw the front brackets on the pedestal 7 For washing machine Gently lay the washing machine on its detergent dispenser side Lay it on cardboard or on a piece of polystyrene to avoid scrat...

Page 99: ...pplied with the appliance 14 For tumble dryer Lift the appliance and slide backwards so that the appliance front feet slides under foot locking brackets 15 For tumble dryer Screw the rear brackets C to the back of the appliance by using the screws removed in step 12 and adjust the appliance feet if required 16 Move the Pedestal Appliance assembly to its permanent location Use a spirit level to che...

Page 100: ...spunzătoare pentru a l recicla Contribuiți la protecția mediului și a sănătății umane și reciclați deșeurile formate din dispozitive electrice și electronice Nu casați dispozitivele marcate cu simbolul împreună cu deșeurile menajere Returnați produsul la unitatea de reciclare locală sau contacta agenția dvs municipală ...

Page 101: ...101 Notă ...

Page 102: ... to adjust the levelling feet 2 additional containers where included Safety Information Product Accessories WARNING Do not stack a dryer on top of washing machine if using a pedestal Information Dimension 1000 mm 595 mm 535 mm 305 mm Accessories WARNING Do not install it alone A B C 2x 2x 2x D 10x E 1x F 2x WARNING Before proceeding with installation make sure there is enough room A B C D E F 2 fr...

Page 103: ...t in a shallow basin For tumble dryer Empty the water container in a wash basin or if available activate the direct drain system to let the water flow out 6 Screw the front brackets on the pedestal 7 For washing machine Gently lay the washing machine on its detergent dispenser side Lay it on cardboard or on a piece of polystyrene to avoid scratching the cabinet 3 Adjust the front adjustable feet t...

Page 104: ...sing the screws removed in step 12 and adjust the appliance feet if required 16 Move the Pedestal Appliance assembly to its permanent location Use a spirit level to check if the assembly is properly leveled If not leveled adjust feet to level properly 17 Where included you can insert the additional container F 18 Connect the appliance as indicated in the instructions supplied with the appliance 5 ...

Page 105: ...е вместе с бытовыми отходами бытовую технику помеченную символом Доставьте изделие на местное предприятие по переработке вторичного сырья или обратитесь в свой муниципалитет Хранить в сухом крытом помещении Дата изготовления выпуска указана на упаковке Изготовитель Electrolux Appliances AB St Göransgatan 143 105 45 Stockholm Швеция Изготовлено в Китае Импортёр и уполномоченная изготовителем органи...

Page 106: ...106 Примечание ...

Page 107: ...anner to adjust the levelling feet 2 additional containers where included Safety Information Product Accessories WARNING Do not stack a dryer on top of washing machine if using a pedestal Information Dimension 1000 mm 595 mm 535 mm 305 mm Accessories WARNING Do not install it alone A B C 2x 2x 2x D 10x E 1x F 2x WARNING Before proceeding with installation make sure there is enough room A B C D E F...

Page 108: ...on a piece of polystyrene to avoid scratching the cabinet 3 Adjust the front adjustable feet to make the pedestal stable 4 If you install the pedestal under a brand new appliance unpack the appliance as indicated in the instructions supplied with it and then proceed with step 6 5 If the appliance is already connected Disconnect the mains plug from the mains socket For washing machine Close the wat...

Page 109: ...ds so that the appliance front feet slides under foot locking brackets 15 For tumble dryer Screw the rear brackets C to the back of the appliance by using the screws removed in step 12 and adjust the appliance feet if required 16 Move the Pedestal Appliance assembly to its permanent location Use a spirit level to check if the assembly is properly leveled If not leveled adjust feet to level properl...

Page 110: ...ustrezne zabojnike za reciklažo Pomagajte zaščititi okolje in zdravje ljudi ter reciklirati odpadke električnih in elektronskih naprav Naprav označenih s simbolom ne odstranjujte z gospodinjskimi odpadki Izdelek vrnite na krajevno zbirališče za recikliranje ali se obrnite na občinski urad ...

Page 111: ...111 Opomba ...

Page 112: ...anner to adjust the levelling feet 2 additional containers where included Safety Information Product Accessories WARNING Do not stack a dryer on top of washing machine if using a pedestal Information Dimension 1000 mm 595 mm 535 mm 305 mm Accessories WARNING Do not install it alone A B C 2x 2x 2x D 10x E 1x F 2x WARNING Before proceeding with installation make sure there is enough room A B C D E F...

Page 113: ... drain hose and collect it in a shallow basin For tumble dryer Empty the water container in a wash basin or if available activate the direct drain system to let the water flow out 6 Screw the front brackets on the pedestal 7 For washing machine Gently lay the washing machine on its detergent dispenser side Lay it on cardboard or on a piece of polystyrene to avoid scratching the cabinet 3 Adjust th...

Page 114: ...ted in the instructions supplied with the appliance 14 For tumble dryer Lift the appliance and slide backwards so that the appliance front feet slides under foot locking brackets 15 For tumble dryer Screw the rear brackets C to the back of the appliance by using the screws removed in step 12 and adjust the appliance feet if required 16 Move the Pedestal Appliance assembly to its permanent location...

Page 115: ...íslušných nádob na recykláciu Pomôžte chrániť životné prostredie a zdravie ľudí a recyklujte odpad z elektrických a elektronických spotrebičov Spotrebiče označené symbolom nevyhadzujte s domovým odpadom Výrobok vráťte miestnemu zariadeniu na recykláciu alebo sa obráťte na obecný úrad ...

Page 116: ...116 Poznámka ...

Page 117: ...sufficient 1 spanner to adjust the levelling feet 2 additional containers where included Safety Information Product Accessories WARNING Do not stack a dryer on top of washing machine if using a pedestal Information Dimension 1000 mm 595 mm 535 mm 305 mm Accessories WARNING Do not install it alone A B C 2x 2x 2x D 10x E 1x F 2x WARNING Before proceeding with installation make sure there is enough r...

Page 118: ...water container in a wash basin or if available activate the direct drain system to let the water flow out 6 Screw the front brackets on the pedestal 7 For washing machine Gently lay the washing machine on its detergent dispenser side Lay it on cardboard or on a piece of polystyrene to avoid scratching the cabinet 3 Adjust the front adjustable feet to make the pedestal stable 4 If you install the ...

Page 119: ...removed in step 12 and adjust the appliance feet if required 16 Move the Pedestal Appliance assembly to its permanent location Use a spirit level to check if the assembly is properly leveled If not leveled adjust feet to level properly 17 Where included you can insert the additional container F 18 Connect the appliance as indicated in the instructions supplied with the appliance 14 For tumble drye...

Page 120: ...ите у одговарајуће контејнере за рециклажу Помозите у заштити животне средине и људског здравља и рециклирајте отпад од електричних и електронских уређаја Немојте одлагати уређаје који су обележени симболом заједно са кућним отпадом Вратите производ на локални пункт за рециклажу или се обратите општини ...

Page 121: ...121 Напомена ...

Page 122: ...ews will be sufficient 1 spanner to adjust the levelling feet 2 additional containers where included Safety Information Product Accessories WARNING Do not stack a dryer on top of washing machine if using a pedestal Information Dimension 1000 mm 595 mm 535 mm 305 mm Accessories WARNING Do not install it alone A B C 2x 2x 2x D 10x E 1x F 2x WARNING Before proceeding with installation make sure there...

Page 123: ...ut from the inlet hose s and the drain hose and collect it in a shallow basin For tumble dryer Empty the water container in a wash basin or if available activate the direct drain system to let the water flow out 6 Screw the front brackets on the pedestal 7 For washing machine Gently lay the washing machine on its detergent dispenser side Lay it on cardboard or on a piece of polystyrene to avoid sc...

Page 124: ...as indicated in the instructions supplied with the appliance 14 For tumble dryer Lift the appliance and slide backwards so that the appliance front feet slides under foot locking brackets 15 For tumble dryer Screw the rear brackets C to the back of the appliance by using the screws removed in step 12 and adjust the appliance feet if required 16 Move the Pedestal Appliance assembly to its permanent...

Page 125: ...mplig återvinningscontainer Hjälp till att skydda miljön och människors hälsa genom att återvinna elektriska och elektroniska apparater Kassera inte produkter med symbolen i de vanliga hushålls soporna Returnera produkten till din lokala återvinningsstation eller kontakta din kommun ...

Page 126: ...126 OBS ...

Page 127: ...spanner to adjust the levelling feet 2 additional containers where included Safety Information Product Accessories WARNING Do not stack a dryer on top of washing machine if using a pedestal Information Dimension 1000 mm 595 mm 535 mm 305 mm Accessories WARNING Do not install it alone A B C 2x 2x 2x D 10x E 1x F 2x WARNING Before proceeding with installation make sure there is enough room A B C D E...

Page 128: ...ce of polystyrene to avoid scratching the cabinet 3 Adjust the front adjustable feet to make the pedestal stable 4 If you install the pedestal under a brand new appliance unpack the appliance as indicated in the instructions supplied with it and then proceed with step 6 5 If the appliance is already connected Disconnect the mains plug from the mains socket For washing machine Close the water tap F...

Page 129: ... tumble dryer Lift the appliance and slide backwards so that the appliance front feet slides under foot locking brackets 15 For tumble dryer Screw the rear brackets C to the back of the appliance by using the screws removed in step 12 and adjust the appliance feet if required 16 Move the Pedestal Appliance assembly to its permanent location Use a spirit level to check if the assembly is properly l...

Page 130: ...nüştürmek için ambalajını ilgili kaplara koyun Çevre ve insan sağlığının korunmasına ve elektrik ve elektrikli cihazların atıklarının geri dönüştürülmesine katkıda bulunun sembolü bulunan evsel atıkları atmayın Ürünü bölgenizde bulunan bir geri dönüşüm tesisine verin veya bulunduğunuz belediyeye danışın ...

Page 131: ...131 Not ...

Page 132: ...fficient 1 spanner to adjust the levelling feet 2 additional containers where included Safety Information Product Accessories WARNING Do not stack a dryer on top of washing machine if using a pedestal Information Dimension 1000 mm 595 mm 535 mm 305 mm Accessories WARNING Do not install it alone A B C 2x 2x 2x D 10x E 1x F 2x WARNING Before proceeding with installation make sure there is enough roo...

Page 133: ...e s and the drain hose and collect it in a shallow basin For tumble dryer Empty the water container in a wash basin or if available activate the direct drain system to let the water flow out 6 Screw the front brackets on the pedestal 7 For washing machine Gently lay the washing machine on its detergent dispenser side Lay it on cardboard or on a piece of polystyrene to avoid scratching the cabinet ...

Page 134: ...r tumble dryer Lift the appliance and slide backwards so that the appliance front feet slides under foot locking brackets 15 For tumble dryer Screw the rear brackets C to the back of the appliance by using the screws removed in step 12 and adjust the appliance feet if required 16 Move the Pedestal Appliance assembly to its permanent location Use a spirit level to check if the assembly is properly ...

Page 135: ...ї сировини Допоможіть захистити навколишнє середовище та здоров я інших людей і забезпечити вторинну переробку електричних і електронних приладів Не викидайте прилади позначені символом разом з іншим домашнім сміттям Поверніть продукт до заводу із вторинної переробки у вашій місцевості або зверніться до місцевих муніципальних органів влади ...

Page 136: ...136 Примітка ...

Page 137: ......

Page 138: ...G0013222 001 A07155701 ...

Reviews: