background image

13.5 Maintenance wash

The repeated and prolonged use of low

temperature programmes can cause

detergent deposits, fluff residues,

bacterial growth inside the drum and the

tub. This could generate bad odours and

mildew. To eliminate these deposits and

clean the inner part of the appliance, run

a maintenance wash regularly (at least

once a month).

Refer to "Cleaning the drum"

paragraph.

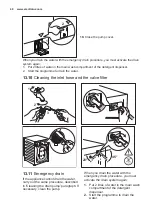
13.6 Door seal with double lip

trap

This appliance is designed with a self

cleaning draining system, allowing light

fluff fibers that fall off the clothes to be

drained out with the water. Regularly

examine the seal. Coins, buttons, other

small items can be recovered at the end

of the cycle.

Clean it when needed, using ammonia

cream cleanser agent without scratching

the seal surface.

Always obey the instructions

that you find on the

packaging of the product.

13.7 Cleaning the drum

Regularly examine the drum to prevent

unwanted deposits.
Rust deposits in the drum may occur due

to rusting foreign body in the washing or

tap water containing iron
Clean the drum with special products for

stainless steel.

Always follow the

instructions that you find on

the packaging of the

product.

Do not clean the drum with

acidic descaling products,

scouring products containing

chlorine or iron or steel wool.

For a thorough clean:
1. Remove all laundry from the drum.

2. Run a Cottons programme with the

highest temperature.

3. Add a small quantity of powder

detergent into the empty drum, in

order to rinse out any left residues.

Occasionally, at the end of a

cycle the display may show
the icon  : this is a

recommendation to perform

the “drum cleaning”. Once

the drum cleaning has been

performed, the icon

disappears.

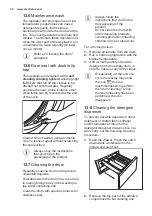
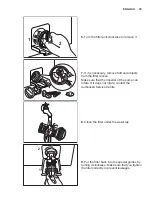
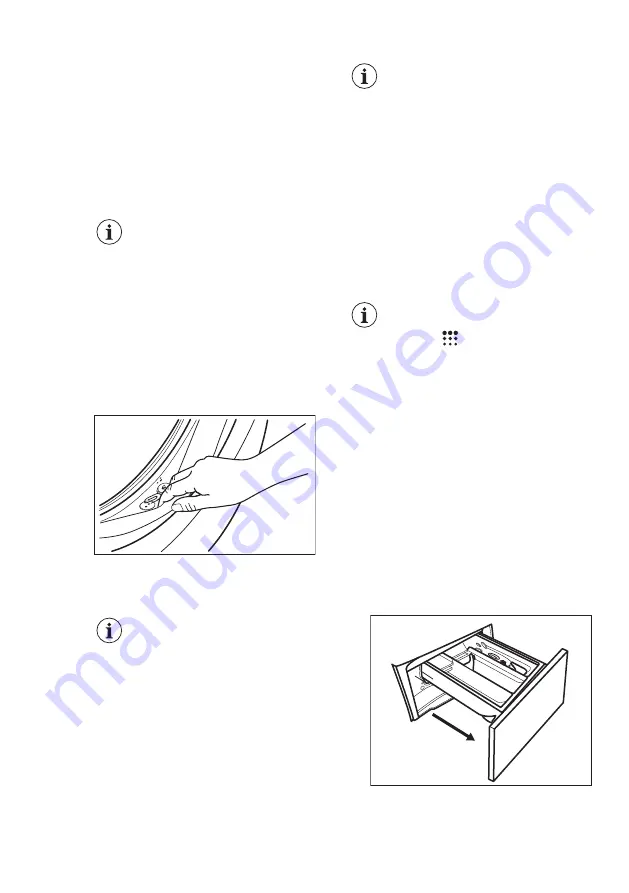
13.8 Cleaning the detergent

dispenser

To prevent possible deposits of dried

detergent or clotted fabric softener

and/or formation of mould in the

detergent dispenser drawer, once in a

while carry out the following cleaning

procedure:
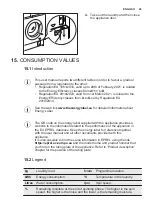
1. Open the drawer. Press the catch

downwards as indicated in the

picture and pull it out.

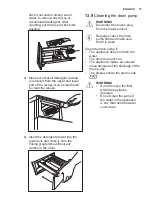
2. Remove the top part of the additive

compartment to aid cleaning and

www.electrolux.com

36

Summary of Contents for E772F402BI

Page 1: ...E772F402BI EN Washing Machine User Manual ...

Page 2: ...use it you can be safe in the knowledge that you ll get great results every time Welcome to Electrolux Visit our website for Get usage advice brochures trouble shooter service and repair information www electrolux com support Register your product for better service www registerelectrolux com Buy Accessories Consumables and Original spare parts for your appliance www electrolux com shop CUSTOMER C...

Page 3: ...nd the hazards involved Children between 3 and 8 years of age and persons with very extensive and complex disabilities shall be kept away from the appliance unless continuously supervised Children of less than 3 years of age should be kept away from the appliance unless continuously supervised Do not let children play with the appliance Keep all packaging away from children and dispose of it appro...

Page 4: ...amaged it must be replaced by the manufacturer its Authorised Service Centre or similarly qualified persons to avoid an electrical hazard Before any maintenance operation deactivate the appliance and disconnect the mains plug from the socket Do not use high pressure water sprays and or steam to clean the appliance Clean the appliance with a moist cloth Use only neutral detergents Do not use abrasi...

Page 5: ...to the mains plug and to the mains cable Should the mains cable need to be replaced this must be carried out by our Authorised Service Centre Connect the mains plug to the mains socket only at the end of the installation Make sure that there is access to the mains plug after the installation Do not touch the mains cable or the mains plug with wet hands Do not pull the mains cable to disconnect the...

Page 6: ...ashing drum drum spider and related ball bearings heaters and heating elements including heat pumps piping and related equipment including hoses valves filters and aquastops printed circuit boards electronic displays pressure switches thermostats and sensors software and firmware including reset software door door hinge and seals other seals door locking assembly plastic peripherals such as deterg...

Page 7: ... and moisture ensured by the protective cover except where the low voltage equipment has no protection against moisture IPX4 Water supply pressure 1 Minimum Maximum 0 5 bar 0 05 MPa 8 bar 0 8 MPa Water supply 2 Cold water Maximum Load Cotton 7 kg Spin Speed Maximum spin speed 1151 rpm 1 The appliance works correctly if the water pressure is not lower than 0 05 MPa 0 5 bar If you cannot connect the...

Page 8: ...ve all the packaging and the transit bolts before installing the appliance 1 Put two polystyrene packaging elements on the floor under the appliance WARNING It is strongly recommended that this action is carries out by two persons 2 Carefully put the appliance down on its rear side Make sure not to damage the hoses www electrolux com 8 ...

Page 9: ...tyrene protection 5 Remove the power supply cable and the drain hose from the hose holders It is possible to see water flowing from the drain hose This is due to the testing with water of the appliance in factory 6 Remove the three bolts the hose holders and plastic spacers by using the spanner supplied with the appliance ENGLISH 9 ...

Page 10: ... under the appliance It should be screwed to at least 2 floor beams and should extend beyond the front feet If possible install the appliance where the floor is more stable 5 5 Positioning and levelling x4 1 Install the appliance on a flat hard floor WARNING Make sure that carpets do not stop the air circulation below the appliance Bring the appliance near the furniture recess before levelling it ...

Page 11: ... 760 mm 1020 mm 900 mm 1360 mm max 1000 mm min 600 mm max 1000 mm min 600 mm The inlet hose 1 Remove the inlet hose from inside the drum 2 To connect the water inlet hose towards the proper direction and with the proper inclination check the position of the water tap before connecting it to the back of the appliance Make sure the hose is nor kinked squashed but neither tensed ENGLISH 11 ...

Page 12: ... couplings Use the hose supplied with appliance Do not use an extension hose if the inlet hose is too short Contact the Authorised Service Centre for an inlet hose replacement Water drainage The drain hose can be connected Ø 40 mm To a stand pipe with vent hole Directly into a drain pipe at a height of not less than 60 cm 23 6 and not more than 100 cm 39 3 The end of the drain hose must always be ...

Page 13: ...the supplied cable tie L You can extend the drain hose to maximum 400 cm Contact the service centre for the other drain hose and the extension 5 7 Building in 600 mm min 820 mm min 560 mm 16 22 mm min This appliance has been designed to be built into the kitchen furniture See the minimum recess dimensions in the drawings 553 mm 596 mm 140 mm 76 mm 50 mm 50 mm 819 mm If hoses run behind the applian...

Page 14: ...bring it near the recess and preposition the inlet hose the drain hose and the mains cable WARNING Make sure they are not kinked or squashed 5 8 Installing anti tilting device Accessory Install this accessory in case of risk of appliance tilting only If the height of the counter is 820 mm or lower you cannot install the anti tilting device 1 Remove the screws of the top cover on the rear of the ap...

Page 15: ...cupboard door should be width min 595 max 598 mm thickness 16 22 mm Factory pre setting The appliance is originally pre set for the assembly of a cupboard door opening from right to left The best solution would be to screw the upper hinge to the upper hole of the top plate and the lower hinge to the lower hole of the bottom plate Reversibility of the cupboard door Carry out the cupboard door rever...

Page 16: ...the door it is recommended to call a professional Align the cupboard door to the furniture correctly Measure the distance X to fix the height of the hole to countersink the upper hinge The centre of the hole Y should be at the same height of the stroke on the hinge support 16 22 mm 22 1 5 mm 449 mm 595 598 mm Ø 35 mm 12 5 14 mm Set the position of the lower hole respecting dimensions and distances...

Page 17: ... Fix the hinges to the hinge supports on the appliance by means of the two supplied screws B The hinges can be adjusted to compensate for possible uneven thickness of the door 2 N 1 E D C Counter magnet The appliance is pre set for a magnetic closure For a correct closure 1 Position the screw C and the counter magnet D on the magnetic plate N Lean the cupboard door against the screw until it leave...

Page 18: ...accessible after installing the appliance For any electrical work required to install this appliance contact our Authorised Service Centre The manufacturer does not accept any responsibility for damage or injury through failure to comply with the above safety precaution 6 CONTROL PANEL 6 1 Control panel description Eco 40 60 Steam Temp Delay Start Time manager 90 60 40 30 20 Cold 1200 900 700 Nigh...

Page 19: ...play Door locked indicator Delay start indicator The digital indicator can show Reset position Programme duration e g Delay time e g Cycle end Warning code e g Error indicator Time Manager indicator Anti stain indicator Extra Rinse indicator Steam phase indicator Add garments indicator it lights at the beginning of the wash ing phase when it is still possible to pause the appliance and add more la...

Page 20: ...mme the appliance automatically proposes a default temperature The indicator Cold cold water The indicator of the set temperature comes on 7 5 Spin When you set a programme the appliance automatically sets the maximum spin speed allowed except in Denim programme By means of this button you can change the default spin speed or set one of the additional spin options Rinse Hold The related indicator ...

Page 21: ...t available with a temperature lower than 40 C 7 8 Permanent Soft Plus Set this option to optimise the fabric softener distribution and improve fabric softness Recommended when you use fabric softener This option increases the programme duration The corresponding indicator above the touch button illuminates and also stays permanently on during next cycles until this option is deactivated 7 9 Perma...

Page 22: ... the door is locked 7 13 Time Manager With this option you can reduce the programme duration depending on the load size and the degree of soiling When you set a washing programme the display shows the default duration and dashes Touch Time Manager button to reduce the programme duration according to your needs The display shows the new programme duration and a number of dashes will decrease accord...

Page 23: ...tton items This programme re moves micro organisms thanks to a washing phase with the temperature maintained above 60 C for some minutes This helps in remov ing germs bacteria micro organism and parti cles The addition of vapour together with an additional rinsing phase ensures a proper re moval of detergent residues and pollens aller genic items making it suitable for delicate and sensitive skins...

Page 24: ...elicate fabrics To spin the laundry and to drain the water in the drum Rinse 1200 rpm 7 kg All fabrics except woollens and very deli cate fabrics Programme for rinsing and spin ning the laundry The default spin speed is the one used for cotton programmes Reduce the spin speed according to the type of laundry If necessary set the Extra Rinse option to add rinses With a low spin speed the appliance ...

Page 25: ... a water repellency restoring cy cle specifically tailored for treating clothes with a hydrophobic coating To perform the water repellency restoring cycle proceed as follows Pour the washing detergent in the compart ment Pour a special water repellency restorer for fabric into the softener compartment of the drawer Reduce the laundry load to 1 kg To further improve the water re pellency restoring ...

Page 26: ...U regulation 1061 2010 this programme at 60 C is the Standard 60 C cotton programme and at 30 C is the Standard 40 C cotton programme They are the most efficient pro grammes in terms of combined energy and water consumption for washing normally soiled cotton laundry The water temperature of the washing phase may differ from the temperature declared for the selected programme 3 If you set a Steam p...

Page 27: ... Outdoor Denim Wool Silk 1 Prewash and Stains cannot be selected together 2 This option is not available with temperature lower than 40 C 3 If you set the No Spin option the appliance performs draining only Suitable detergents for washing programmes Programme Universal powder1 Liquid Uni versal Liquid for coloureds Delicates woollens Special Eco 40 60 Cottons ENGLISH 27 ...

Page 28: ... and other laundry instruc tions M1380 The Woolmark symbol is a Certification mark in many countries 9 SETTINGS 9 1 Acoustic signals This appliance has different acoustic signals that operate when You activate the appliance special short tune You deactivate the appliance special short tune You touch the buttons click sound You make an invalid selection 3 short sounds The programme is completed seq...

Page 29: ... On Off button for a few seconds to activate the appliance A short tune sounds 11 2 Loading the laundry 1 Open the appliance door 2 Empty the pockets and unfold the items before you put them in the appliance 3 Put the laundry in the drum one item at a time Do not put too much laundry in the drum 4 Close the door firmly CAUTION Make sure that no laundry gets caught between the seal and the door to ...

Page 30: ...the flap down With the flap in the position DOWN Do not use gelatinous or thick liquid detergents Do not exceed to liquid detergent dose indicated on the flap Do not set the prewash phase Do not set the delay start function 5 Measure out the detergent and the fabric conditioner 6 Carefully close the detergent dispenser Make sure that the flap does not cause a blockage when you close the drawer 11 ...

Page 31: ...button repeatedly until the display shows and the indicator goes off 3 Touch the Start Pause button again to start the programme immediately Changing the delay start after the countdown has started To change the delay start 1 Touch the Start Pause button to pause the appliance The related indicator flashes 2 Touch the Delay Start button repeatedly until the display shows the desired delay time 3 T...

Page 32: ...rogramme When the programme has finished the appliance stops automatically The acoustic signals operate if they are active The display shows The indicator of the Start Pause button goes off The door unlocks and the indicator goes off 1 Press button On Off to deactivate the appliance After five minutes from the end of the programme the energy saving function automatically deactivates the appliance ...

Page 33: ...TS AND TIPS WARNING Refer to Safety chapters 12 1 The laundry load Divide the laundry into white coloured synthetics delicates and wool Follow the washing instructions on the laundry care labels Do not wash white and coloured items together Some coloured items can discolour with the first wash We recommend that you wash them separately for the first couple of times Turn multilayered fabrics wool a...

Page 34: ...u are washing a small load the laundry is lightly soiled there is large amounts of foam during washing When using detergent tabs or pods always put them inside the drum not in the detergent dispenser Insufficient detergent may cause unsatisfactory washing results the wash load to turn grey greasy clothes mould in the appliance Excessive detergent may cause sudsing reduced washing effect inadequate...

Page 35: ... part 13 2 Removing foreign objects Make sure that pockets are empty and all loose elements are tied up before running your cycle Refer to The laundry load in Hints and tips Remove any foreign objects such as metal clip buttons coins etc that you may find in the door seal the filters and the drum Refer to Door seal with double lip trap Cleaning the drum Cleaning the drain pump and Cleaning the inl...

Page 36: ... may occur due to rusting foreign body in the washing or tap water containing iron Clean the drum with special products for stainless steel Always follow the instructions that you find on the packaging of the product Do not clean the drum with acidic descaling products scouring products containing chlorine or iron or steel wool For a thorough clean 1 Remove all laundry from the drum 2 Run a Cotton...

Page 37: ...ramme without any clothes in the drum 13 9 Cleaning the drain pump WARNING Disconnect the mains plug from the mains socket Regularly check the drain pump filter and make sure that it is clean Clean the drain pump if The appliance does not drain the water The drum does not turn The appliance makes an unusual noise because of the blockage of the drain pump The display shows the alarm code WARNING Do...

Page 38: ...Always keep a rag nearby to dry up any water spillages when removing the filter 180 3 Turn the filter 180 degrees in anti clockwise direction to open it without removing Let the water flow out 4 When the bowl is full of water turn the filter back and empty the container 5 Repeat the steps 3 and 4 until the water stops to flow out www electrolux com 38 ...

Page 39: ...r recess Make sure that the impeller of the pump can rotate If it does not rotate contact the Authorised Service Centre 8 Clean the filter under the water tap 2 1 9 Put the filter back into the special guides by turning it clockwise Make sure that you tighten the filter correctly to prevent leakages ENGLISH 39 ...

Page 40: ...ning the inlet hose and the valve filter 1 2 3 45 20 13 11 Emergency drain If the appliance cannot drain the water carry out the same procedure described in Cleaning the drain pump paragraph If necessary clean the pump When you drain the water with the emergency drain procedure you must activate the drain system again 1 Put 2 litres of water in the main wash compartment of the detergent dispenser ...

Page 41: ...igher than 0 C before you use the appliance again The manufacturer is not responsible for damages caused by low temperatures 14 TROUBLESHOOTING WARNING Refer to Safety chapters 14 1 Alarm Codes and Possible failures The appliance does not start or it stops during operation First try to find a solution to the problem refer to the tables WARNING Deactivate the appliance before carrying out any check...

Page 42: ...tion of the drain hose is correct Set the drain programme if you set a programme without drain phase Set the drain programme if you set an option which ends with water in the tub The appliance door is open or not closed correctly Make sure that the door is properly closed No communication between electronic elements of the ap pliance The programme was not finished properly or the appliance stopped...

Page 43: ...he water hoses are tight and there is not water leakages Make sure that the water inlet hose and the drain hose have no damages Make sure you use the correct detergent and the correct quantity of it You cannot open the appliance door Make sure that a washing programme that ends with water in tub has not been selected Make sure that the washing programme is finished Set the drain or the spin progra...

Page 44: ... Emergency door opening In case of power failure or functioning failure the appliance door remains locked The washing programme continues when the power is restored If the door remains locked in case of failure it is possible to open it using the emergency unlock function Before opening the door CAUTION Risk of burns Make sure that the water temperature is not too high and the laundry is not hot I...

Page 45: ...e appliance provides a web link to the information related to the performance of the appliance in the EU EPREL database Keep the energy label for reference together with the user manual and all other documents provided with this appliance It is also possible to find the same information in EPREL using the link https eprel ec europa eu and the model name and product number that you find on the rati...

Page 46: ...odes Off W Stand by W Delay start W 0 48 0 48 4 00 Time to Off Standby mode is 15 minutes maximum 15 4 According to Regulation 1061 2010 Standard cotton pro grammes Load kg Energy con sumption kWh Water con sumption litres Approxi mate pro gramme duration minutes Remain ing mois ture 1 For Standard 60 C cotton Set Eco 40 60 at 60 C 7 0 93 52 250 53 For Standard 60 C cotton Set Eco 40 60 at 60 C 3 ...

Page 47: ...pin speed 2 Suitable for washing heavily soiled textiles 3 Suitable for washing lightly soiled cottons 4 It also performs as quick washing cycle for lightly soiled laundry 16 ENVIRONMENTAL CONCERNS Recycle materials with the symbol Put the packaging in relevant containers to recycle it Help protect the environment and human health by recycling waste of electrical and electronic appliances Do not d...

Page 48: ...www electrolux com shop 157019953 A 092020 ...

Reviews: