background image

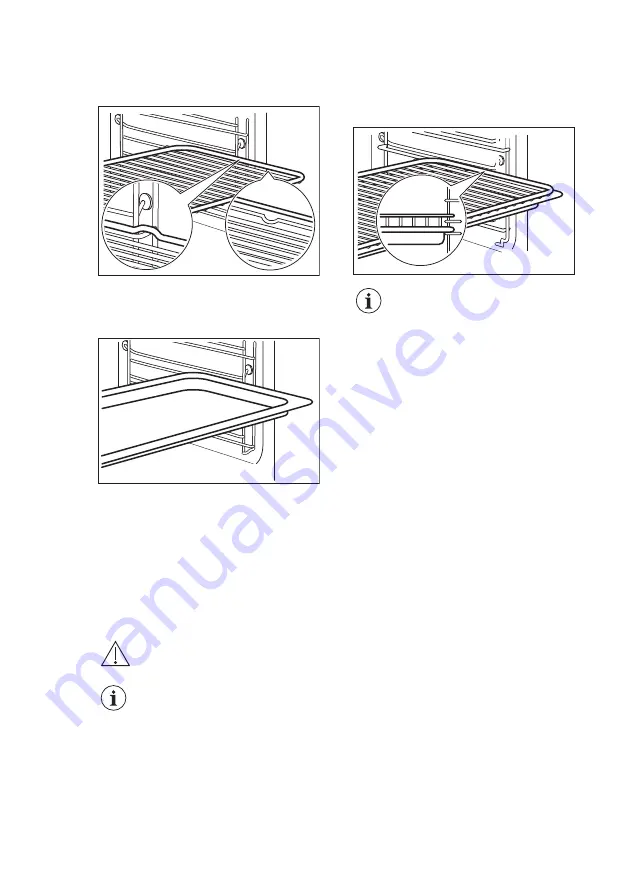
Push the shelf between the guide bars of

the shelf support and make sure that the

feet point down.

Baking tray:
Push the baking tray between the guide

bars of the shelf support.

Wire shelf and baking tray together:
Push the baking tray between the guide

bars of the shelf support and the wire

shelf on the guide bars above.

Small indentation at the top

increase safety. The

indentations are also anti-tip

devices. The high rim

around the shelf prevents

cookware from slipping of

the shelf.

7. ADDITIONAL FUNCTIONS

7.1 Cooling fan

When the oven operates, the cooling fan

turns on automatically to keep the

surfaces of the oven cool. If you turn off

the oven, the cooling fan can continue to

operate until the oven cools down.

8. HINTS AND TIPS

WARNING!

Refer to Safety chapters.

The temperature and baking

times in the tables are

guidelines only. They

depend on the recipes and

the quality and quantity of

the ingredients used.

8.1 Cooking recommendations

Your oven may bake or roast differently

to the oven you had before. The below

tables provide you with the standard

settings for temperature, cooking time

and shelf position.
If you cannot find the settings for a

special recipe, look for the similar one.

8.2 Baking

• Use the lower temperature the first

time.

• You can extend baking times by 10 –

15 minutes if you bake cakes on more

than one shelf position.

• Cakes and pastries at different

heights do not always brown equally.

ENGLISH

9

Summary of Contents for EB6L20CN

Page 1: ...EB6L20CN EB6L20SW EB6L20WE EN Oven User Manual ...

Page 2: ...to Electrolux Visit our website for Get usage advice brochures trouble shooter service information www electrolux com webselfservice Register your product for better service www registerelectrolux com Buy Accessories Consumables and Original spare parts for your appliance www electrolux com shop CUSTOMER CARE AND SERVICE Always use original spare parts When contacting our Authorised Service Centre...

Page 3: ...s shall be kept away unless continuously supervised Children of less than 3 years of age should be kept away unless continuously supervised Do not let children play with the appliance Keep all packaging away from children and dispose of it appropriately Keep children and pets away from the appliance when it operates or when it cools down Accessible parts are hot If the appliance has a child safety...

Page 4: ...FETY INSTRUCTIONS 2 1 Installation WARNING Only a qualified person must install this appliance Remove all the packaging Do not install or use a damaged appliance Follow the installation instructions supplied with the appliance Always take care when moving the appliance as it is heavy Always use safety gloves and enclosed footwear Do not pull the appliance by the handle Keep the minimum distance fr...

Page 5: ...pliance after each use Be careful when you open the appliance door while the appliance is in operation Hot air can release Do not operate the appliance with wet hands or when it has contact with water Do not apply pressure on the open door Do not use the appliance as a work surface or as a storage surface Open the appliance door carefully The use of ingredients with alcohol can cause a mixture of ...

Page 6: ...s packaging Do not clean the catalytic enamel if applicable with any kind of detergent 2 5 Internal lighting WARNING Risk of electric shock The type of light bulb or halogen lamp used for this appliance is for household appliances only Do not use it for house lighting Before replacing the lamp disconnect the appliance from the power supply Only use lamps with the same specifications 2 6 Service To...

Page 7: ...obs To use the appliance press the control knob The control knob comes out 5 2 Turning the oven on and off 1 Turn the knob for the oven functions to select an oven function 2 Turn the knob for the temperature to select a temperature 3 To turn off the oven turn the knobs for the oven functions and temperature to the off position The lamp turns on when the oven operates 5 3 Heating functions Oven fu...

Page 8: ...be closed during cook ing so that the function is not interrupted and to ensure that the oven operates with the high est energy efficiency possible When you use this function the tem perature in the cavity may differ from the set temperature Due to the use of the residual heat the heating power may be reduced For general energy saving recom mendations refer to Energy Efficiency chapter Energy Sav ...

Page 9: ...of the oven cool If you turn off the oven the cooling fan can continue to operate until the oven cools down 8 HINTS AND TIPS WARNING Refer to Safety chapters The temperature and baking times in the tables are guidelines only They depend on the recipes and the quality and quantity of the ingredients used 8 1 Cooking recommendations Your oven may bake or roast differently to the oven you had before ...

Page 10: ...liquid Be careful with mixing times especially if you use a mixing machine The cake is too dry The oven temperature is too low The next time you bake set a higher oven temperature The baking time is too long The next time you bake set a shorter baking time The cake browns un evenly The oven temperature is too high and the baking time is too short Set a lower oven temperature and a longer baking ti...

Page 11: ...rocedure Top Bottom Heat 1 2301 2 160 180 1 20 2 30 60 1 Cream puffs Eclairs Top Bottom Heat 190 2101 20 35 3 Swiss roll Top Bottom Heat 180 2001 10 20 3 Cake with crumble topping dry True Fan Cooking 150 160 20 40 3 Buttered almond cake Sug ar cakes Top Bottom Heat 190 2101 20 30 3 Fruit flans made with yeast dough sponge mixture 2 True Fan Cooking 150 35 55 3 Fruit flans made with yeast dough sp...

Page 12: ...g 150 160 20 40 3 Puff pastries True Fan Cook ing 170 1801 20 30 3 Rolls True Fan Cook ing 1601 10 25 3 Rolls Top Bottom Heat 190 2101 10 25 3 1 Preheat the oven 8 5 Bakes and gratins Food Function Temperature C Time min Shelf position Pasta bake Top Bottom Heat 180 200 45 60 1 Lasagne Top Bottom Heat 180 200 25 40 1 Vegetables au gratin1 Turbo Grilling 160 170 15 30 1 Baguettes top ped with mel t...

Page 13: ...ps in shell 180 200 30 40 4 Whole fish 300 500 g in salt 190 200 45 50 4 Whole fish 300 500 g in parch ment 190 200 50 60 3 Amaretti 20 500 g in total 170 180 40 50 3 Apple crumble 190 200 50 60 4 Chocolate muffins 20 500 g in total 160 170 35 45 3 8 7 Multilevel Baking Use the function True Fan Cooking Cakes pastries breads on baking trays Food Temperature C Time min Shelf position 2 positions 3 ...

Page 14: ...stries 170 1801 30 50 1 4 Rolls 180 20 30 1 4 1 Preheat the oven 8 8 Pizza Setting Food Temperature C Time min Shelf position Pizza thin crust 200 2301 2 15 20 2 Pizza with a lot of topping 180 200 20 30 2 Tarts 180 200 40 55 1 Spinach flan 160 180 45 60 1 Quiche Lorraine 170 190 45 55 1 Swiss Flan 170 190 45 55 1 Cheesecake 140 160 60 90 1 Apple cake cov ered 150 170 50 60 1 Vegetable pie 160 180...

Page 15: ...meat and fish in large pieces 1 kg or more baste large roasts and poultry with their juices several times during roasting 8 10 Roasting tables Beef Food Quantity Function Tempera ture C Time min Shelf posi tion Pot roast 1 1 5 kg Top Bot tom Heat 230 120 150 1 Roast beef or fillet rare per cm of thickness Turbo Grill ing 190 2001 5 6 1 Roast beef or fillet medium per cm of thickness Turbo Grill in...

Page 16: ...Grill ing 150 170 100 120 1 Saddle of lamb 1 1 5 Turbo Grill ing 160 180 40 60 1 Game Food Quantity kg Function Tempera ture C Time min Shelf posi tion Saddle Leg of hare up to 1 Top Bottom Heat 2301 30 40 1 Saddle of venison 1 5 2 Top Bottom Heat 210 220 35 40 1 Haunch of venison 1 5 2 Top Bottom Heat 180 200 60 90 1 1 Preheat the oven Poultry Food Quantity kg Function Tempera ture C Time min She...

Page 17: ...Set the shelf into the shelf position as recommended in the grilling table Always set the pan to collect the fat into the first shelf position Grill only flat pieces of meat or fish Always preheat the empty oven with the grill functions for 5 minutes CAUTION Always grill with the oven door closed Fast Grilling Food Time min Shelf position 1st side 2nd side Burgers Burgers 8 10 6 8 4 Pork fillet 10...

Page 18: ...put the food on a plate Use the first shelf position from the bottom Do not cover the food with a bowl or a plate as this can extend the defrost time For large portions of food place an upturned empty plate on the bottom of the oven cavity Put the food in a deep plate or dish and set it on top of the plate inside the oven Remove shelf supports if necessary Food Quantity kg Defrosting time min Furt...

Page 19: ...y to give sufficient moisture in the oven When the liquid in the jars starts to simmer after approximately 35 60 minutes with one litre jars stop the oven or decrease the temperature to 100 C see the table Soft fruit Food Temperature C Cooking time until simmering min Continue to cook at 100 C min Strawberries Blue berries Raspber ries Ripe goose berries 160 170 35 45 Stone fruit Food Temperature ...

Page 20: ... 3 1 4 Fruit Food Temperature C Time h Shelf position 1 position 2 positions Plums 60 70 8 10 3 1 4 Apricots 60 70 8 10 3 1 4 Apple slices 60 70 6 8 3 1 4 Pears 60 70 6 9 3 1 4 8 16 Information for test institutes Tests according to EN 60350 1 2013 and IEC 60350 1 2011 Baking on one level Baking in tins Food Function Temperature C Time min Shelf posi tion Fatless sponge cake True Fan Cooking 140 1...

Page 21: ... min Shelf posi tion 2 po si tions 3 po si tions Short bread Pastry Stripes True Fan Cooking 140 25 45 1 4 1 3 5 Small cakes 20 per tray True Fan Cooking 1501 23 40 1 4 1 Preheat the oven Grilling Preheat the empty oven for 5 minutes Grill with the maximum temperature setting Food Function Time min Shelf position Toast Grilling 1 3 5 Beef Steak Grilling 24 301 4 1 Turn halfway through Fast Grillin...

Page 22: ... remove the shelf supports CAUTION Be careful when you remove the shelf supports 1 Pull the front of the shelf support away from the side wall 2 Pull the rear end of the shelf support away from the side wall and remove it 2 1 Install the removed accessories in the opposite sequence 9 3 Oven ceiling WARNING Deactivate the appliance before you remove the heating element Make sure that the appliance ...

Page 23: ... to remove it 8 Hold the door glass panels on their top edge one by one and pull them up out of the guide 9 Clean the glass panel with water and soap Dry the glass panel carefully When the cleaning is completed do the above steps in the opposite sequence Install the smaller panel first then the larger and the door One of the hinge arms normally the right one is free to move Make sure that both hin...

Page 24: ...ensation settle on the food and in the cavity of the oven You left the dish in the oven for too long Do not leave the dishes in the oven for longer than 15 20 minutes after the cooking process ends 10 2 Service data If you cannot find a solution to the problem yourself contact your dealer or an Authorised Service Centre The necessary data for the service centre is on the rating plate The rating pl...

Page 25: ...the oven operates Do not open the door too often during cooking Keep the door gasket clean and make sure it is well fixed in its position Use metal dishes to improve energy saving When possible do not preheat the oven before you put the food inside When the cooking duration is longer than 30 minutes reduce the oven temperature to minimum 3 10 minutes before the end of the cooking time depending on...

Page 26: ...l lapse if the operating instructions and conditions of use are not adhered to if the product is incorrectly installed or in the event of damage caused by external influences force majeure intervention by third parties or the use of non genuine components 13 ENVIRONMENTAL CONCERNS Recycle materials with the symbol Put the packaging in relevant containers to recycle it Help protect the environment ...

Page 27: ...ENGLISH 27 ...

Page 28: ...www electrolux com shop 867344125 B 082018 ...

Reviews: