background image

4

. INSTALLING YOUR NEW APPLIANCE

Clean the refrigerator thoroughly according to 

instruction, and wipe away any dust that has 

accumulated during shipping.
Check that the floor is level. If it is not then 

adjust the provided leveling leg so product is 

level and stable.
We recommend that you let your refrigertor run 

for two to three hours before you put any food 

in it. This will allow you to check that it is 

operating properly and that enough cool air is 

going to the freezer.
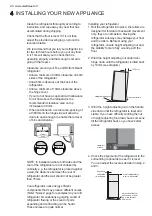
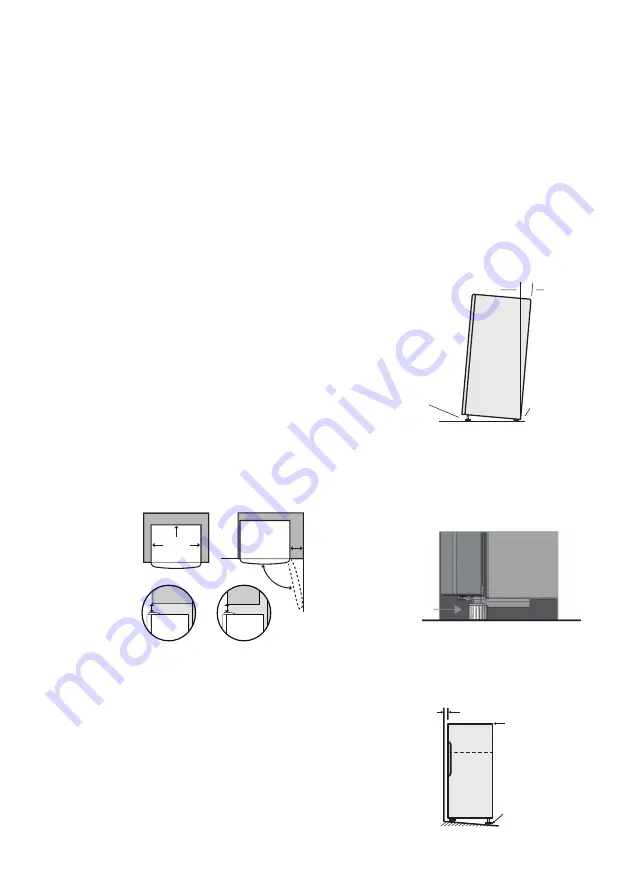
Clearance around your Top and Bottom Mount 

refrigerator;

• Allow a minimum of 30mm clearance on both 

sides of the refrigerator. 

• Allow 50mm clearance at the back of the 

refrigerator.

• Allow a minimum of 10mm clearance above 

the hinge cover.

• If you do not have a cupboard with allowance 

for air flow above the refrigerator, the 

recommended clearance area on top 

increases to 90 mm.

• When positioned in a corner area, spacing of 

at 350mm on the hinge side will allow the 

doors to open enough to enable the removal 

of bins and shelves. 

NOTE: In installation where both sides and the 

rear of the refrigerator are not enclosed by 

cabinetry e.g. the refrigerator is placed against 

a wall, the clearance between the rear of 

refrigerator and the wall should not be greater 

than 75mm.

You refrigerator uses energy efficient 

components that may produce different noises 

(Refer “Noises” page for examples) to your old 

refrigerator. Occasionally a gurgling sound of 

refrigerator flowing or the sound of parts 

expanding and contracting can be heard.  

These noises are quite normal. 

350mm

30mm

30mm

DOOR

CABINET

airspace

Recommended

50mm

90 mm

10 mm

Installing your refrigerator 

1. Roll the refrigerator into place, the rollers are 

designed for forward or backward movement 

only, they are not castors. Moving the 

refrigerator sideways may damage your floor 

and the rollers. Before moving your 

refrigerator, ensure height adjusting nut and 

the stability foot are fully wound up off the 

floor.

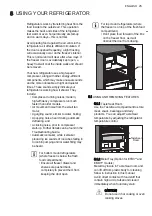
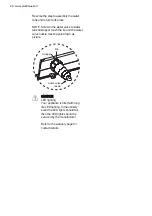
2. Wind the height adjusting nut under door 

hinge down until the refrigerator is tilted back 

by 10mm (see diagram).

3. Wind the  height adjusting nut on the handle 

side down until the refrigerator is level and 

stable. If you have difficulty winding the nut 

or height adjusting foot down, have someone 

tilt the refrigerator back so you have better 

access.

4. Check the alignment of the refrigerator to the

surrounding cupboards to see if it is level. 

You can adjust the level as detailed in step 2 

and 3.

Height adjusting nut


Fixed rear rollers

10-15mm 

aligned to 

cupboards

ie. even gap

top of refrigerator is

level ie. horizontal


adjust front feet for

uneveness of floor

eg. wind this foot 

down or up


stability foot

wound up

24   www.electrolux.com

Summary of Contents for EBB2802K-A

Page 1: ...B3760K A User Manual EN Refrigeration 2 ETB2302J H ETB2502J H ETB2802J H ETB3400K H ETB3440K H ETB3460K H ETB3700K H ETB3740K H ETB3760K H EBB2802K A EBB3402K A EBB3442K A EBB3462K A EBB3702K A EBB3742K A EBB3762K A EBB2802K H EBB3402K H EBB3442K H EBB3462K H EBB3702K H EBB3742K H EBB3762K H ...

Page 2: ...Warning Caution Safety information General information and tips Environmental information Thank you for choosing Electrolux We have designed this product to make your life simpler and deliver impeccable performance for many years Please spend a few minutes reading this document to get the best from your new Electrolux appliance Visit our website to Get usage advice or service information www elect...

Page 3: ...frigerators and freezers remove any doors Children can suffocate if they get trapped inside When positioning the appliance ensure the supply cord is not trapped or damaged Do not locate multiple portable socket outlets or portable power supplies at the rear of the appliance WARNING R600a refrigerant warning This appliance contains flammable R600a refrigerant Avoid safety hazards by carefully insta...

Page 4: ...lant in this appliance Never store fizzy drinks in the freezer compartment Side View Stabilising foot wound down Never try to repair the refrigerator yourself only use a qualified or authorised service person for repairs Never use electric heaters or dryers to defrost the freezer because you can receive an electric shock When transporting and installing the refrigerator care should be taken to ens...

Page 5: ...Slide Control Freezer Temperature Gaskets Freezer Shelf Door Bins TasteSeal Room Multi Flow Refrigerator Light FlexStor Rails Shelves Deoderizer Cover Refrigerator Features may vary depending on model Not all models will have features listed 1 2 3 4 5 6 7 8 9 10 11 12 13 14 15 16 17 18 19 20 Egg Tray FlexStor Bins Bottle Bins TOP MOUNT REFRIGERATOR FEATURES 2 1 3 4 5 6 7 8 9 10 11 12 13 14 15 16 1...

Page 6: ...eezer Shelf Egg Tray TasteSeal Room Multi Flow Metal Cover Deoderizer Refrigerator Temperature Control Panel Shelves Auto Humidity Control Features may vary depending on model Not all models will have features listed 1 2 3 4 5 6 7 8 9 10 11 12 13 14 15 16 17 ETB3400K A ETB3400K H 2 1 3 4 5 6 7 8 9 10 11 12 13 14 18 19 16 ETB3400 illustrated 15 17 Door Bins Upper Bottle Bin 18 19 6 www electrolux c...

Page 7: ...izer Shelves Features may vary depending on model Not all models will have features listed 1 2 3 4 5 6 7 8 9 10 12 13 14 15 16 17 18 19 20 Crisper Feet Gaskets Door Bins Shallow Refrigerator Light Water Tank Refrigerator Temperature Control Panel Egg Tray Door Bin Upper ETB3440K A ETB3440K H 2 1 3 4 5 6 7 8 9 10 11 12 13 14 15 20 21 17 ETB3440 illustrated 19 16 18 Auto Humidity Control 11 21 Bottl...

Page 8: ...Light Slide Control Freezer Temperature Freezer Shelf TasteSeal Room Water Tank Multi Flow Metal Cover Deoderizer Features may vary depending on model Not all models will have features listed 1 2 3 4 5 6 7 8 9 10 12 13 14 15 16 17 18 19 20 Refrigerator Temperature Control Panel Egg Tray 2 1 3 4 7 8 9 10 11 6 12 13 14 15 16 21 20 22 18 ETB3460 illustrated 5 17 19 Shelves 11 22 Bottle Bin 21 Door Bi...

Page 9: ...ins Shallow Slide Control Freezer Temperature Refrigerator Light Freezer Shelf Egg Tray TasteSeal Room Multi Flow Metal Cover Deoderizer Refrigerator Temperature Control Panel Shelves Auto Humidity Control Features may vary depending on model Not all models will have features listed 1 2 3 4 5 6 7 8 9 10 11 12 13 14 15 16 17 ETB3700K A ETB3700K H Door Bins Upper Bottle Bin 18 19 15 17 ENGLISH 9 ...

Page 10: ... Twist Serve Door Bins Shallow Slide Control Freezer Temperature Refrigerator Light Freezer Shelf TasteSeal Room Multi Flow Water Tank Metal Cover Deoderizer Shelves Features may vary depending on model Not all models will have features listed 1 2 3 4 5 6 7 8 9 10 11 12 13 14 15 16 17 18 Refrigerator Temperature Control Panel ETB3740K A ETB3740K H 19 Egg Tray 16 18 20 Door Bin Upper 21 Bottle Bin ...

Page 11: ...o Ice Maker Door Bins Shallow Ice Bin Refrigerator Light Slide Control Freezer Temperature Freezer Shelf TasteSeal Room Water Tank Multi Flow Metal Cover Deoderizer Features may vary depending on model Not all models will have features listed 1 2 3 4 5 6 7 8 9 10 12 13 14 15 16 17 18 19 20 Refrigerator Temperature Control Panel Egg Tray ETB3760K A ETB3760K H 5 17 19 Shelves 11 21 22 Door Bin Upper...

Page 12: ...over Deoderizer Gaskets Shelves FlexStor Rails Slide Control Refrigerator Temperature Slide Control Freezer Temperature Humidity Slide FlexStor Bins Crisper TasteSeal Room Features may vary depending on model Not all models will have features listed 1 2 4 5 6 7 8 9 10 11 12 13 14 15 16 17 18 19 20 Egg Tray Bottle Bin 1 4 6 7 8 9 10 11 12 13 14 5 15 16 17 18 19 20 2 3 Refrigerator Light 3 12 www el...

Page 13: ... Refrigerator Temperature Control Panel Door Bin Dairy Multi Flow Door Bin Upper Shelves Metal Cover Deoderizer Slide Control Freezer Temperature Egg Tray Auto Humidity Control Crisper 1 2 3 4 5 6 7 8 9 10 13 14 15 16 17 19 20 Bottle Bin The details of the refrigerator feature Features may vary depending on model Not all models will have features listed 18 3 4 TasteSeal Room Ice Twist Serve 11 12 ...

Page 14: ...helves Gaskets Metal Cover Deoderizer Slide Control Freezer Temperature Auto Humidity Control Egg Tray Crisper TasteSeal Room 1 2 3 6 7 8 9 10 11 12 13 14 15 16 17 18 19 20 21 Water Tank Bottle Bin The details of the refrigerator feature Features may vary depending on model Not all models will have features listed EBB3442K A EBB3442K H 4 5 Refrigerator Light 4 Refrigerator Temperature Control Pane...

Page 15: ...Temperature Auto Humidity Control Crisper 1 2 3 6 7 8 9 10 11 12 12 13 14 15 16 17 18 19 20 21 TasteSeal Room Room Auto Ice Maker Drawer Meat Boxes Ice Bin Small Large Freezer Drawer Lower Feet Gaskets Egg Tray Water Tank Bottle Bin The details of the refrigerator feature Features may vary depending on model Not all models will have features listed 5 4 Refrigerator Light 4 Refrigerator Temperature...

Page 16: ...ol Panel Feet Gaskets Shelves Door Bin Dairy Metal Cover Deoderizer Door Bin Upper Slide Control Freezer Auto Humidity Control Crisper Egg Tray TasteSeal Room Ice Twist Serve 1 2 5 6 7 8 9 10 11 12 13 14 15 16 17 18 19 20 Bottle Bin The details of the refrigerator feature Features may vary depending on model Not all models will have features listed 4 3 Refrigerator Light 3 Multi Flow 4 16 www elec...

Page 17: ...er Lower Refrigerator Temperature Control Panel Feet Shelves Gaskets Metal Cover Deoderizer Slide Control Freezer Temperature Auto Humidity Control Door Bin Dairy Crisper TasteSeal Room 1 2 3 6 7 8 9 10 11 12 13 14 15 16 17 18 19 20 21 22 Egg Tray Water Tank Bottle Bin The details of the refrigerator feature Features may vary depending on model Not all models will have features listed 4 6 Refriger...

Page 18: ...Slide Control Freezer Temperature Auto Humidity Control Door Bin Dairy Crisper TasteSeal Room 1 2 3 6 7 8 9 10 11 12 13 14 15 16 17 18 19 20 21 22 Egg Tray Water Tank Bottle Bin The details of the refrigerator feature Features may vary depending on model Not all models will have features listed EBB3762K illustrated 3 1 2 6 12 10 11 13 14 16 8 17 9 15 18 20 21 22 7 19 5 4 Refrigerator Light 4 Multi...

Page 19: ...mperature you set an average temperature for the whole refrigerator cabinet Checking the softness of ice cream is a good indication that your freezer is the right temperature while checking the temperature of water kept in the refrigerator is a good way of checking the temperature of the food compartment Temperatures inside each compartment may vary depending on how much food you store and where y...

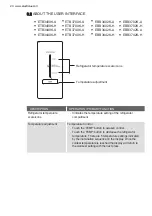
Page 20: ...e TEMP button to decrease the refrigerator temperature There are 5 temperature settings indicated by the illumination sequence on the display Once the coldest temperature is reached the display will return to the warmest setting with the next press DESCRIPTION OPERATION PRIMARY FUNCTION ETB3400K A ETB3400K H ETB3440K A ETB3440K H ETB3700K A ETB3700K H ETB3740K A ETB3740K H EBB3702K A EBB3702K H EB...

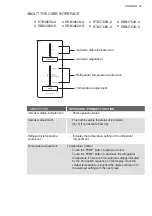
Page 21: ...tor temperature scale icons Indicates the temperature setting of the refrigerator compartment Temperature adjustment Temperature Control Touch the TEMP button to awaken control Touch the TEMP button to decrease the refrigerator temperature There are 5 temperature settings indicated by the illumination sequence on the display Once the coldest temperature is reached the display will return to the wa...

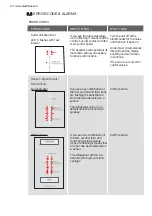
Page 22: ...third icons are flashing it means that an error has been detected on a sensor The refrigerator will run in a default cycle to prevent food spoilage If you see any combination of the first second third and fourth and all temperature icons are flashing it means that an error has been detected on a sensor The refrigerator will run in a default cycle to prevent food spoilage Turn the unit off at the e...

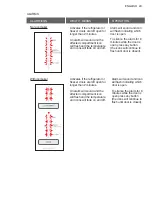
Page 23: ... minutes while the door is open press any button the icons will continue to flash until door is closed With icemaker Non icemaker Activates if the refrigerator or freezer doors are left open for longer than 2 minutes An alarm will sound and the affected compartment icon will flash and the temperature and icons will fade on and off Alarm will sound and icon will flash indicating which door is open ...

Page 24: ...n 75mm You refrigerator uses energy efficient components that may produce different noises Refer Noises page for examples to your old refrigerator Occasionally a gurgling sound of refrigerator flowing or the sound of parts expanding and contracting can be heard These noises are quite normal 350mm 30mm 30mm DOOR CABINET airspace Recommended 50mm 90 mm 10 mm Installing your refrigerator 1 Roll the r...

Page 25: ...ng noise heard during automatic defrosting and A clicking noise prior to compressor start up Further details can be found in the Troubleshooting Guide Automatic icemaker while icemaker producing ice sounds of ice cubes falling in to ice bin pumping and or water filling may be heard For bottom mount refrigerators where freezer is below the fresh food compartment Ensure all freezer drawer and shelve...

Page 26: ...r drawer is designed for storing fruits vegetables and other fresh produce Crisper have an auto humidity membrane in front of crisper cover to maintain optimum humidity for longer fresh vegetables To empty food from the crisper On some models it will be necessary to remove the bottle storage bins Remove the crisper by pulling forward then up and forward again For top mount models remove the crispe...

Page 27: ...t becomes damaged or ruined If the membrane becames soiled or dirty it can be washed with soap and water Ensure membrane is dry before putting back in crisper drawer Please contact our service provider when need to replace your AHC membrane 5 1 6 Crisper bin Storing Vegetables Usethe crisper bin to store vegetables fruits or small items You can adjust the humidity inside the bin by sliding the hum...

Page 28: ...tank till stopper touch the rip and the water valve nozzle must be point down as picture CAUTION LED lighting Your appliance is fitted with long life LED lighting In the unlikely event the LED lights should fail then the LED lights should be serviced by the manufacturer Refer to the warranty page for contact details 28 www electrolux com ...

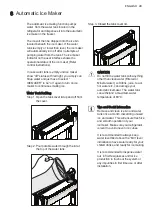
Page 29: ... from the cover Step 2 Pour potable water through the lid at the top of the water tank Step 3 Closed the tank cover lid CAUTION Do not fill the water tank with anything other than clean water Filtered or Mineral water soft drink juice tea or hot water etc can damage your automatic icemaker The water tank can withstand a maximum water temperature of 60 C Tips and Useful Information Remove and clean...

Page 30: ...y soap residue Door seals Always keep door seals clean by washing them with a mild detergent and warm water followed by a thorough drying Sticky food and drink can cause seals to stick to the cabinet and tear when you open the door CAUTION Never use hot water solvents commercial kitchen cleaners aerosol cleaners metal polishes caustic or abrasive cleaners or scourers to clean your refrigerator Man...

Page 31: ...ll or colour and you are unsure about it it is best to throw it out 2 Weeks 2 Months 2 Months Grated Soft Cheeses Not Suitable 1 2 Weeks Butter Depending on the variety hard cheese can last from 2 weeks to 2 months 12 Months 8 Weeks Fruit Vegetables 8 12 Months When freezing chop and blanch in small portions Every fruit and vegetable has a different shelf life Some stay fresh for a couple of days ...

Page 32: ...er Items with a high water content should not be placed near the cooling vents Unable to change temperature settings Refer to function guide in Controlling Your Refrigerator Ensure that user interface is in awake mode before trying to adjust temperature settings Occcasional gurgling similar to water boiling Nothing As each refrigeration cycle ends you may hear a gurgling sound due to the refrigeran...

Page 33: ...ce will not respond To ensure settings are not accidentally changed the user interface will go into sleep mode when not in use Press any button to wake user interface Check that the user interface is in awake mode refer to section About the user interface If the user interface is frozen turn the appliance off for five minutes for the memory to clear then turn back on Alarms Sounding Alarm activates ...

Page 34: ... not enough ice Ensure that the Ice Maker is switched on at the user interface refer to About the User Interface for details Ensure water tank is full and contains clean water if liquids other than clean water have been used call Electrolux Customer Care Ensure water tank is securely pushed into pump housing The icemaker is designed to produce a tray of ice approximately every 2 hours depending on ...

Page 35: ...erned about them Most of the new sounds are normal Hard surfaces like the floor walls and cabinets can make the sounds seem louder than they actually are The following describes the kinds of sounds and what may be making them BRRR HISSS CLICK BLUBB CRACK SSSRRR OK CLICK CLICK SSSRRR SSSRRR BRRR BRRR HISSS HISSS BLUBB BLUBB CRACK CRACK ENGLISH 35 ...

Page 36: ...www electrolux com shop A12081659 A 492020 ...

Reviews: